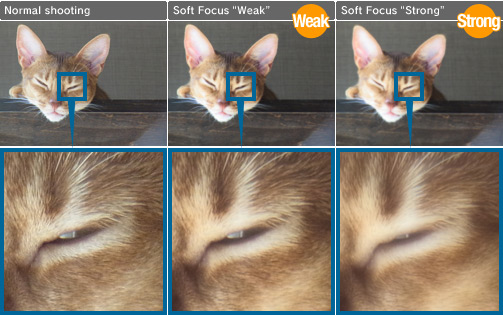
Soft Focus mode enables you to takes pictures with the soft feel of images photographed with a soft-focus lens. So what do photos created with the mode actually look like? I performed some experiments to find out.
I found that shooting in Soft Focus reduced outline definition to create images with a soft feel. Although the images became softer, since the contrast was slightly strengthened and the coloring made a bit more vivid, they did not end up with a dull, featureless feel. As the photos shown, with this mode it is possible to select from the two options “Weak” and “Strong.” Make the selection that you think will best fit the subject and the image you wish to create.
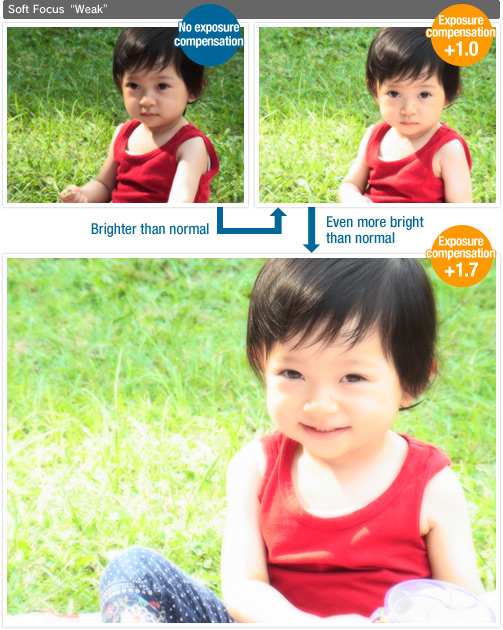
To further soften the image impression, I tried increasing the brightness.
Using the exposure compensation setting giving the higher level of brightness resulted in an image that is softer as well as having a glittering, dreamlike quality to it.
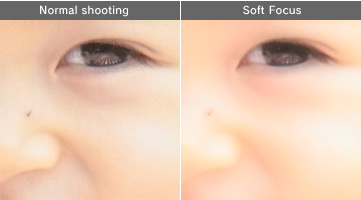
As you can see by looking at the enlarged photos at right, compared to normal shooting, in the soft focus image the shadows under the eye and to the side of the nose are faded and the baby’s skin has a smooth, porcelain quality.
Photographing the dragonfly brighter than normal created a scene with a fantasy feel.
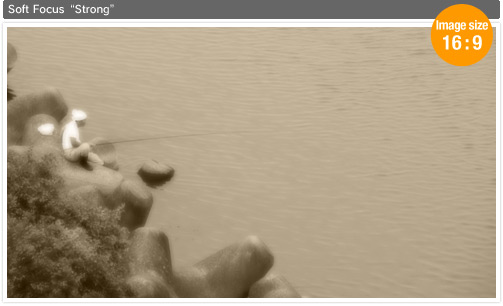
By the way, by changing the color to sepia and shooting at 16:9 image size, I was able to shoot an image that feels like one scene out of an old movie.
For detailed operation instructions, see below.
Camera: CX4 ●1/270sec ●F5.6 ●ISO400 ●EV+1.3
Camera: CX4 ●1/500sec ●F4.5 ●ISO100 ●EV+0.3
Creative Shooting mode ()
With Creative Shooting mode, you can select from six different still photography modes to enjoy a variety of creative effects.
Dynamic Range
Create images with natural contrast, reducing loss of detail in shadows and highlights.
Miniaturize
Use to create pictures that appear to be photos of dioramas.
High Contrast B&W
Use to create black-and-white images with higher contrast than those normally produced using black and white.
Produces grainy images similar to those taken with highly sensitive film or high gain film processing.
Soft Focus
Choose for soft focus effects similar to those created by soft focus lenses. The amount of softening can be selected using the [Soft Focus Options] item in the shooting menu.
Cross Process
Take photographs with colors that differ markedly from those of the actual subject. The colors can be selected using the [Hue] option in the shooting menu.
Toy Camera
Take photographs with the sharp contrast, saturated colors, distortion, and vignetting associated with toy cameras. Use the [Vignetting] option in the shooting menu to choose the amount of vignetting, the [Toy Color] option to choose the amount of saturation.
Turn the mode dial to.
-
The camera enters shooting mode with the current creative shooting mode option shown at the top of the picture display.
Press the MENU button.
-
To choose a different creative shooting mode, press the MENU button to display creative shooting mode options.
Select the desired mode.
Press the ADJ./OK or Fn button.
-
Pressing ADJ./OK button returns the camera to shooting mode with
the selected option shown at the top of the picture display.
-
Pressing Fn button selects the highlighted option and displays the shooting menu.
Press the shutter release button to shoot the picture.
Accessing the Shooting and Setup Menus ──
After pressing the MENU button in shooting mode to display the menus, press
the ADJ./OK button to select the [MODE] tab. You can then press the ▼ button once to display the shooting menu or twice to display the setup menu.


 Using the exposure compensation setting giving the higher level of brightness resulted in an image that is softer as well as having a glittering, dreamlike quality to it.
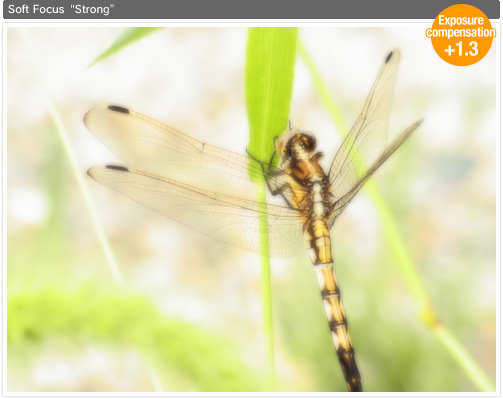
 With Creative Shooting mode, you can select from six different still photography modes to enjoy a variety of creative effects.
 .
.

 to select the [MODE] tab. You can then press the ▼ button once to display the shooting menu or twice to display the setup menu.