
GR IV * Use Outside the Country of Purchase
Below is a list of frequently asked questions and corresponding answers for the GR Ⅳ digital camera.
General function and specification
 What to do first?
Please follow the steps below:
- Check the included items according to the enclosed Start Guide.
- Refer to the Start Guide to review the precautions for use, then insert the rechargeable battery (DB-120) and a commercially available microSD memory card.
* Even without a microSD card, you can still record images using the camera’s built-in memory (approx. 53 GB).
- Charge the lithium-ion battery (DB-120) following the instructions in the Start Guide.
- Turn on the power and complete the initial setup when starting the camera for the first time.
- If you insert a commercially available microSD memory card, make sure to format it with the GR IV before shooting.
- Perform a test shot by pressing the shutter button and confirm that the image is recorded correctly.
- Access the GR IV User Guide, which provides more detailed information, via the QR code or URL on the cover of the Start Guide.
- Follow the instructions in the Start Guide or the User Guide to complete the settings, and enjoy shooting with your GR IV.-
What accessories are provided with this camera?
The following accessories are providing with this camera.
・Strap O-ST198
・USB cable I-USB198
・Rechargeable lithium-ion battery DB-120
・Hot Shoe Cover (attached to camera) O-HC198
・Ring Cap: GN-3 (BK) (attached to camera)
・Start guide-
What are the optional accessories for this camera?
The optional accessories are as follows:
■Battery
・Rechargeable Lithium-ion Battery DB-120
・Battery Charger BJ-12
■AC Adapter
・AC Adapter Kit K-AC166J (AC Adapter + AC Cable)
・AC Adapter D-AC166 (AC Adapter only)
■External Viewfinder
・External Viewfinder GV-1
・External Mini Viewfinder GV-2
■External Flash
・External Flash GF-2
■Conversion Lens
・Wide Conversion Lens GW-4
・Lens Adapter GA-3
■Case
・Soft Case GC-14
・Soft Case GC-12
・Soft Case GC-11
■Metal Hotshoe Cover
・GK-2
■Strup
・Neck Strap GS-3
・Neck Strap ST-2
・Hand Strap GS-2
・Finger Strap GS-4
■USB Cable
・USB Cable I-USB198
■Ring Cap
・GN-3 (BK)
*For more information, please click here.-
What else to do need besides the included items when purchasing?
The GR IV has approximately 53 GB of built-in memory.
If you want to store more images, please prepare a memory card with a capacity suitable for the number of images you plan to shoot.-
What material is used for the body’s exterior parts?
They are made of magnesium alloy.-
Does the camera have a built-in optical viewfinder?
No, it does not. Optional external viewfinders (GV-1 / GV-2) are available.-
Does the camera have a zoom function?
No, it does not have either an optical zoom function or a digital zoom function.
*It has a “crop” function that allows you to set the angle of view to 35mm or 50mm equivalent, in addition to the standard 28mm equivalent (35mm format conversion).-
What is the crop function?
The crop function works by cutting away the outer area of the normal shooting range, resulting in a narrower angle of view. This makes it possible to shoot as if using a longer focal length. Although the camera is equipped with a fixed focal length lens, the crop function allows you to switch angles of view according to your subject, expanding your range of expression.
・This can be set in the Still Image menu under “4: Recording Settings” > “Trimming” Selecting ‘35mm’ or “50mm” will change the angle of view from 28mm equivalent to 35mm equivalent or 50mm equivalent. (35mm format equivalent).
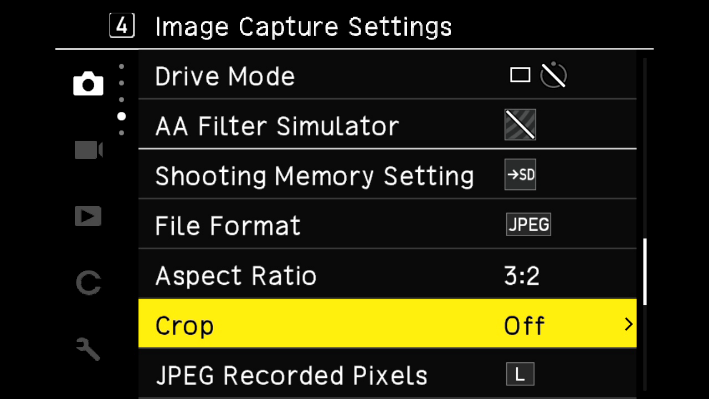

When the [Crop] function is set, the available JPEG recording sizes are limited.
- Values are based on 35mm format conversion.Crop Setting Off
(28mm)Follows selected JPEG size 35mm [L] setting: recorded in [M].
[M], [S], [XS] settings: recorded according to the selected JPEG recording size.35mm [L] or [M] settings: recorded in [S].
[S] or [XS] settings: recorded according to the selected JPEG recording size.
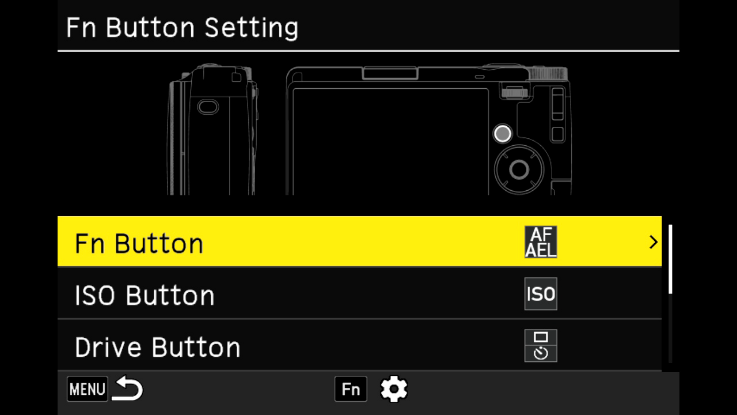
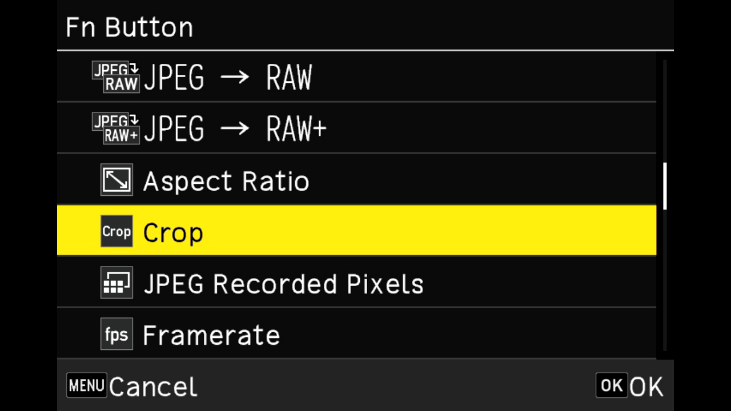
・You can assign the [Crop] function to the Fn button in the still image menu under [2: Operation Custom Setting] → [Fn Button Setting]. Once set, you can switch the angle of view simply by pressing the Fn button, without navigating the menu.

-
What is the angle of view when using the crop function, and what is it when the Wide Conversion Lens is attached to the GR IV?
■GR IV (Single Unit)
・ No Crop: 75.2°
・ 35mm Crop: 63.3°
・ 50mm Crop: 46.7°
■GR IV + Wide Conversion Lens (GW-4)
・No crop: 91.5°
・35mm crop: 78.8° (35mm equivalent: 26mm)
・50mm crop: 59.8° (35mm equivalent: 38mm)
Notes:
•All values represent diagonal angles of view.
•When using the Wide Conversion Lens (GW-4), the Lens Adapter (GA-3) must be attached.-
Does the camera have image stabilization?
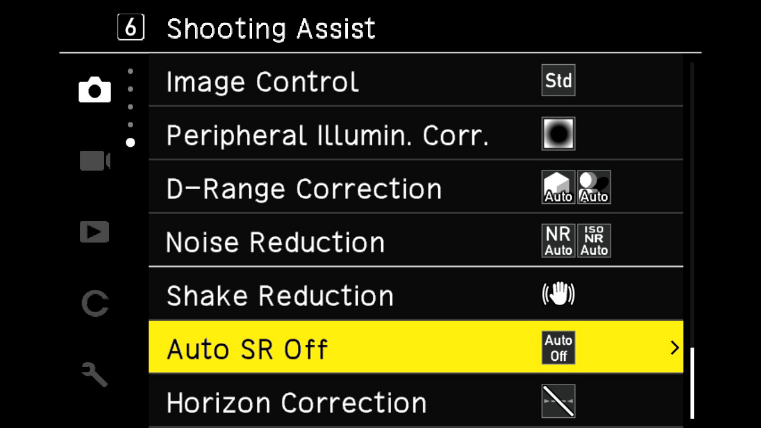
Yes. It has a 5-axis, 6-stop Shake Reduction system using a sensor-shift method. You can turn it on or off in the still image menu under [6: Shooting Assist Menu] → [Shake Reduction].
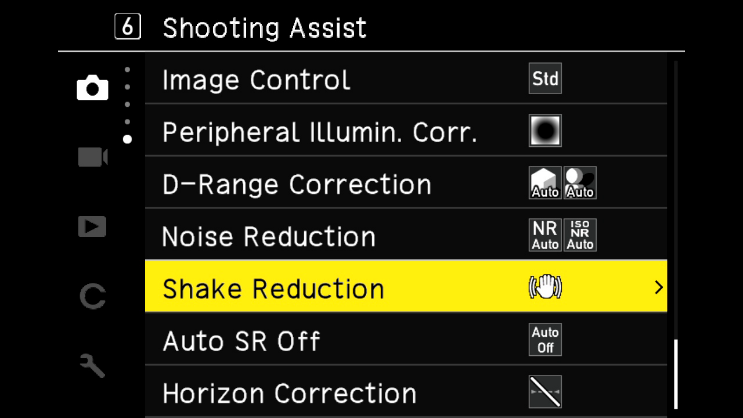
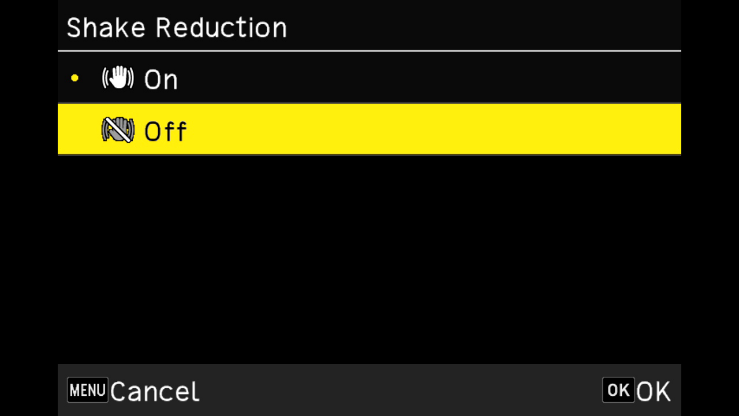
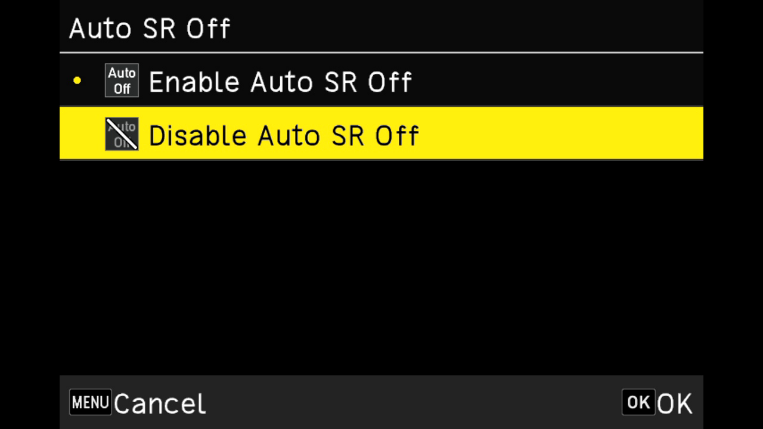
・When the self-timer is set to 2 seconds or 10 seconds in Drive mode, the Shake Reduction function automatically turns off.
To keep the Shake Reduction function on while using the self-timer, set the “SR Auto Off” option in the 6: Shooting Assist Menu under the Still Image Settings menu to “Do Not Auto Off”.
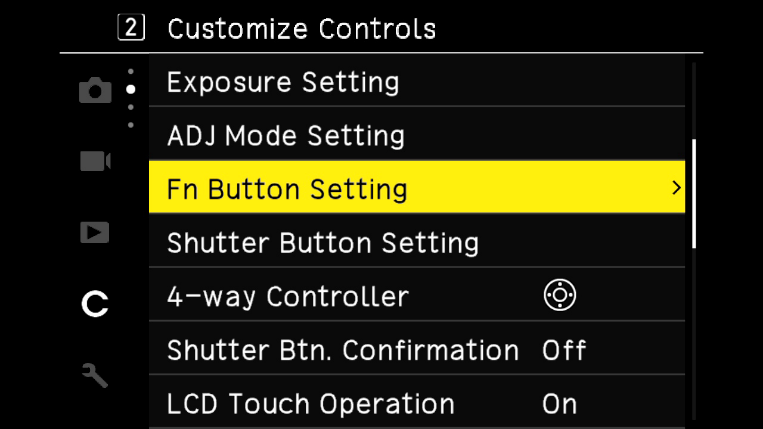
・The Shake Reduction on/off function can be assigned to the Fn button in still image mode. In the Menu Custom Setting → [2: Operation Custom Setting] → [Fn Button Setting], assign Shake Reduction to the Fn button. Once set, you can turn Shake Reduction on or off simply by pressing the Fn button, without navigating the menu.

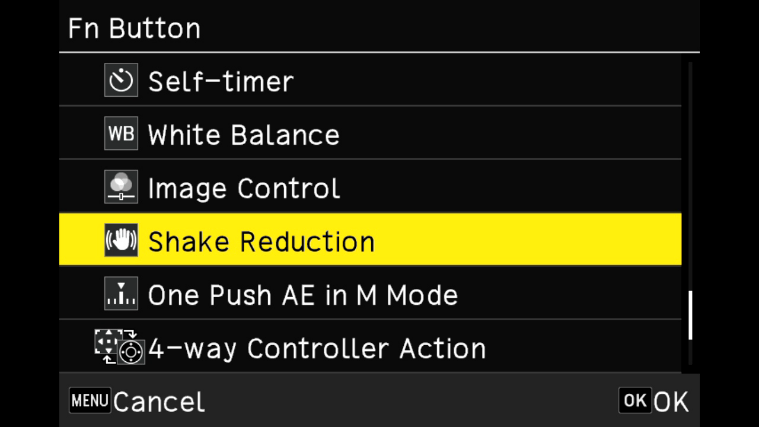
-
What image and video recording formats are supported?
The supported recording formats for still images and movies are as follows:
[Still Images]
File Formats JPEG: Compliant with Exif 2.3 and DCF 2.0 standards
RAW: Records RAW images in DNG format (14-bit)
RAW + JPEG: Records RAW and JPEG images simultaneouslyAspect Ratios 3:2, 4:3, 1:1, 16:9 Crop Settings Off, 35mm, 50mm JPEG Recording Sizes L, M, S, XS Color Spaces sRGB, AdobeRGB
・When the aspect ratio is “4:3” or “1:1”, black bars appear on the left and right sides of the image monitor. When the aspect ratio is “16:9”, black bars appear at the top and bottom of the image monitor.Aspect Ratio Size Resolution (pixels) Approx. Megapixels 3:2 L 6192 × 4128 26M M 4944 × 3296 16M S 3504 × 2336 8.2M XS 1920 × 1280 2.5M 4:3 L 5504 × 4128 23M M 4400 × 3296 15M S 3120 × 2336 7.3M XS 1920 × 1440 2.8M 1:1 L 4128 × 4128 17M M 3296 × 3296 11M S 2336 × 2336 5.5M XS 1280 × 1280 1.6M 16:9 L 6192 × 3480 22M M 4944 × 2784 14M S 3504 × 1968 6.9M XS 1920 × 1080 2.1M
[Video]
File Format MPEG-4 AVC / H.264 (MOV) Recording Size Full HD: 1920 × 1080Frame rates: 60p, 30p, 24p Audio Recording Built-in stereo microphone Recording Time Up to 4GB or approximately 25 minutes. Automatically shuts down when internal temperature rises. -
What is the operating temperature range?
The RICOH operating temperature range is 0°C to 40°C. Depending on environmental conditions, such as high ambient temperature or direct sunlight, the camera’s temperature may rise. For safety, the camera is equipped with a function that automatically shuts it down if it exceeds a certain temperature.-
What is the maximum magnification for macro shooting?
The maximum magnification is 0.35× when using the camera alone. When the Wide Conversion Lens (GW-4) is attached, the maximum magnification increases to 0.48×.
Shooting Distance (from lens front) Magnification GR IV only 10 cm – ∞
6 cm – 15 cm0.21
0.35GR IV + Wide Conversion Lens (GW-4) +Lens Adapter (GA-3) 3.4 cm
1.5 cm0.28
0.48*Upper row: Normal shooting mode, Lower row: Macro mode.
- The shooting distances listed for when the conversion lens is attached are measured from the front of the conversion lens.
Power supply / Battery
-
What type of battery can be used?
The camera uses the rechargeable battery DB-120.
* The DB-110 used in the GR III series, as well as the DB-65 used in the GR / GR II / GR DIGITAL series, are not compatible.-
What is the approximate shooting time (number of shots) when using batteries?
The approximate usage time for the DB-120 (fully charged) is as follows.
The number of shots is based on CIPA standard measurement conditions and is provided as an approximate value. Actual results may vary depending on usage conditions.Still Image Shooting 250 shots Playback Time 240 minutes
(CIPA standard conditions: LCD monitor ON, 23°C)-
How can the rechargeable DB-120 battery be charged?
The DB-120 can be charged while inserted in the camera, or by using the optional battery charger (BJ-12).
■Charging with the Battery Charger
Prepare the optional battery charger (BJ-12) and remove the DB-120 battery from the camera. Insert the battery into the charger to charge it.
- For detailed instructions on charging, refer to the battery charger’s user manual.
■Charging with an AC Adapter (Charging the DB-120 while it is still in the camera)
・Connect the included USB cable (I-USB198) to a commercially available USB Power Delivery (PD) compatible AC adapter to charge the battery.
・Charge using the optional AC adapter (D-AC166).
■Charging via Computer
(Charging the DB-120 while it is still in the camera)
・Use the included USB cable (I-USB198) and a computer equipped with a USB Type-C port to charge the battery.
- When the battery is fully depleted, the charging time is approximately 2.5 hours at 25°C.
- This charging time is for reference only and may vary depending on usage conditions.
- The actual charging time depends on the remaining battery level.
- If the battery has been left in the camera for a long period and becomes over-discharged, charging with a device other than a computer will be required.
- When connecting the camera to your computer via the USB cable, the camera will start up in playback mode.
After connecting, turn off the camera’s power to begin charging.
The camera’s status lamp will light up, indicating that charging has started. When the status lamp turns off, charging is complete.-
Does the camera support an AC adapter?
Yes.
The compatible AC adapter is the D-AC166 (sold separately).
An AC adapter kit (including the AC cable and AC adapter), K-AC166J, is also available.-
How long will the camera keep the date and time settings when the battery is removed?
If a fully charged battery has been installed for more than 24 hours before removal, the date and time settings will be maintained for approximately 2 days.-
Characteristics of the rechargeable battery DB-120.
This product is powered by a lithium-ion battery.
Due to the characteristics of lithium-ion batteries, the battery may expand slightly after charging and return to its original size when discharged.
In addition, repeated charging and discharging over time may gradually increase the battery thickness, under normal use. This is a normal characteristic of lithium-ion batteries and is not considered a defect as long as it remains within our specified standards.
Dropping the battery or subjecting it to a strong impact may damage its internal components and create a safety risk. Do not drop, deform, or apply excessive force to the battery.
If any part of the battery surface feels soft, or if it feels as though there is liquid or air inside when pressed, the battery may be damaged internally. Discontinue use immediately.
Do not apply stickers, tape, or any other materials to the battery surface. Even when the battery remains within the normal range of expansion, such materials may make it difficult to insert or remove the battery from the camera.
Please stop using the battery immediately and contact our Customer Support Center if any of the following conditions apply:
• The battery swelling increases significantly soon after purchase.
• The battery is difficult or impossible to insert into the camera.
• The battery is difficult or impossible to remove from the camera.
• The battery is swollen, and any part of its surface feels soft or appears to contain liquid or air when pressed.
• The battery shows significant deformation or any other condition that causes concern.
If you are unsure whether the battery is abnormal or have any concerns about its condition, please do not continue using it. Contact our Customer Support Center for assistance.-
How to store the battery?
When the battery is not in use, always remove it from the camera and charger before storing.
**To prevent over-discharge:**
Even when the camera is turned off, a small amount of power is consumed if the battery remains inserted. This may lead to over-discharge and could render the battery unusable.
**About the date and time settings:**
If the battery is removed from the camera and left for more than 2 days, the date and time settings will be reset. Please set again before using the camera.
Memory Card
-
What type of memory card can be used?
The camera uses microSD cards in size and shape.
It supports microSD, microSDHC, and microSDXC memory cards.
microSDHC and microSDXC cards are compatible with the UHS-I standard.
The maximum transfer speed of the UHS-I standard is 104 MB/s.
■The following memory cards have been tested for compatibility:
• KIOXIA (Toshiba) and SanDisk
o microSDHC memory cards: up to 32 GB
o microSDXC memory cards: up to 1 TB
*For video recording, it is recommended to use a high-speed memory card with a speed class of Class 6 or higher.
*The camera has approximately 53 GB of built-in memory.
As of September 2025
“Tested for compatibility” means that the camera has been tested by the manufacturer for operational confirmation to assist customers. This does not constitute a guarantee to the customer.-
Is there anything that should be done before using a microSD memory card?
For a new memory card, or one that has been used in a computer or other device, any data on the card should be saved to a PC or other storage device first. Then, format the card using the camera before use.
Note: Formatting will erase all data on the card, so take care.-
Does the camera support the UHS speed class?
Yes, it is compatible with the UHS-I standard for microSDHC and microSDXC memory cards.
The maximum transfer speed of the UHS-I standard is 104 MB/s.
Shooting Functions
-
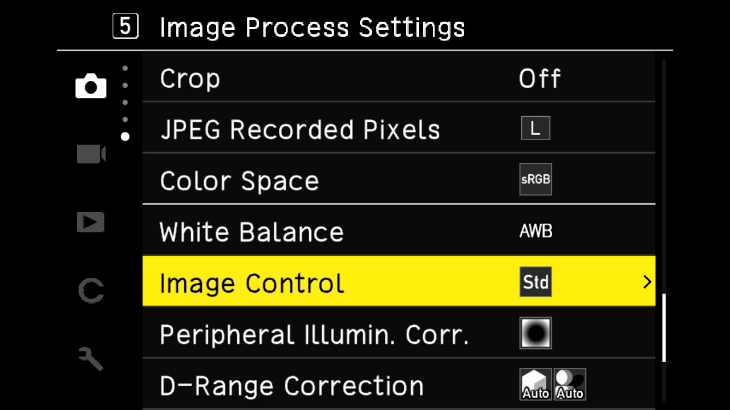
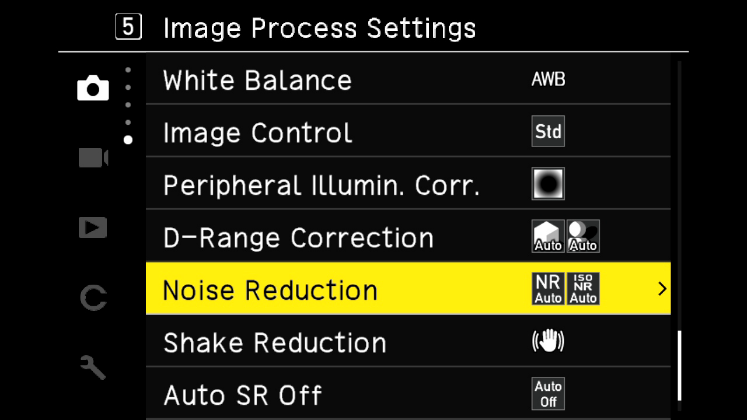
What is the Image Control function?
The Image Control function allows you to capture images with adjusted saturation, contrast, and other settings.
It enables you to modify color tones and create distinctive images.
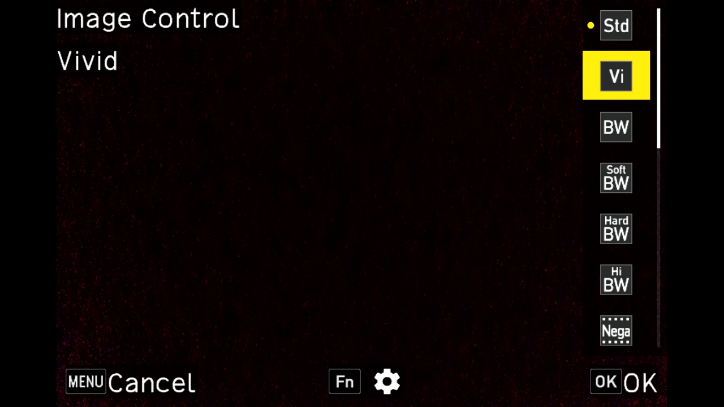
Preset Description Standard Captures images with normal image quality. Vivid Produces bright and vivid images with strong contrast. Monotone Captures images in black and white. Soft Monotone Creates black and white images with a soft impression. Hard Monotone Creates black and white images with a strong, hard impression. Hi-Contrast Captures black and white images with emphasized contrast, producing Monochrome a grainy effect similar to high-speed film or push processing. Negative Film Produces images resembling those taken on negative film. Positive Film Produces high-saturation images resembling positive film.
- In Movie mode, Soft Monotone and HDR presets cannot be selected.Preset Description Cinema (Yellow) Produces cinema-style images with a yellowish tone. Cinema (Green) Produces cinema-style images with greenish shadows. Cross Process Changes color and contrast to create an effect similar to cross-processed film. Bleach Bypass Produces images with reduced saturation and higher contrast. Retro Creates images with a vintage photo appearance. HDR Enhances fine contrast to create a painterly effect. Custom 1 / 2 / 3 Allows registration of three user-defined settings with adjusted parameters.
- Image Control settings are not applied to RAW image data.
They can be applied when developing RAW images via the 3: Image Edit Menu in the Playback Menu.
Custom Image Control settings can be registered in 2: Operation Customization under the ADJ Mode Settings or Fn Button Settings.-
What functions can be accessed using the Direct Key?
In shooting mode, pressing each button on the Direct Key allows the following functions to be executed immediately:
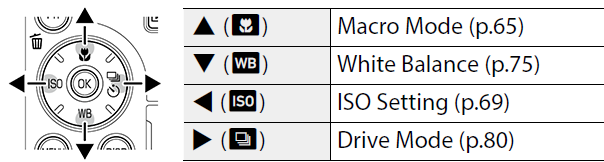
- The above functions can also be set via the Shooting Settings Menu by pressing the MENU button. The ISO sensitivity, Drive mode, and White Balance functions can be customized for each button.
In the 2: Operation Customization section under Fn Button Settings, you can assign or change the functions of the ISO / Left button, Drive / Right button, and White Balance / Down button to any desired function.-
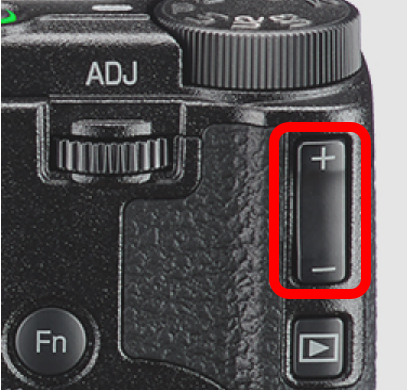
How do I adjust the exposure compensation?
Use the Exposure Compensation button (indicated by the red frame in the diagram below) to apply positive or negative exposure compensation.
-
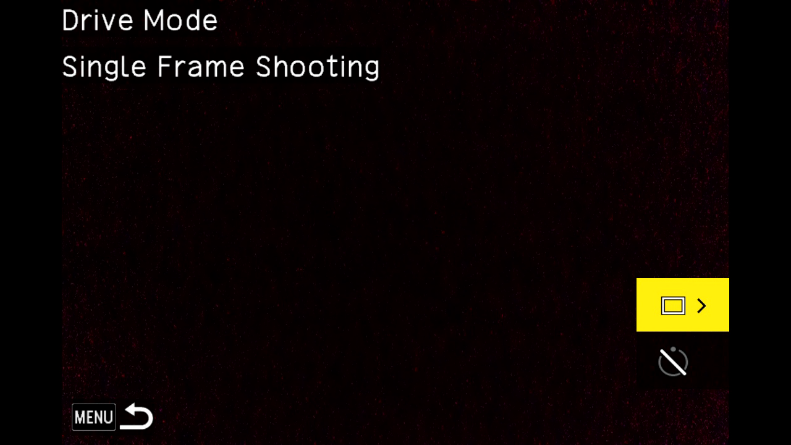
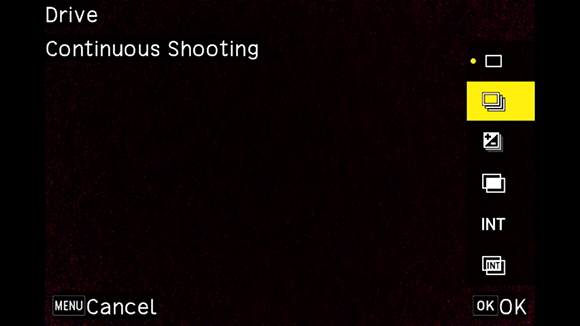
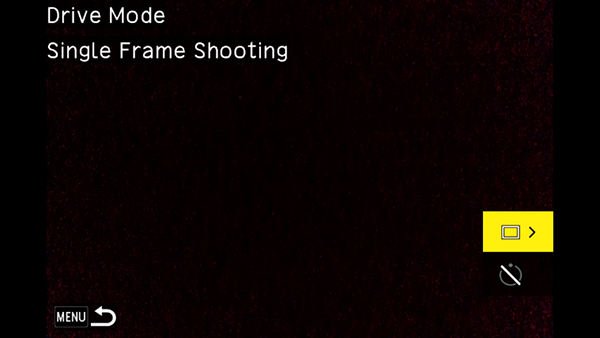
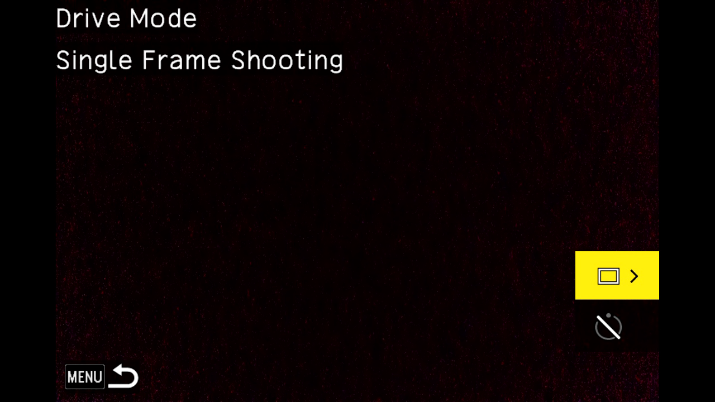
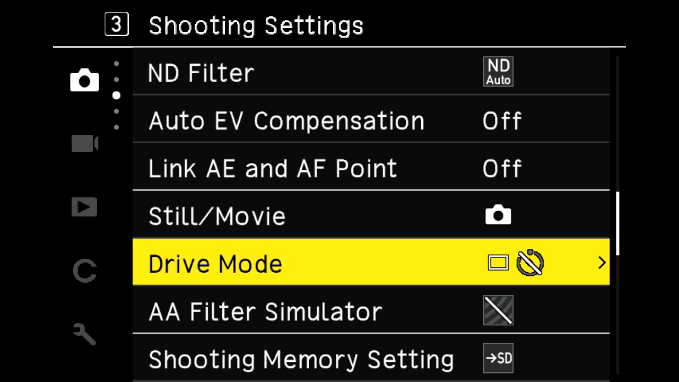
Please explain continuous shooting in Drive Mode.
While the shutter button is held down, the camera will take pictures continuously. You can set continuous shooting either from Drive Mode in the Still Image Settings (Shooting Settings Menu 3), or by pressing the Drive/Right button on the Direct Key.

-
Please explain macro shooting.
In shooting mode, press the Macro/Up button on the Direct Key to activate Macro Mode.
In this mode, you can use autofocus to capture subjects within a range of approximately 6–15 cm from the lens tip.
- If you try to focus on distant subjects while in Macro Mode, the camera will not be able to focus.
Please cancel Macro Mode when shooting distant subjects.
*To cancel Macro Mode, press the Macro/Up button on the Direct Key again.-
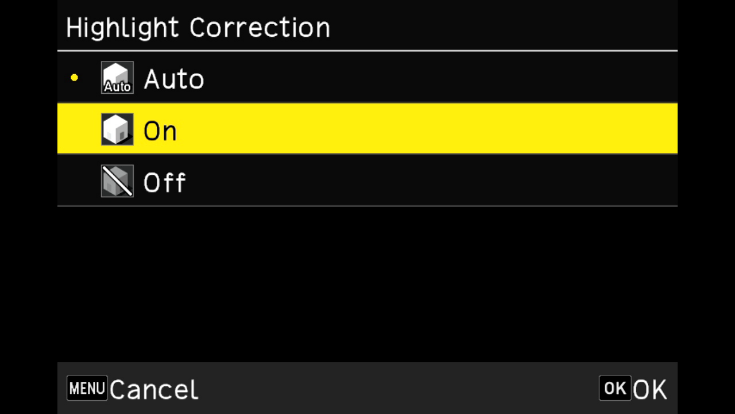
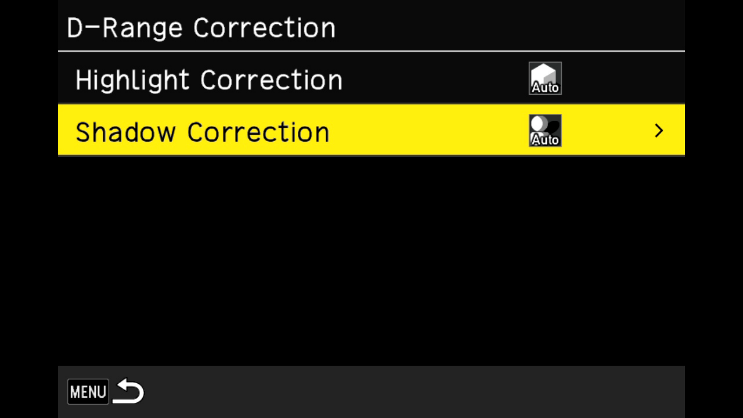
Please explain the Dynamic Range Correction function.
The Dynamic Range Correction function consists of Highlight Correction and Shadow Correction.
• Highlight Correction expands the tonal range of bright highlight areas, making them less likely to become overexposed.
• Shadow Correction adjusts the tonal range of dark shadow areas, helping to reduce loss of detail in dark regions.
・Select Dynamic Range Correction from the Image Processing Settings in the Still Image Settings menu (Menu 5).
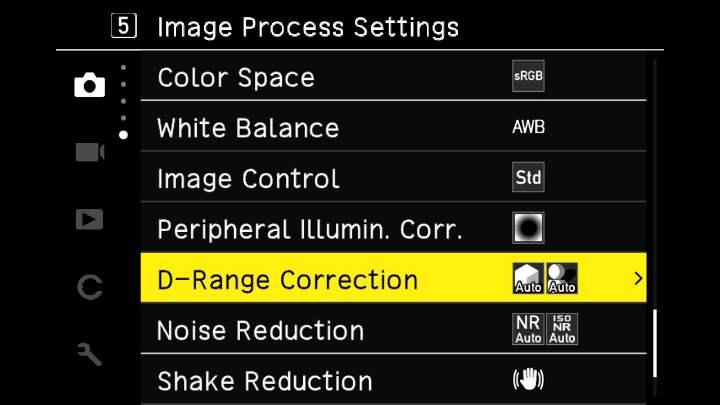
・Press the Drive/Right button on the Direct Key, then select either Highlight Correction or Shadow Correction.
・For Highlight Correction, you can choose Auto, On, or Off.
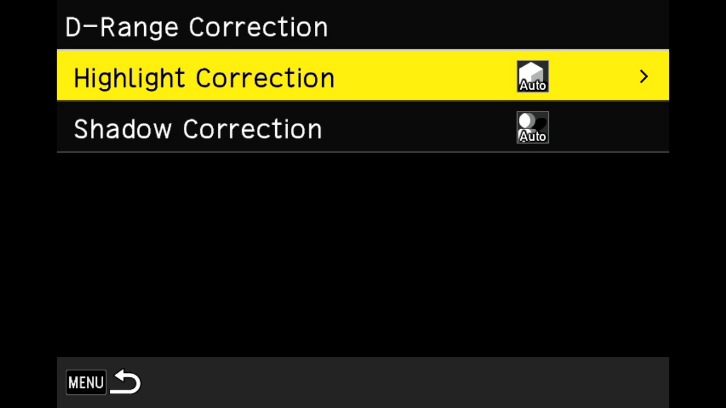
・For Shadow Correction, you can choose Auto, Weak, Medium, Strong, or Off.
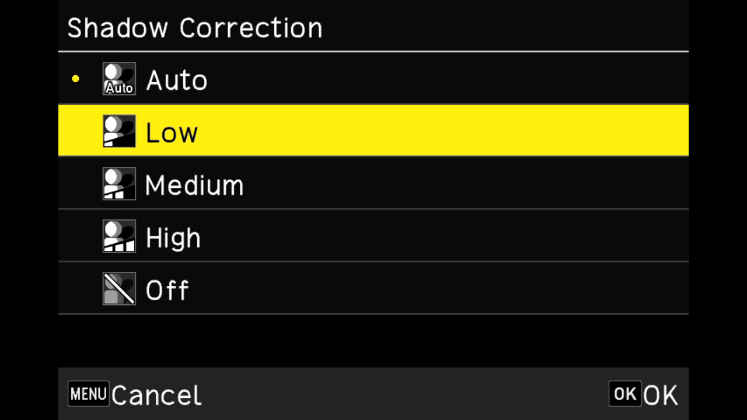

- If Shadow Correction is set to Strong, image noise may become more noticeable.-
How does the Preview function work?
This function allows you to check the depth of field while shooting.
・In the Menu → Custom Settings, go to 2: Operation Customization and select Fn Button Settings.
Change the Long Press Movie Button setting to Preview to enable the function.
・By pressing and holding the Movie/Recording Destination Memory Switch Button, the aperture blades operate up to the set f-stop, allowing the depth of field to be previewed.
・Releasing the Movie/Recording Destination Memory Switch Button cancels the aperture preview.
・While in Preview mode, shooting or changing the aperture value is not possible.
・When using the flash, the Preview may differ from the actual aperture result.
・Since Preview is intended to check depth of field, the AE (Auto Exposure) may not be accurate.
・Images may appear noisy or rough while in Preview mode.
・This function cannot be used in Movie Shooting mode .
.
-
Please explain the Bulb / Time / Bulb Timer shooting functions.
When in M (Manual) mode with a fixed ISO sensitivity, the shutter speed can be set to B (Bulb), T (Time), or BT (Bulb Timer).
・B and T can be used when Drive Mode is set to Single Frame or Multiple Exposure.Shutter Speed Operation B (Bulb) Exposure continues while the shutter button is held down and ends when it is released. T (Time) Pressing the shutter button starts the exposure, and pressing it again ends the exposure. BT (Bulb Timer) Pressing the shutter button starts the exposure, which ends automatically after the set time. The exposure time can be set from 10 seconds to 20 minutes using the Exposure Compensation button.
BT can be used when Drive Mode is set to Single Frame, Multiple Exposure, Interval Shooting, or Interval Composite.
・If M Mode One-Push AE is assigned in Menu → Custom Settings → 2: Operation Customization → Fn Button Settings, the Bulb / Time / Bulb Timer functions will not operate.-
What is the Interval Shooting function?
Interval Shooting is a function that automatically takes pictures at the specified time intervals.
It can be set by selecting Drive Mode from Still Image Settings → 3: Shooting Settings Menu, or by pressing the Drive/Right button on the Direct Key.

Select INT and press the Fn button.
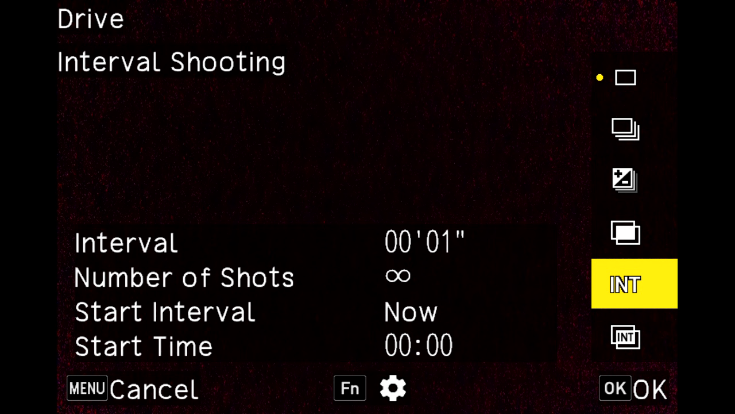
Set the “shooting interval,” “number of shots,” “start trigger,” and "shooting start time.
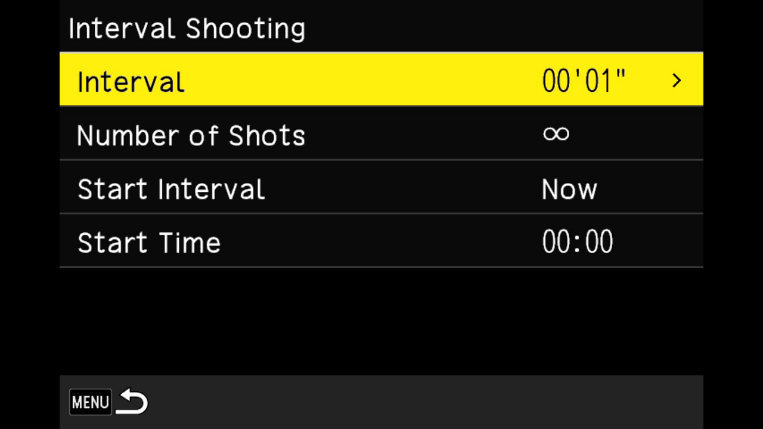
- Depending on the shooting settings, the time until the next shot may be longer than the set interval.Setting Description Shooting Interval Set the interval between shots from the minimum possible value up to 60 minutes. Number of Shots Specify how many shots to take, from 2 to 99, or select ∞ for unlimited shots. Start Trigger Choose whether to take the first shot immediately or at a specified time. Shooting Start Time Set the start time when Start Trigger is set to Specified Time.
- Pressing the OK button will end the Interval Shooting.
- A new folder is created for each Interval Shooting session, and images are saved in that folder.
- If “Focus” is set to “MF”, ‘Snap’, or “∞” in the Focus setting in the menu Still Image Settings, the camera will be fixed at the focus position at which the first picture was taken.
- We recommend using a battery with sufficient remaining power or the optional AC adapter (D-AC166) or AC adapter kit (K-AC166J).-
What is the Interval Composite function?
The camera continuously takes pictures for a specified period and composites them so that the bright areas in the captured images are preserved.
This function is suitable for capturing light trails, such as stars in night or starry sky scenes.
It is also possible to save intermediate images during the shooting process.
Interval Composite shooting can be set from Drive Mode in Still Image Settings → 3: Shooting Settings Menu, or by pressing the Drive/Right button on the Direct Key.

Select [ ] and press the Fn button.
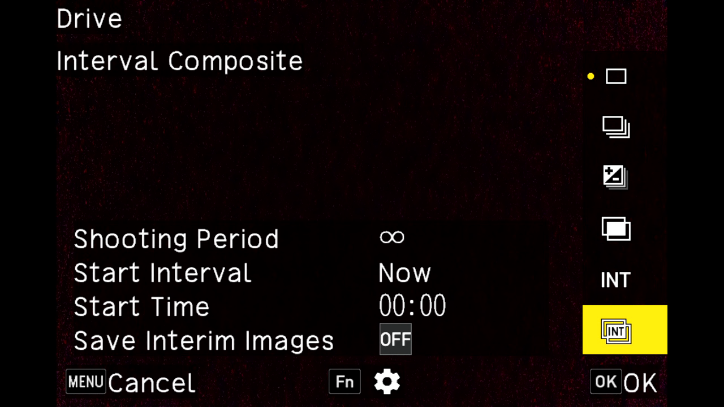
・Set the “Shooting Time,” “Start Trigger,” “Shooting Start Time,” and “Save Image During” settings.

・It is recommended to fix the camera on a tripod and perform a test shot beforehand.Item Description Shooting Time Specify the shooting duration. You can set it to ∞ (Unlimited) or between 10 minutes and 24 hours. Start Trigger Choose whether to start shooting immediately or at a specified time. Shooting Start Time Set the start time when Start Trigger is set to Specified Time. Save Intermediate Images Choose whether to save each image before compositing or intermediate composite images. Saved files are in JPEG format.
・Set the exposure, focus mode, and white balance, and check the composition before starting the shooting. The images will be composited using the exposure and white balance settings you configured.
・Once the shutter is pressed to take the first image, subsequent images will be captured continuously at the shortest possible interval.
・When the Start Trigger is set to “Immediate,” it is recommended to use the self-timer for the first shot to reduce camera shake.
・Half-pressing the shutter during shooting allows you to check the composite image in progress.
・Fully pressing the shutter during shooting saves the current composite image and starts a new composite sequence while continuing the interval composite shooting.
・Pressing the OK button ends the shooting and saves the composited image.
Note:
・If the OK button or shutter is fully pressed during exposure, that image will not be composited.
・Changing the exposure mode or turning off the power will forcefully end the interval shooting.
・AF will not operate during the second and subsequent shots.
・In the Still Image Settings → 5: Image Quality Settings menu, Long Exposure Noise Reduction and Shake Reduction are fixed to OFF during interval composite shooting.
Note:
・If Save Intermediate Images is enabled, a new folder will be created for each interval composite session, and images will be saved there.
・The following settings are fixed at the values used for the first shot:
- ISO sensitivity when ISO AUTO is used
- Shutter speed
- Aperture value
- White balance value when Auto WB is selected-
What is Long Exposure Noise Reduction?
This setting allows you to turn on or off noise reduction processing that occurs when using a long shutter speed.
By setting Long Exposure Noise Reduction in Still Image Settings → 5: Image Quality Settings → Noise Reduction, noise reduction processing will be applied.

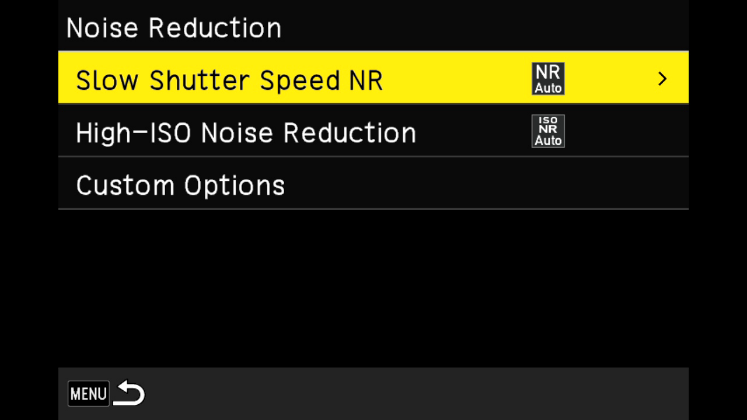
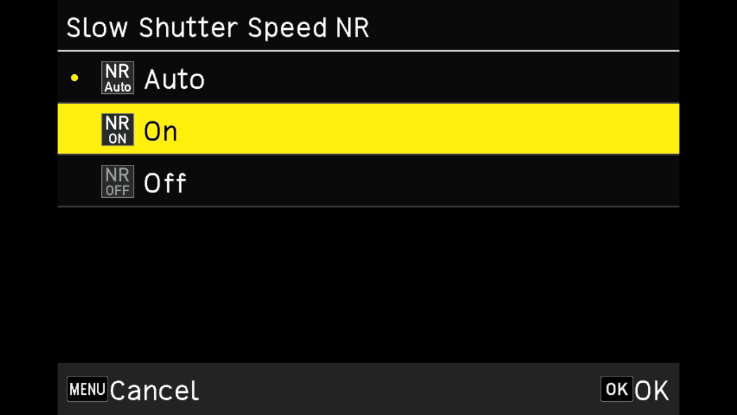
During Long Exposure Noise Reduction processing, the status lamp will blink.Setting Description Auto Performs noise reduction based on shutter speed, ISO sensitivity, and the camera’s internal temperature. On Performs noise reduction when the shutter speed is 1 second or longer. Off Does not perform noise reduction. -
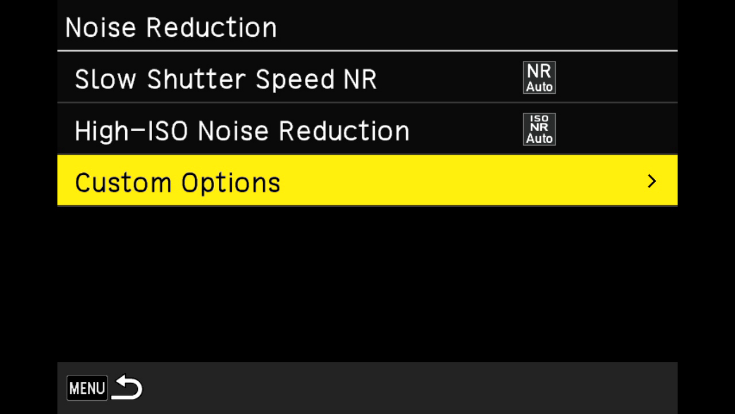
What is High ISO Noise Reduction?
This setting allows you to enable or disable noise reduction when using a high ISO sensitivity.
■Select High ISO Noise Reduction in Still Image Settings → 5: Image Quality Settings → Noise Reduction, then press the Drive/Right button on the Direct Key to display the High ISO Noise Reduction screen.
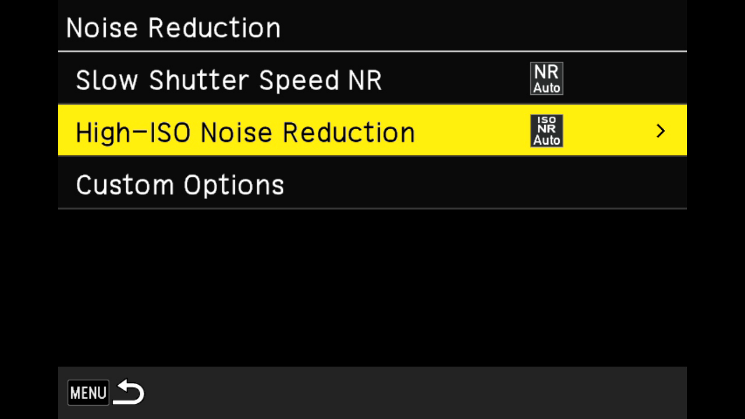
Use the “Macro/Up” and “White Balance/Down” buttons on the Direct Key to make your selection, then press the OK button.
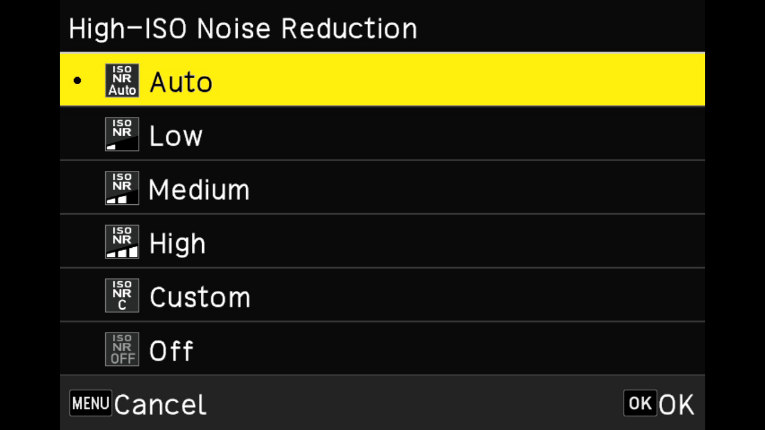
■If Custom is selected, you can set the noise reduction strength to Off / Low / Medium / High for each ISO sensitivity.
In Still Image Settings → 5: Image Quality Settings → Noise Reduction, select Operation in Custom Mode and press the Drive/Right button on the Direct Key.
Auto Performs noise reduction automatically according to ISO sensitivity. Low / Medium / High Applies noise reduction at Low, Medium, or High strength. Custom Allows you to set the noise reduction strength individually for each ISO sensitivity. Off Does not perform noise reduction. 
・The screen for selecting ISO sensitivity will be displayed.
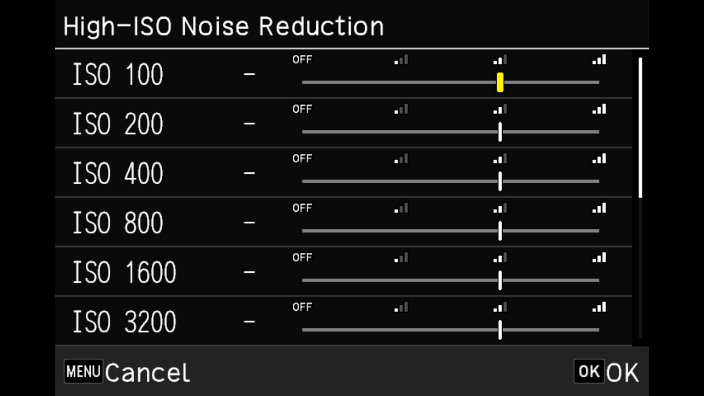
・Use the Macro/Up and White Balance/Down buttons on the Direct Key to select the ISO sensitivity, then use the ISO/Left and Drive/Right buttons to select the noise reduction strength.
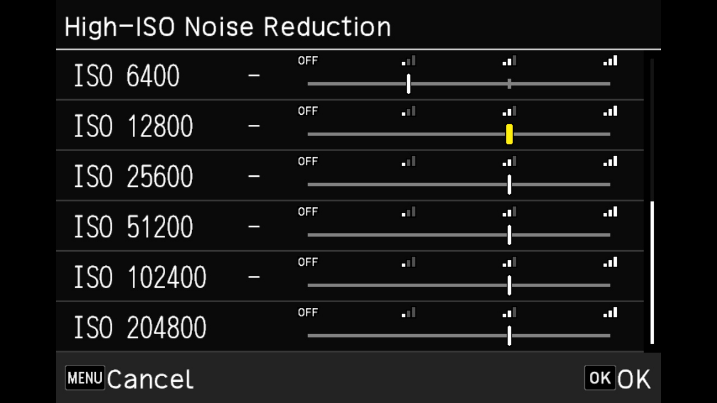
Note: Setting noise reduction may increase the time required to record images.-
What is the ND filter?
This camera has a built-in ND filter. Using the ND filter reduces the light by 2 stops.
It is used when you want to slow down the shutter speed without changing the aperture value.
The ND filter can be set to Auto / Always On / Always Off.
Set this in Still Image Settings → 2: Exposure Settings → ND Filter.
Note:Auto The camera automatically turns the ND filter on or off depending on the situation. The ND filter is used when the icon is displayed on the shooting screen during a half-press of the shutter. This mode cannot be selected in mode.On The ND filter is always used. The icon is displayed on the shooting screen. Off The ND filter is not used.
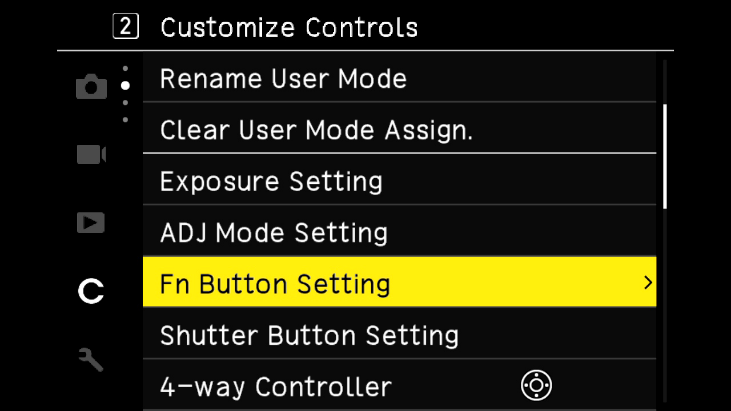
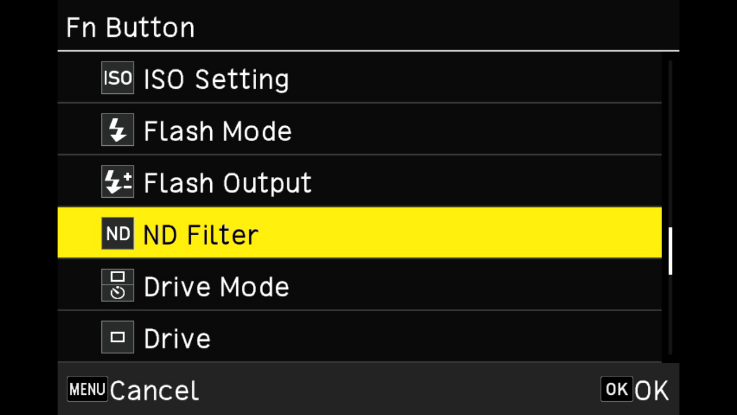
・In Custom Settings → 2: Operation Customization → Fn Button Settings, you can assign the ND Filter function to the Fn button.
During shooting, pressing the Fn button cycles through ND Auto → On → Off → ND Auto….
-
What is the Focus Assist function?
Focus Assist enhances the edges and contrast of the in-focus areas, making it easier to check focus on the image monitor, especially when using MF (Manual Focus).
・It can be set in Still Image Settings → 1: Focus Settings → Focus Assist.
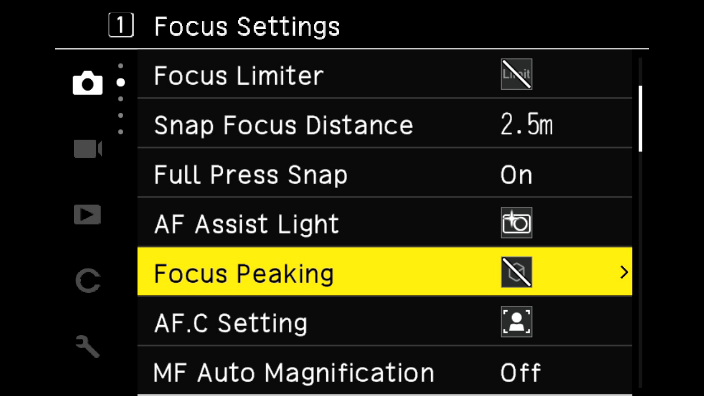
・Can be set to On or Off.
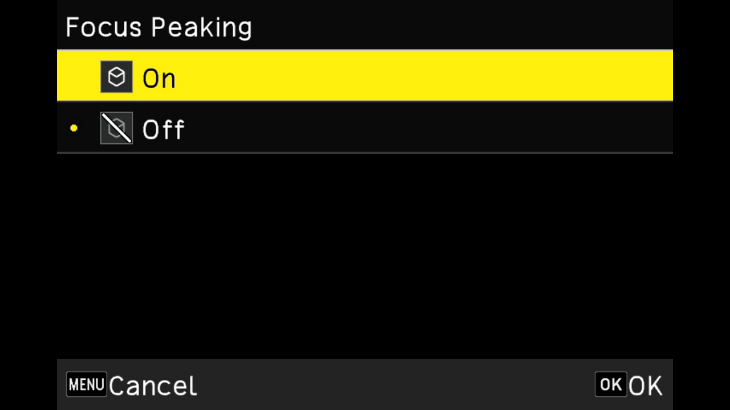
Note:
Focus Assist will not be displayed during a half-press of the shutter button, for both AF and MF.-
How can the focus frame be returned to the center after moving it?
When touch panel operation is enabled on the rear LCD, double-tap the screen to return the focus frame to the center.
When touch panel operation is off and the focus mode is set to Select AF, Pinpoint AF, Tracking AF, or Continuous AF, pressing the OK button on the shooting screen allows the focus frame to be moved.
While in this state, pressing and holding the OK button returns the focus frame to the center.-
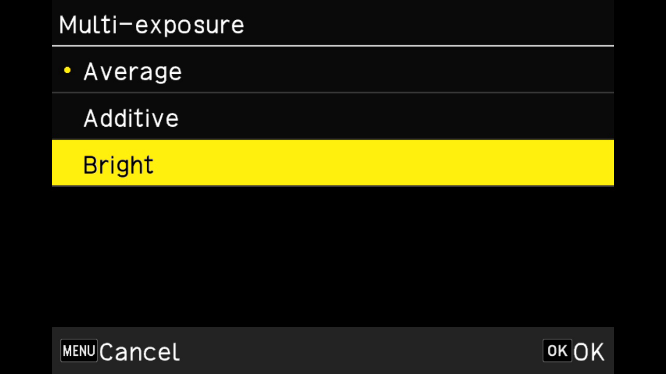
Is multiple exposure photography possible?
Yes.
This function allows multiple images to be combined. On the GR IV, it is possible to review the combined result after each shot and decide whether to continue shooting or finish.
The final appearance of the composite image varies depending on the selected blending method.
Multiple exposure settings can be configured in Still Image Settings → 3: Shooting Settings → Drive Mode, or by pressing the Drive/Right button on the Direct Key.
■Types of Blending Methods
【Average】
Combines the images by averaging the exposure.
【Add】
Combines the images by adding the exposure.
If each frame (first, second, etc.) is properly exposed for multiple exposure, the resulting composite image may tend to be overexposed.
In that case, try reducing the exposure for each individual frame.
【Comparison brightness】
Compares the first image with subsequent images and composites them by replacing only the brighter areas.
■Selecting a Composite Method
From the menu, go to Still Image Settings → 3: Shooting Settings, and select Drive Mode.
・Select multiple exposures
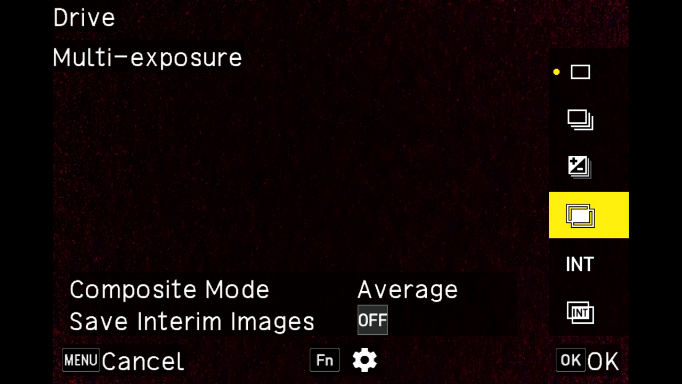
・Select the composite method.
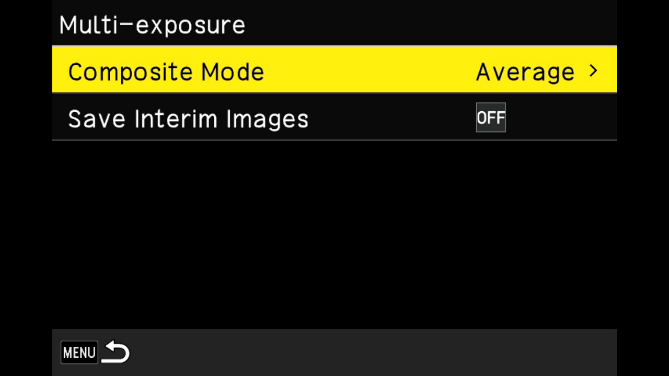
・Select the composite method from “Average,” “Add,” or “Comparison brightness,” and confirm with the OK button.
■Saving interim images
・Select “Save Interim Images”

・Select the method for saving interim images, and press OK to confirm.
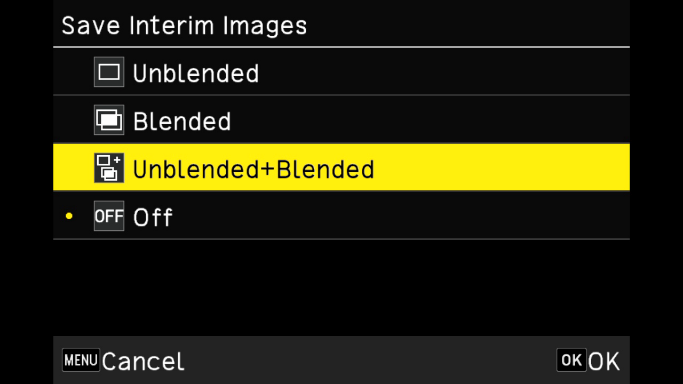
・The configured settings are displayed in the lower left corner of the screen.

・Press MENU to return to the “Drive Mode” screen and take the first shot.
・To continue shooting the next image, select “Next Shot” and press the OK button to return to the shooting screen.
- The previously captured image is faintly displayed on the screen as a guide for alignment.
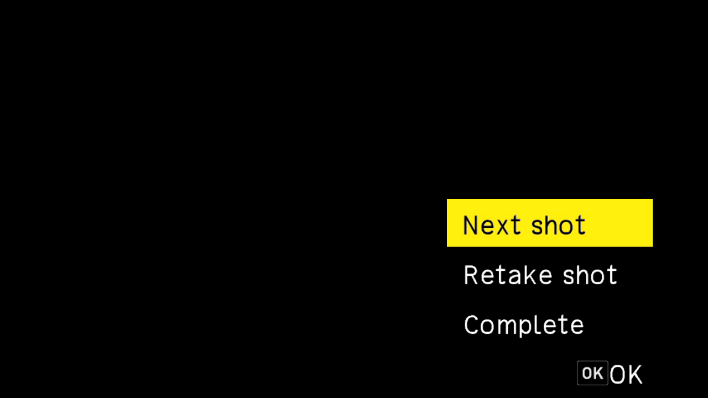
・To layer additional images, repeat the above steps.
・To return to the previously combined image, select “Retake” and press the OK button.
・When you finish shooting, select “Done” to save the composite image.
Note: The following settings cannot be changed during multiple exposure shooting:
- Menu Still Image Settings, 3: Shooting Settings → “Drive Mode”
- Menu Still Image Settings, 4: Recording Settings → “File Format,” “Aspect Ratio,” “Crop,” “JPEG Recording Size”
- Menu Still Image Settings, 5: Image Finishing Settings → “White Balance,” “Image Control”-
What is the video recording function?
It allows recording videos with sound.
■Main Specifications
File Format MPEG4 AVC / H.264 (MOV) Recording Size Full HD (1920 × 1080 / 60p / 30p / 24p) Audio Recording Built-in stereo microphone Recording Time Up to 4 GB or approximately 25 minutes; automatically stops if internal temperature rises
■Menu: Video Settings
1. Focus Settings
Focus AF, MF, Snap, ∞ Macro Mode On, Off Focus Limiter Near side, Far side, Off Snap Shooting Distance 0.3 m, 1 m, 1.5 m, 2 m, 2.5 m, 3.5 m, 5 m, ∞ Focus Assist On, Off Auto Magnification in MF On, Off
2. Exposure Settings
Metering Mode Multi, Center-Weighted, Spot, Highlight-Weighted ND Filter On, Off Still/Video Switch Still, Video
- Regardless of the mode dial position, exposure mode will be set to P mode during shooting. Exposure compensation can be adjusted using the Macro/up button and White Balance/down button on the Direct Key.
3. Shooting Settings
Still / Video Still, Video
4. Recording Settings
Recording Memory Setting Internal Memory Priority, Memory Card Priority Frame Rate 60p, 30p, 24p Audio Recording On, Off
5. Image Processing Settings
White Balance Auto WB, Auto WB (Warm Priority), Auto WB (White Priority), Daylight, Shade, Cloudy, Daylight Fluorescent, Neutral White Fluorescent, White Fluorescent, Incandescent Fluorescent, Incandescent, CTE, Manual WB, Color Temperature, Custom 1, Custom 2, Custom 3 Image Control Standard, Vivid, Monotone, Hard Monotone, High-Contrast B/W, Negative Film, Positive Film, Cinema (Yellow), Cinema (Green), Cross Process, Bleach Bypass, Retro, Custom 1, Custom 2, Custom 3 Peripheral Illumination Correction On, Off Dynamic Range Correction Highlight Correction: Auto, OffShadow Correction: Auto, Low, Medium, High, Off
6. Shooting Assistance
Movie SR On / Off
- When Touch AF is enabled in Menu Customization Settings → 2: Operation Customization, the autofocus can also be activated via the touch panel while recording.
- Movies can be recorded continuously up to 4 GB or a maximum of 25 minutes.
- Recording will automatically stop when the memory card or internal memory becomes full.
- The maximum recording time per session may vary depending on the memory card used. Even within the available recording time, recording will automatically stop if the internal temperature of the camera rises.
- The remaining recording time is recalculated during video recording based on the available memory capacity, so the displayed remaining time may not decrease at a constant rate.
- For movie recording, it is recommended to use a memory card with a speed class of Class 6 or higher.
- It is also recommended to use a fully charged battery, an optional AC adapter (D-AC166), or an AC adapter kit (K-AC166J).
- During movie recording, sounds such as touch panel operation noises, button clicks, or handling noise when holding the camera may be recorded. In addition, if Touch AF is used during movie recording, both the panel operation sound and the AF drive sound will be recorded.-
Is flash photography available?
Yes. Flash photography is possible by connecting the optional external flash “GF-2.”-
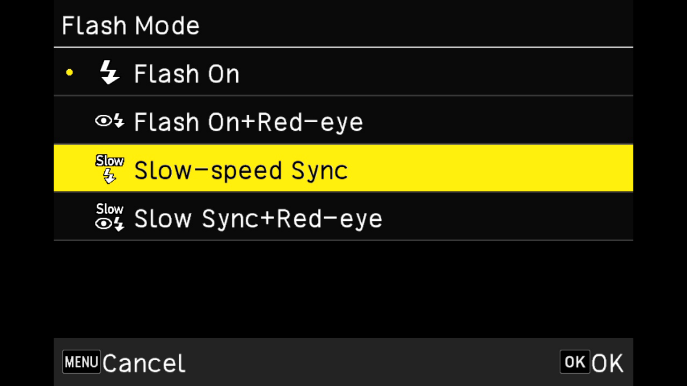
What flash modes are available?
The following flash modes are available:
*When the exposure mode is set to M or Tv, only Fill Flash and Red-Eye Reduction Fill Flash are available.Fill Flash The flash fires continuously. Red-Eye Reduction Fill Flash Fires the flash while reducing red-eye. Slow Sync When the background is dark, such as in portrait photography, the shutter speed is slowed to brighten the background that the flash does not reach. Using a tripod is recommended as camera shake may occur. Red-Eye Reduction Slow Sync Fires the flash using slow sync while reducing red-eye.
■How to Set Up
・In Menu → Still Image Settings → 2: Exposure Settings, select Flash Mode and press the Drive / Right Button.

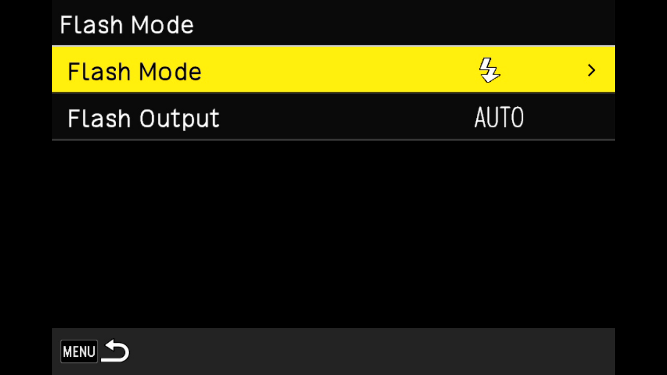
・Select the flash mode and press the OK button to confirm.
-
Can the light intensity of the external flash GF-2 be adjusted from the camera?
No, it cannot.-
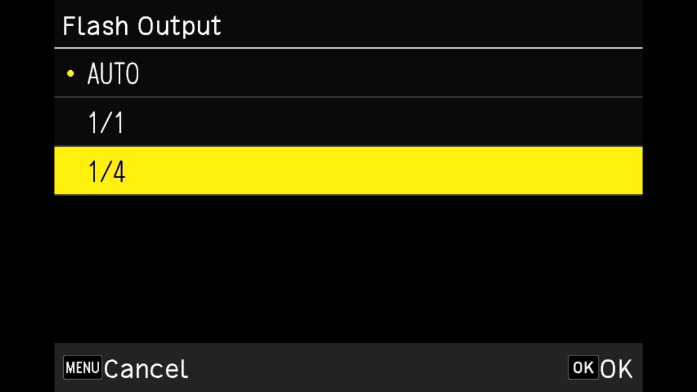
Is manual flash available with the optional external flash GF-2?
Manual flash can be used when the camera’s shooting mode is set to M, with flash output at 1/1 or 1/4.
Manual flash settings can be configured in Menu → Still Image Settings → 2: Exposure Settings → Flash Mode → Flash Output. You can set it to AUTO, 1/1, or 1/4.


-
What is the guide number and flash sync speed when using the optional external flash GF-2?
The guide number is 3 (ISO 100).
At ISO 400, the guide number is 6, and at ISO 1600, it is 12.
When using the GF-2, flash sync is possible up to a shutter speed of 1/2500 sec.
Note: Please take the following into consideration when shooting.
Depending on the shooting conditions and the subject, the image may gradually become darker as the shutter speed increases. This occurs because the flash duration is longer than the time the shutter is open.
If the image appears dark even when the flash fires at high shutter speeds, use a slower shutter speed.
Do not fire the flash directly in front of or near a person’s eyes during portrait photography, as this may cause eye injury. Pay special attention with infants.-
What are the features of the optional external flash GF-2?
Its ultra-compact design makes it easy to carry.
In terms of functionality, when the camera is set to ISO AUTO, it supports automatic flash control, where the camera adjusts the guide number and ISO sensitivity according to the distance to the subject.-
Can the optional external flash GF-2 be used in HS mode (High-Speed Sync mode)?
The flash does not support High-Speed Sync mode, but flash sync is possible up to a shutter speed of 1/2500 sec.-
Is the optional external flash GF-1 supported?
Since there is no linking function, please use the GF-1 as a camera other than the R type described in the GF-1 user manual, either with Auto External Flash or Manual Flash.-
Are Macro Strobes (Auto Macro Flash) AF160FC or AF140C supported?
They cannot be used because there is no linking function.
Although it may be physically attachable with certain adapter combinations, proper exposure may not be achieved, so usage is not supported.-
Are Auto Flashes AF180FG or AF201FG supported?
They cannot be used because there is no linking function.
Although they can be attached, manual flash using the flash unit’s M (FULL) and M (1/4) settings is possible. However, proper exposure may not be achieved in P-TTL, so usage is not supported.
Note: The Flash Mode cannot be set. The flash always operates in Fill Flash mode.-
Are Auto Flashes AF540FGZ II and AF360FGZ II supported? Can they be used for wireless shooting?
They cannot be used because there is no linking function.
Although they can be attached and manual flash is possible. However, proper exposure may not be achieved in P-TTL, so usage is not supported. Wireless shooting is not possible.
Note: The Flash Mode cannot be set. The flash always operates in Fill Flash mode.-
What are the program lines?
When the exposure mode is set to P (Program AE), you can choose from the following three program lines that determine the exposure.
Normal The camera automatically selects the shutter speed and aperture that achieve standard exposure. Depth Priority (Shallow) Within the combination of exposure values that achieve standard exposure, the camera automatically selects the aperture to be as wide as possible (F2.8). Depth Priority (Deep) For no crop and 35mm crop, the camera prioritizes F8 when selecting exposure values. For 50mm crop, F11 is prioritized. This allows for a deep depth of field, enabling pan-focus style shooting.
Playback Functions
-
What are the specifications of the playback functions?
The main specifications of the playback functions are as follows:
Playback Methods Single image, multi-screen display (20 or 48 images), zoom display (up to 16×, 1:1 display, quick zoom), histogram display (Y histogram, RGB histogram), grid display (9×9, 16×16), highlight warning, auto image rotation, folder display, display by shooting date JPEG Quality Adjustment Standard editing, monochrome editingAdjustable items: Brightness, Saturation, Filter Effects, Hue, Color Tone, Contrast, Sharpness (adjustable items vary depending on selection) RAW Development RAW image selection: single image / multiple images / folder / shooting dateRAW development parameters: JPEG recording size, aspect ratio, color space, white balance, image control, peripheral illumination correction, exposure compensation, high ISO noise reduction, shadow correction Editing Functions Delete, Protect, Rotate, Copy, Transfer, Resize, Crop (aspect ratio change, tilt correction), Level correction, White balance correction, Color moiré correction, Video trimming, Video splitting, Save video frame as JPEG -
What settings are available in the playback settings menu?
The following settings can be configured in the menu:
1. Playback Settings
Playback Memory Selection Choose between the internal memory (approx. 53 GB) or a memory card. Auto Image Rotation Can be set to On or Off. Playback Order Choose either File Number or Shooting Date. Playback Volume Select from 21 levels, 0 to 20.
2. File Operations
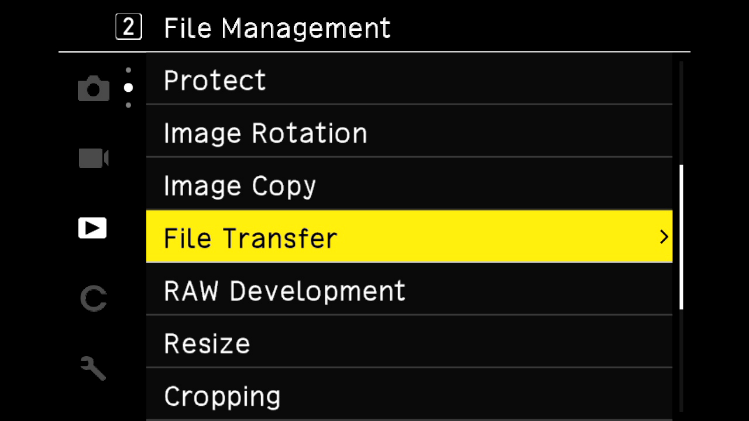
Delete Delete a single image, multiple images, or all images. Protect Protect a single image, multiple images, or all images. Rotate Rotate Right 90°, 180°, or Left 90°. Copy Copy all images stored in internal memory to an SD memory card. Transfer Transfer a single image or multiple images.
3. Image Editing
RAW Development Configure JPEG recording size, aspect ratio, color space, white balance, image control, peripheral illumination correction, exposure compensation, high ISO noise reduction, and shadow correction, then save as a new JPEG image. Resize Reduce the size of a JPEG image. Crop Cut out a portion of a JPEG image and save it. Level Correction Adjust highlights, midtones, and shadows in a JPEG image to correct brightness and contrast. White Balance Correction Correct the white balance of a JPEG image. Color Moiré Correction Correct color moiré artifacts in an image. JPEG Quality Adjustment Adjust brightness, saturation, hue, contrast, and sharpness of a JPEG image. Video Editing Trim Video: Specify start and end points and save the selected range as a new video.
Split Video: Specify a split point and save the two resulting videos as new files.-
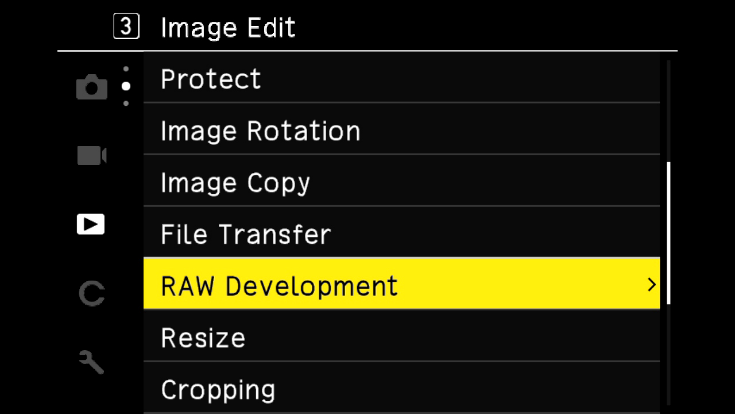
What is the RAW development function?
You can convert captured RAW image files to JPEG format and save them as new images after adjusting parameters.
To do this, select RAW Development in the 3: Image Editing menu under the playback settings, and save in JPEG format.
・Press the Drive / Right Button on the direct key to access the Parameter Selection Screen shown below.
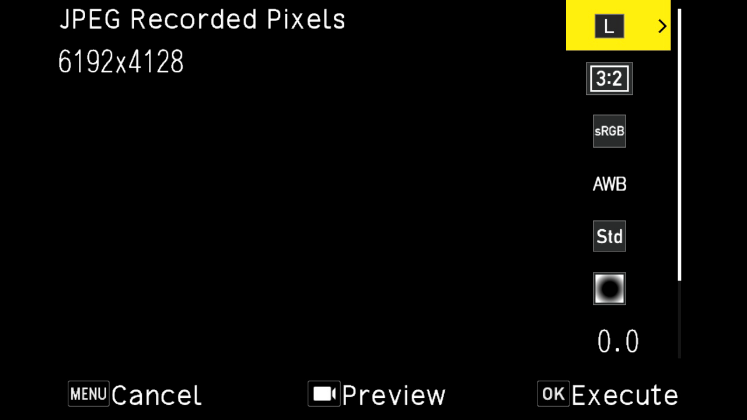
・The configurable items (parameters) are as follows:
JPEG Recording Size / Aspect Ratio / Color Space / White Balance / Image Control / Peripheral Illumination Correction / Exposure Compensation / High ISO Noise Reduction / Shadow Correction.
*The settings used during RAW shooting are initially selected and displayed.
*Only parameters that can be changed are selectable.
・Use the Macro / Up Button and White Balance / Down Button on the direct key to select the item to adjust.
・For White Balance and Image Control, pressing the Fn Button displays the detailed settings screen.
・After configuring each item, press the OK Button to return to the Parameter Selection Screen.
・Once all settings are complete, press the OK Button to save the image as a new JPEG file.-
What are the specifications of the image monitor?
The main specifications are as follows:
Type 3.0-inch TFT color LCD (aspect ratio 3:2), approx. 1.037 million dots, wide viewing angle, air-gapless tempered glass Touch Panel Capacitive type Adjustments Brightness, Saturation, Blue/Amber, Green/MagentaOutdoor Monitor: Auto, Manual (±2 steps) -
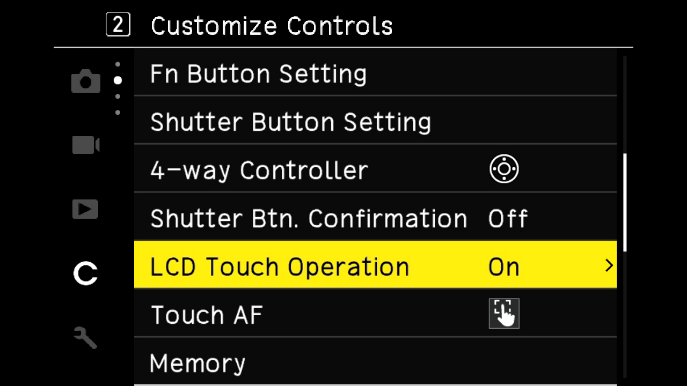
What operations can be performed using the touch panel?
FBy simply touching or sliding on the LCD monitor, you can move the focus point and operate the menu.
Additionally, during playback, you can use a two-finger pinch in/out gesture to change the zoom level, or flick horizontally across the screen with your finger to browse previous and next images.
By default, only focus point movement is enabled via the touch panel.
・To enable AF and shooting via the touch panel, set Touch AF in 2: Operation Customization under the menu Customize Settings.

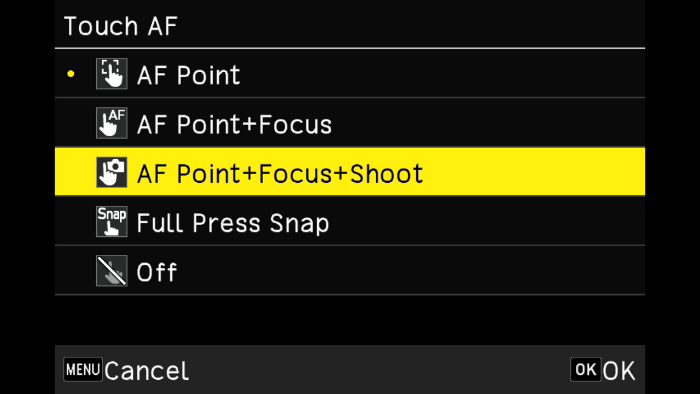
Focus Point Move Moves the focus point to the location you touch. Focus Point Move + AF Moves the focus point to the location you touch and performs autofocus. Focus Point Move + AF + Shoot Moves the focus point to the location you touch, performs autofocus, and takes a photo. Full-Press Snap Focuses at a preset snap shooting distance and releases the shutter. Off Touch AF is disabled.
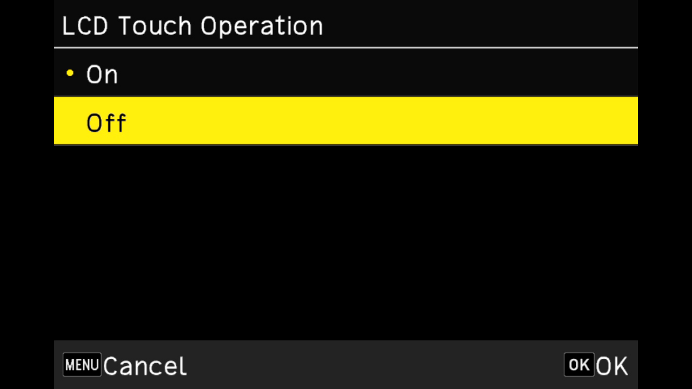
・To disable touch panel operations, set Touch Panel Operation to Off in 2: Operation Customization under Customize Settings.
Computer & Software
-
Which operating systems have been confirmed to work when connecting the camera to a computer via USB?
USB connection with this camera has been confirmed to work on the following operating systems:
Windows® Windows® 11 / Windows®8.1 10 Mac macOS 14 Sonoma / macOS 13 Ventura / macOS 12 Monterey / macOS 11 Big Sur -
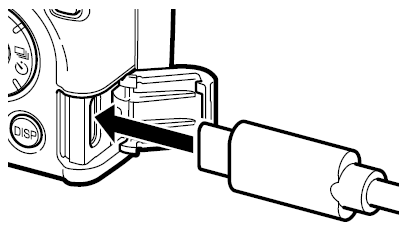
How to transfer images to a computer via USB cable?
Use the supplied USB cable (I-USB198: Type-C to Type-C) to connect the camera to a computer.
[Windows®]
1. Turn off the camera.
2. Open the camera terminal cover and connect the USB cable to the USB terminal.
3. Connect the USB cable to a USB port on the computer.
The camera will power on automatically and enter playback mode.
The computer will recognize the camera as a device (RICOH GR).
4. Copy the images to your computer.
5. Once the transfer is complete, disconnect the camera from the computer.
6. Remove the USB cable.
Note: Files on the camera cannot be deleted from the computer. (Only copying is allowed; moving is not possible.)
[Mac] Using Image Capture
1. Turn off the camera.
2. Open the camera terminal cover and connect the USB cable (I-USB198) to the USB terminal.
3. Connect the USB cable to a USB port on the Mac.
4. Launch Image Capture on the Mac.
5. In Image Capture, the device RICOH GR will be displayed.
6. Select Import All or choose the images you want to import to transfer them to the Mac.
7. Once the transfer is complete, turn off the camera (the status lamp will remain lit even after powering off).
8. Disconnect the USB cable (I-USB198).
Note:
- • Do not disconnect the USB cable (I-USB198) while images are being transferred.
- • If the battery level is low, it may take some time for the camera to be recognized by the computer.
- • When connecting or disconnecting the USB cable (I-USB198) to/from the USB terminal, always insert and remove it straight without wiggling it from side to side.
Wiggling the cable may cause looseness or poor contact at the camera’s USB terminal.
-
Can the camera be used as a PC camera (webcam) when connected to a computer via USB?
The camera cannot be used as a PC camera (webcam).-
Is any application software included for PC use?
No application software is included.
When performing RAW development, ensure that the DNG images captured with the camera are saved in the ***RICOH folder within the DCIM folder on the SD card. You can then use the camera’s built-in RAW development feature, or use commercially available RAW development software for PC that supports the DNG format. Note: The ***RICOH folder name contains a 3-digit number in place of the asterisks (***).-
Can images be displayed by connecting the camera to AV equipment?
You can connect the camera to a TV or monitor with an HDMI terminal to display live view images during shooting, as well as menu and playback screens. ・The camera’s USB terminal (Type-C) supports DisplayPort Alternate Mode.
・To display images on AV equipment with an HDMI input, use a commercially available USB Type-C to HDMI adapter and a compatible HDMI cable.
Note:
- • While connected to AV equipment, the camera’s LCD monitor will not display images, and volume adjustments cannot be made on the camera. Please adjust the volume on the AV equipment.
- • Compatibility with all AV equipment is not guaranteed.
- • Some HDMI conversion adapters may not be compatible.
- • Depending on the HDMI cable used, video output may not be possible.
Note:
- • Check the instruction manual of your AV equipment and select the video input terminal to which the camera will be connected.
- • The output format will be automatically selected based on the maximum resolution supported by both the camera and the AV equipment.
- • Supported resolutions are 1080p, 1080i, 720p, and 480p. 640×480 is not supported.
-
Is the camera compatible with PRINT Image Matching III?
Yes, it is compatible.-
Is the camera compatible with PictBridge?
No, it is not compatible.
Please transfer images to a computer for printing, or save them to a memory card and use a print service provider.
Connection with Communication Terminals
-
Can I operate the camera or transfer images from the camera using a communication terminal? How long does the connection take?
By using the dedicated app GR WORLD, you can connect the camera and the communication terminal via Bluetooth® or Wi-Fi to operate the camera and transfer images from the camera to the terminal.
Note: For details on the functions of GR WORLD and how to connect the camera to a communication terminal, please refer to the following address (link).
https://www.ricoh-imaging.co.jp/english/products/app/gr-world/
・Before using GR WORLD on a communication terminal, please check the OS version of your device in advance.
・Instruction manuals (PDF) are available for download on our website.
Please also refer to:
https://www.ricoh-iaging.co.jp/english/support/download/manual/
・With the camera powered off, launch GR WORLD on the communication terminal and tap Remote Shooting to start connecting to the camera.
At this stage, the connection is via Bluetooth® only. Within a few seconds, the camera will power on and establish a full connection with the terminal.
Note: Except for the first time you set up the connection, there is no need to perform any connection operations in the terminal’s Settings beforehand.
・For Image Transfer, a Wi-Fi connection is required in addition to Bluetooth® due to the large data volume.
When you tap Image Transfer while connected via Bluetooth® or turn on Wi-Fi, the Wi-Fi connection will be established after about 10 seconds, and images from the camera will be displayed on the terminal.
Note: The time it takes for images to appear on the screen may vary depending on the model of the communication terminal.
Note: Wi-Fi is disabled when the camera is connected to AV equipment, in video mode, or connected via USB.
・If the wireless communication setting is turned on, the camera will continue to transmit a Bluetooth signal even when powered off. Please be aware that this may drain the battery.
-
What operations can be performed on a communication terminal using the GR WORLD app?
When the camera is connected to a communication terminal via Bluetooth® or Wi-Fi, the following functions are available through GR WORLD:
Remote Shooting When connected via Bluetooth®, the camera can be remotely triggered. In addition to immediate release, the self-timer can be set for 2 s or 10 s. Image Viewing Images stored on the camera can be displayed on the communication terminal and transferred. The Gallery function allows viewing of transferred images. Date/Time Sync Synchronizes the camera’s date and time with the communication terminal’s settings. Camera Power Control The camera’s power can be turned on or off remotely via the app.
・GR WORLD is compatible with iOS and Android™. Please download it from the App Store or Google Play™. For details on supported OS versions, please refer to the download site.
・For information on how to connect the camera to a communication terminal and the functions of GR WORLD, please refer to the following address:
https://www.ricoh-imaging.co.jp/english/products/app/gr-world/
・The FAQ for GR WORLD is as follows:
https://www.ricoh-imaging.co.jp/english/support/faq/gr-world/-
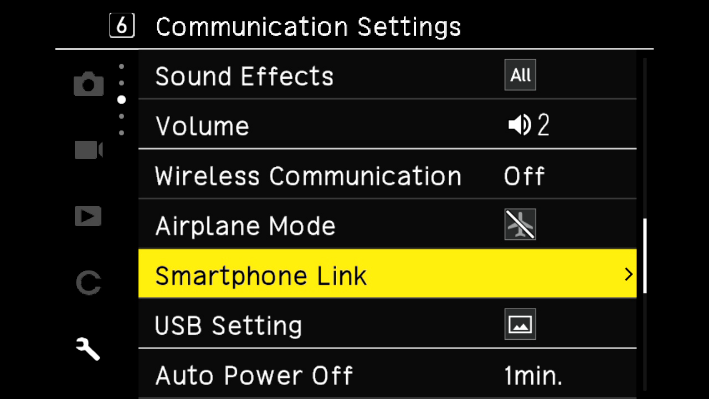
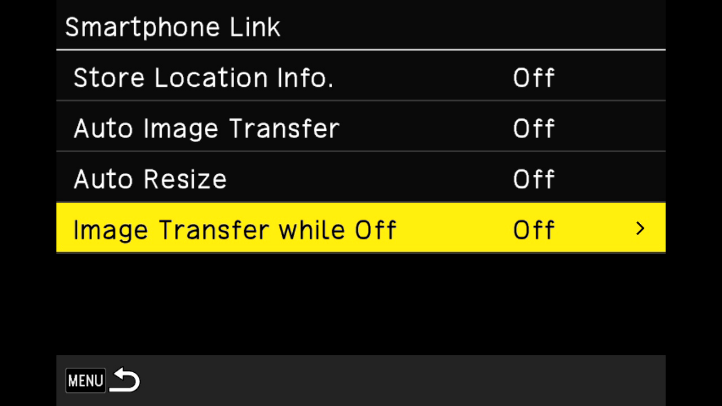
What settings are available for the smartphone linkage function?
In the Setup Menu, under 6: Communication Settings → Smartphone Linkage Function, you can configure the following settings:
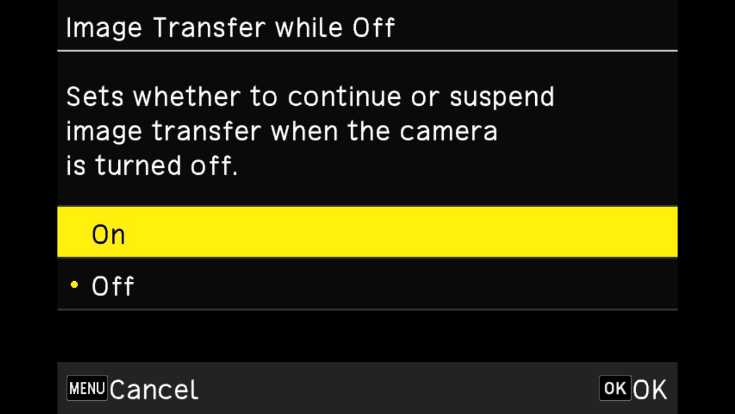
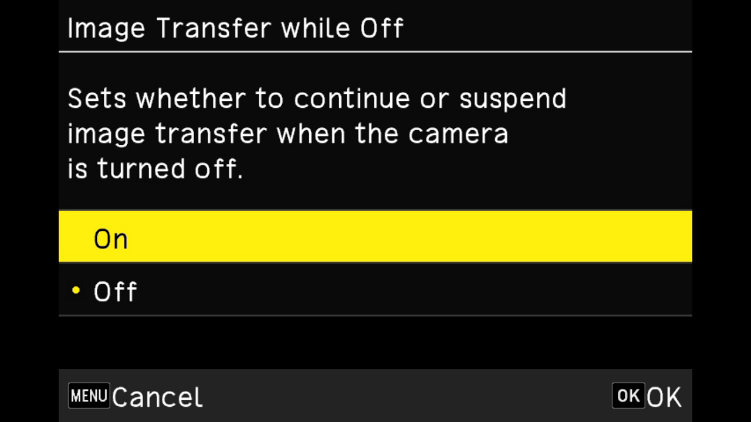
Location Information Recording Records the location information from the communication terminal in the images. Automatic Image Transfer Captured images are automatically scheduled for transfer. Image Transfer When Powered Off Determines whether to continue or stop the transfer if the camera is powered off during image transfer. Auto Resize Transfer When transferring images scheduled on the camera, they are automatically resized to XS size for transfer.
Note: The camera normally connects to the communication terminal via Bluetooth®. For image transfer, the connection automatically switches to Wi-Fi.-
How can images be transferred using the camera’s built-in functions?
Captured images can be transferred to a communication terminal using Transfer in Menu → Playback Settings → 2: File Operations, where you can select the images to transfer.


・You can set whether image transfer continues or stops when the camera is powered off.
Go to Menu → Setup → 6: Communication Settings → Smartphone Linkage Function, select Image Transfer When Powered Off, and choose On to continue transfer or Off to stop transfer when the camera is powered off.

・You can also schedule captured images for transfer.
Go to Menu → Setup → 6: Communication Settings → Smartphone Linkage Function, and turn Automatic Image Transfer On to schedule images for transfer.
Note: Scheduled images are transferred when GR WORLD is launched and Image Transfer is tapped to connect via Wi-Fi.
・You can schedule captured images for transfer using Transfer in Menu → Playback Settings → 2: File Operations.
・On the above screen, press the Drive/Right Button on the direct keys to display the captured images. Use the ISO/Left Button and Drive/Right Button to select the image you want to transfer, then choose Transfer Single Image.
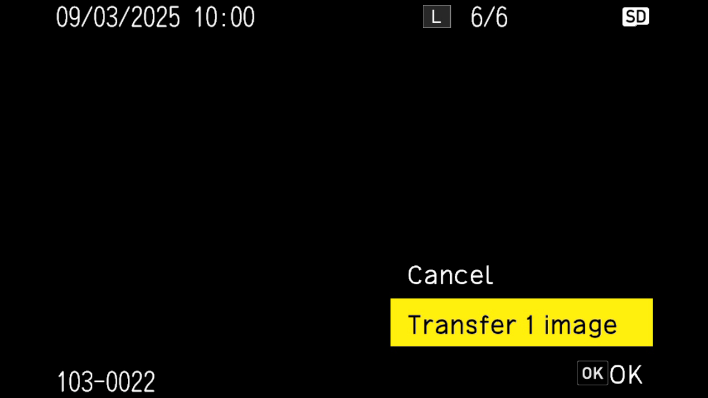
・When you press the OK button on the above screen, a transfer reservation indication will appear in the red frame area on the screen below.

・The images reserved for transfer will be sent when you launch GR WORLD on the communication device and connect via wireless LAN.
Note: When transferring images to GR WORLD, there is an “Auto Resize” function that resizes images to size XS before transfer.
From the Setup Menu, under 6: Communication Settings, select Smartphone Connection and switch Auto Resize to [On].
Using Other Accessories
-
Can I take pictures using a cable release?
A wired cable release is not available.
Please connect the camera to your communication device via Bluetooth® using the dedicated “GR WORLD” app, and use the remote shooting function.-
Can I attach a (third-party) filter?
Yes, it can be attached.
Use a 49 mm general-purpose filter (filter diameter 49 mm, compliant with JIS standards) by attaching it to the optional lens adapter (GA-3).
・Lens Adapter (GA-3): Dedicated for GR IV-
What is the wide conversion lens (GW-4)?
The Wide Conversion Lens (GW-4) is a dedicated wide conversion lens for the GR IV / GR III.
For the GR IV, attach the optional dedicated Lens Adapter (GA-3) to the camera, and then attach the Wide Conversion Lens (GW-4) to the Lens Adapter (GA-3) for use.
- When using the Lens Adapter (GA-3), remove the Ring Cap (GN-3).
- The Lens Adapter (GA-3) is required. The GW-4 cannot be attached directly to the camera body.
- When the Wide Conversion Lens (GW-4) is attached, the camera will automatically recognize it.
- Make sure that “WIDE” is displayed on the LCD screen.
- The filter diameter of the Wide Conversion Lens (GW-4) is 72 mm.
- The Wide Conversion Lens (GW-4) comes with a dedicated rubber hood.
- The Wide Conversion Lenses (GW-1), (GW-2), and (GW-3) cannot be used with the GR IV.
- The Lens Adapter (GA-3) is dedicated for the GR IV and cannot be used with the GR III.-
Can I use the Tele Conversion Lens (GT-2)?
The GT-2 is a dedicated tele conversion lens for the GR IIIx. It cannot be used with the GR IV.
Troubleshooting
-
Is the included warranty valid overseas?
The included warranty is valid only in Japan.-
I purchased the camera in Japan. Are there any precautions when using it overseas?
When using the camera outside the country of purchase, the available wireless communication frequency bands may differ depending on the country.
Kindly access the confirmation page via the link provided below, select the country of purchase, and verify whether camera usage is permitted in that region.
Confirmation Page:
https://www.ricoh-imaging.co.jp/english/support/detail/gr-4/purchase_available_outside_the_country_griv.html-
I am using the included USB cable, but I can no longer charge the camera via my PC.
This may be due to poor contact at the camera’s USB terminal or a break in the USB cable (I-USB198).
Please try charging with another Type-C to Type-C cable you have on hand.
When connecting or disconnecting the USB cable (I-USB198) to the camera’s USB terminal, if the cable is inserted or removed while being wiggled from side to side, it may cause looseness or poor contact at the camera’s USB terminal.