
GR III / GR IIIx
Below is a list of frequently asked questions and corresponding answers for the GRIII and GR IIIx digital cameras.
General function and specification
 What accessories are provided with this camera?
The following accessories are providing with this camera.
•Hand Strap
•USB cable I-USB166 (Type C⇔Type A)
•Rechargeable lithium-ion battery DB-110
•USB power adaptor AC-U1
•Power plug
•Hot shoe cover (Set on camera)
•Ring cap
GR III:GN-1(BK) (Set on camera)
GR IIIx:GN-2 (BK) (Set on camera)
•Instruction manual
* No camera case nor SD (SDHC) Memory Cards are included with the camera.-
What are the optional accessories for this camera?
The optional accessories are as follows:
•Rechargeable Battery (DB-110)
•Battery charger (BJ-11)
•AC adapter kit (K-AC166)
•External viewfinder:
For GR III: External viewfinder (GV-1), External mini viewfinder (GV-2)
For GR IIIx: External mini viewfinder (GV-3)
•Flash:
External P-TTL Flash: PENTAX AF540FGZ / PENTAX AF540FGZII / PENTAX AF360FGZ / PENTAX AF360FGZII / PENTAX AF201FG
•Conversion lens / Lens adapter:
For GR III: Wide-angle conversion lens (GW-4), Lens adapter (GA-1)
For GR IIIx:Tele conversion lens (GT-2), Lens adapter (GA-2)
•Case:
For GR III: Soft Case (GC-9), Soft Case (GC-10)
For GR III and GR IIIx: Soft Case (GC-11), Soft Case (GC-12)
•Strap:
Neck strap (GS-3)…GR logo, Neck strap (ST-2)…RICOH logo, Hand strap (GS-2)…GR logo
•Cable switch:
Cable switch (CA-3)
•USB cable:
USB Cable I-USB166 (Type C⇔Type A)
•Ring cap:
For GR III:GN-1 (DG) Dark Gray / (BK) Black
For GR IIIx:GN-2 (DG) Dark Gray / (BK) Black / (BZ) Bronze
*Please click here for images.-
Are there any other necessary items that are not included in the kit?
None required; the GR III and GR IIIx have about 2GB of storage space as internal memory.
If you want to store more images, please prepare a card with a capacity that matches the number of images you will take.-
What is the material of camera exterior parts.
It is a magnesium alloy-
Does the camera have an optical viewfinder?
There is no built-in optical viewfinder.
Optional external viewfinder (GV-1) / (GV-2) / (GV-3) is available.
For GR III: External viewfinder (GV-1), External mini viewfinder (GV-2)
For GR IIIx: External mini viewfinder (GV-3)-
Does the camera have a zoom function?
There is no optical zoom function or digital zoom function.
However, there is a "crop" function that allows you to set the angle of view.
GR III: Can be set to 35mm or 50mm from normal 28mm.
GR IIIx: Can be set to 50mm or 71mm from normal 40mm.
*Figures are in 35mm format.-
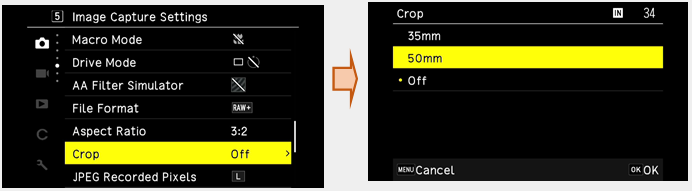
What is a [Crop] function ?
This function uses the center of the image sensor for shooting.
The outside of the normal shooting range is cut off, and the angle of view becomes narrower as the shooting range becomes narrower, giving the impression of a longer focal length.
Even though it is a single focal length lens, you can use different angles of view depending on the theme, expanding the range of expression.
This can be set in the [Crop] menu in the recording settings menu 5.
5.
In the case of the GR III, when set to [35mm] or [50mm], the angle of view changes from the normal 28mm to the equivalent of 35mm or 50mm, and the screen display also changes.
*Figures are in 35mm format.
In the case of the GR IIIx, when set to [50 mm] or [71 mm], the angle of view changes from the normal 40 mm to the equivalent of 50 mm or 71 mm, and the screen display also changes.
*Figures are in 35mm format.
There are some restrictions for [JPEG Recording Size] depends on a [Crop] setting.
*Figures are in 35mm format.GR III: Crop off (28mm) GR IIIx: Crop off (40mm) Follow the JPEG recording size GR III:35mm GR IIIx: 50mm When set to [L]: Record in [M].
If set to [M], [S] or [XS]: Follow the JPEG recording sizeGR III: 50mm GR IIIx: 71mm When set to [L] or [M]: Recoding in [S].
If set to [S] or [XS]: Follow the JPEG recording size
When [Crop] is set in the [Fn Button Setting] menu of the C 2 Customize Controls, the angle of view can be changed by pressing the Fn button.
-
What is the angle of view when the crop function is set, when the wide conversion lens is attached to the
GR III, and when the tele conversion lens is attached to the GR IIIx?
- In the case of GR III
Crop off: 75.2°
Crop 35mm: 63.3°
Crop 50mm: 46.7°
GR III + Wide conversion lens (GW-4)
Crop off: 91.5°
Crop 35mm: 78.8°(35mm film equivalent 26mm)
Crop 50mm: 59.8°(35mm film equivalent 38mm)
In the case of GR IIIx
Crop off: 56.8°
Crop 50mm: 46.7°
Crop 71mm: 33.7°
GR IIIx + Tele conversion lens (GT-2)
Crop 50mm: 32.1°(35mm film equivalent 75mm)
Crop 71mm: 22.8°(35mm film equivalent 107mm)
*When the tele conversion lens (GT-2) is attached, the camera will automatically switch to a 50mm crop.
* All are diagonal angles. -
What is the shooting distance range when the tele conversion lens is attached to the GR IIIx?
- When macro is off in Focus AF, the shooting distance range is from 0.4m to ∞ from the tip of the GT-2.
When the macro mode is on, the shooting distance range is from 23cm to 50cm from the tip of the GT-2.
*The value on the focus bar displayed when the focus is MF, It is the shooting distance from the tip of the lens.
*When the tele conversion lens (GT-2) is attached, the camera will operate within the allowable shooting distance when moving the focus in MF mode. -
Is there any function for reduce camera shake?
Yes, there is the built-in sensor-shift Shake Reduction system (SR) with 3-axis both of GR III and GR IIIx.
*You can set [On] or [Off] at7 [Shooting Assist] menu.
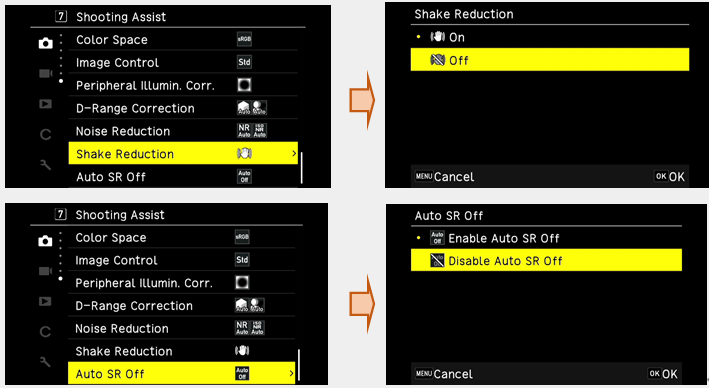
*If you set [Self-timer] for [Drive Mode], the [Shake Reduction] is automatically switched off.
*If you like to keep it stay on, set [Auto SR Off] mode of7 [Shooting Assist] menu for [Disable Auto SR Off].
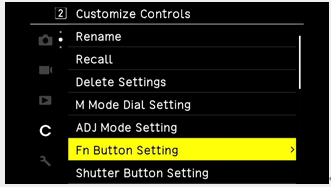
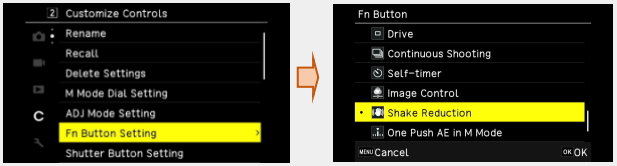
・Customization settings for the Fn button (in still image mode)
*If you set [Shake Reduction] for [Fn Button Setting] at C 2 [Customize Controls] menu, then you can switch [On] or [Off] accordingly by pressing Fn button.
-
What is the recording format?
Still Image:
File Format [JPEG] (Exif 2.3 compliance), (DCF2.0 compliance)
[RAW]: Record RAW (DNG) image (14bit)
[RAW]+[JPEG]: Record both RAW image and JPEG image at same time.Aspect Ratio [3:2], [1:1] Crop GR III: [35mm], [50mm] and [Off]
GR IIIx: [50mm], [71mm] and [Off]JPEG [L], [M], [S] and [XS] Color Space [sRGB], [AdobeRGB]
・When set the [Aspect Ratio] for [1:1], left and right of LCD monitor will display black.Recorded Pixels 3:2 L(24M:6000 × 4000) M(15M:4800 × 3200) S(7M:3360 × 2240) XS(2M:1920 × 1280) 1:1 L(16M:4000 × 4000) M(10M:3200 × 3200) S(5M:2240 × 2240) XS(1.6M:1280 × 1280)
Movie:
File Format MPEG4 AVC / H.264(MOV) Recorded Pixel Full HD (1920 x 1080 / 60p / 30p / 24p) Sound Built-in stereo microphone Recording Time Up to 4GB or 25 minutes at max. automatically stops recording if the internal temperature of the camera becomes high. -
What is the operating temperature range?
The operating temperature range for both the GR III and GR IIIx is 0°C to 40°C.
Depending on the surrounding temperature and usage conditions, the temperature of the camera may become high. For safety reasons, the camera is equipped with a function that automatically shuts down when the temperature exceeds a certain level.-
What is the maximum magnification for macro close-up photography?
The GR III is 0.35x with the camera alone and 0.48x with the wide conversion lens (GW-4) attached.
The GR IIIx is 0.25x with the camera alone and 0.17x when the tele conversion lens (GT-2) is attached.
*Upper row: Normal shooting condition / Lower: Macro modeShooting distance
(From the tip of lens)Magnification GR III 10cm
6cm0.21
0.35GR III + Wide conversion lens (GW-4)
+ Lens adapter (GA-1)3.4cm
1.5cm0.28
0.48GR IIIx 20cm
12cm0.14
0.25GR IIIx + Tele conversion lens (GT-2)
+ Lens adapter (GA-2)40cm
23cm0.09
0.17
*Figures for shooting distance with conversion lens attached are the distance from the tip of the conversion lens.
Power supply / Battery
-
What kind of battery does the camera use?
The rechargeable lithium-ion battery DB-110.
The DB-65 for GR / GR ll /GR DIGITAL series or dry cell can’t be used for GR IlI and GR IIIx.-
How long can the rechargeable lithium-ion battery DB-110 be used for?
As a guide of using time are as below.
*1 The number of still images shot is measured in conditions that comply with CIPA standards and it may vary from condition of use. (Example of CIPA standards: LCD monitor On, Temperature 23℃)Number of still images shot: *1 Approx. 200 Playback time *2 Approx. 180 minutes
*2 The movie recording time is limited as up to 4GB or 25 minutes at one time.-
How to charge the rechargeable battery DB-110?
There are two ways to charge the DB-110: with the DB-110 inside the camera, or by using the battery charger (BJ-11), optional accessories.
[Charge with the camera]
・With the DB-110 set inside the camera, connect the USB cable.
・Charge the battery from an electrical outlet using the supplied USB cable, USB power adapter (AC-U1) and power plug.
・The charging time depends on the remaining battery power.
*When the battery is empty, it takes about 2.5 hours to complete charging (at 25°C).
・The battery will also be charged when the camera is connected to the computer with a USB cable.
(When connected to a computer, the camera will start up in playback mode, so please turn off the camera after connecting.)
[Charge with using the battery charger (BJ-11), optional accessories]
・Remove the DB-110 from the camera and recharge it using the battery charger (BJ-11), optional accessories.
(Charging time: about 2.5 hours)
*Charging time is approximate. It may vary depending on usage conditions.
*Batteries that have been left in the camera for a long period of time and have become over-discharged need to be recharged by a device other than a PC.
(It is recommended to use the USB cable and USB power adapter included with the camera.)-
Is there an AC adapter for the camera?
There is the optional AC adapter kit [K-AC166]-
When the battery is removed, how long the date and time set in the camera retained?
Once a fully charged battery has been loaded and left in the camera for 2 hours, data remains backed up for approximately 2 days when the battery is removed.
Memory Card
-
Which SD Memory Cards have been tested for compatibility?
Compatibility with this camera has been tested with memory cards from the following manufacturers:
- Panasonic / Toshiba (KIOXIA) / SanDisk
SD Memory Cards with capacities up to 2GB
SDHC Memory Cards with capacities up to 32GB
SDXC Memory Cards with capacities of 64GB / 128GB
- Toshiba (KIOXIA) / SanDisk
SDXC Memory Cards with capacities of 256GB
- SanDisk
SDXC Memory Cards with capacities of 512GB
*If saving movie images, it is recommended to use a Class 6 or faster Memory Card.
*The GRlll has 2GB built in memory.
As of October 2021
*Tested" denotes only that the operation of the product has been checked by RICOH IMAGING and in no way constitutes a guarantee to customers that the product is suited to their requirements.-
When using SD Memory Cards, what should I do first?
Card that are unused or that have been used on other devices, such as another camera or a computer, must first be formatted on the GRIlI.
*Please note that formatting will delete all data recorded on the card.-
Can I use the SD Memory Card with Wi-Fi function?
No, it is not corresponded. (We are not guarantee the function.)-
Does GRlll correspond with UHS standard?
Yes, it is corresponded with UHS-1 standard. (SDHC and SDXC Memory card)-
Can I use mini SD card and micro SD card with the adapter?
No, we cannot guaranty the function of any memory card use with adapter.
Please use SD, SDHC or SDXC Memory card.
Shooting Function
-
Please tell me about [Image Control] function.
・For GR III (firmware version 1.20 or earlier)
To update to the latest GR III firmware version, click here.
By changing the saturation, color or contrast you can create characteristic images.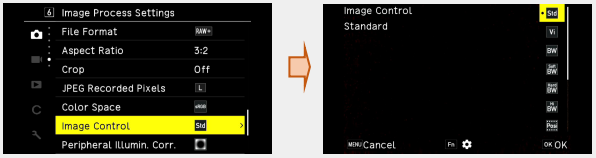
・Standard Normal image Vivid Create sharp and colorful image. Monotone Black & White Soft Monotone Create soft impression of B&W image Hard Monotone Create solid impression of B&W image Hi-Contrast B&W Create B&W image that emphasize contrast. It will show up grained image such as used ultra-fast film or result of the sensitized development. Positive Film Create high saturation image such as used Positive Film. Bleach Bypass Create image that lower saturation and higher contrast. Retro Create image like old photograph. HDR Tone Emphasize fine contrast and create with image of a painting impression. Custom1
Custom2Can be registered 2 kinds of settings  (movie) mode: [Soft Monotone] and [HDR Tone] are not usable.
・The [Image Control] is not reflected for RAW image. It can be set when run the [RAW Development] at the 2 [Image Edit] menu.
・You can set it to [ADJ Mode Setting] and [Fn Button Setting] at C 2 [Customize Controls] menu.
・For GR IIIx
* For the GR III, the same functions as below are available with firmware version 1.30 or later (click here).
By changing the saturation, color or contrast you can create characteristic images.
・Standard Normal image Vivid Create sharp and colorful image. Monotone Black & White Soft Monotone Create soft impression of B&W image Hard Monotone Create solid impression of B&W image Hi-Contrast B&W Create B&W image that emphasize contrast. It will show up grained image such as used ultra-fast film or result of the sensitized development. Positive Film Create high saturation image such as used Positive Film. Bleach Bypass Create image that lower saturation and higher contrast. Retro Create image like old photograph. HDR Tone Emphasize fine contrast and create with image of a painting impression. Cross process The result is a distinctive color that looks like silver halide film that has been cross-developed. Custom1
Custom2Can be registered 2 kinds of settings (movie) mode: [Soft Monotone] and [HDR Tone] are not usable.
・The [Image Control] is not reflected for RAW image. It can be set when run the [RAW Development] at the2 [Image Edit] menu.
・You can set it to [ADJ Mode Setting] and [Fn Button Setting] at C 2 [Customize Controls] menu.-
Which function can be set for the [Direct Key].
If you press each button at the Capture mode, you can run below function instantly.
・The above function also can be set at the [Image Capture Settings] by pressing [MENU] button.
・The function of can be changed by the [Drive Button] and [ISO Button] at the [Fn Button Setting] of the C 2 [Customize Controls] menu.
-
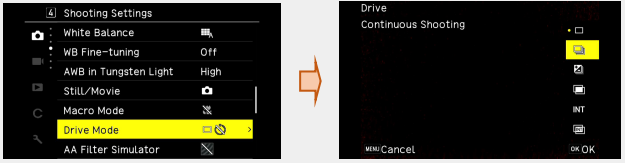
Continuous Shooting
It will shoot continuosly while pressing [ ].
].
Set [Continuous Shooting] mode of the [Drive Mode] at the of the 4 [Shooting Settings] menu or
[Drive Mode] of the [Direct Key] to perform continuous shooting..
-
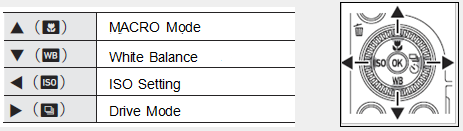
How to operate the Macro mode.
In shooting mode, press the direct key ▲ (macro mode button) to enter macro mode.
The GR III can shoot AF within a range of 6 to 12 cm from the lens tip.
The GR IIIx can be shoot AF within a range of 12 to 24cm from the lens tip.
・If you point the camera at a distant subject and focus while in macro mode, the camera will not focus.
If you want to shoot a distant subject, cancel the macro mode.
・If you press ▲ [Macro Mode] button once again, Macro mode will be cancelled-
What is the [Dynamic Range Compensation]?
You can expand an image gradation to make the bright and dark portions of an image clearly visible.
・Set [D-Range Correction] of the6 [Image Process Settings] menu.
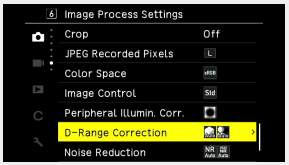
Press key for select [Highlight Correction] / [Shadow Correction].
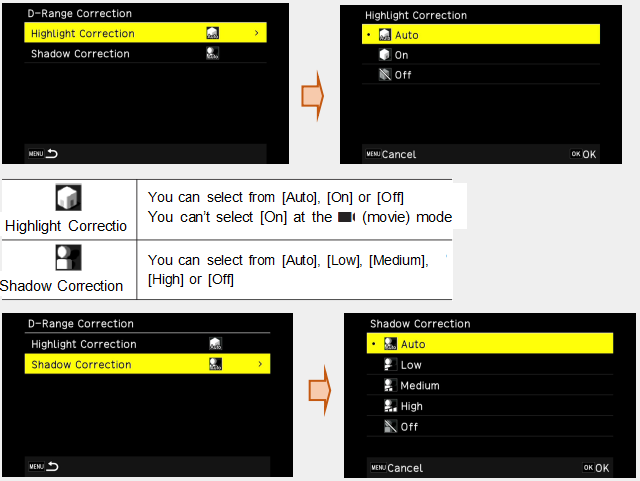
・The noise of image may be noticeable if you select [High] of the [Shadow Correction].-
What is the [Preview]?
You can check the depth of field before shooting the image.
・When [Hold Movie/Wireless Btn.] of the [Fn Button Setting] menu is set to [Preview] at the C 2 [Customize Controls] menu, the Aperture preview is available.
If you press and hold(Movie/Wireless) button, the aperture will change to set value, and you can check the depth of field.
When you release the(Movie/Wireless) button, the [Preview] mode is canceled.
・In the [Preview] mode, the shutter release cannot be operated, and the aperture value cannot be changed.
・When the Flash is in use, Preview value and actual aperture value may differ.
・Because the [Preview] is used for checking the depth of field, the AE system may not function properly.
・The [Preview] is not available at the(Movie) mode.-
What is the function of [B(Bulb)], [T(Time)] and [BT(Bulb Timer)] ?
You can select B, T and BT for the shutter speed in M mode.
Shutter Speed Function B (Bulb) The image continues to be exposed while the shutter release button is pressed. The exposure ends when the shutter release button is released. T (Time) The exposure begins when the shutter release button is pressed.
The exposure ends when the shutter release button is pressed again.BT:(Bulb Timer) The exposure begins when the shutter release button is pressed and ends at set time. The exposure time can be set by [Control Dial (  )].
)].
*The following function are available at [B] and [T] setting.
・Single Frame Shooting
・Multiple Exposure Shooting
*The following function are available at [BT] setting.
・Single Frame Shooting
・Multiple Exposure Shooting
・Interval Shooting
・Interval Composite
*Operation is also possible using the optional Cable Switch (CA-3) with the USB Cable. *The [One Push AE in M Mode] of [Fn Button Setting] at the C 2 [Customize Controls] menu is not available,-
What is the function of [Interval Shooting] ?
The camera takes pictures automatically at the fixed interval time.
Set the [Drive Mode] at the4 [Shooting Setting] menu or [Drive Mode Button] of the [Direct Key].
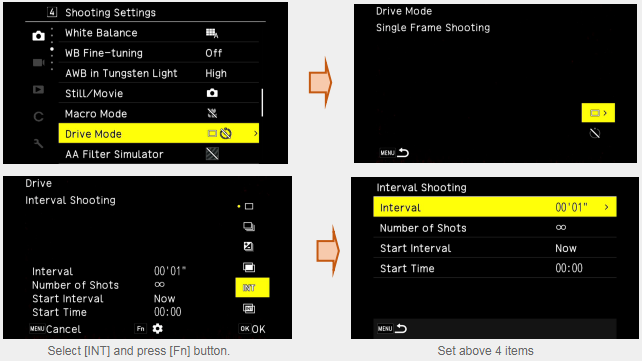
Interval Set interval time from 00:01 to 60:00 Number of Shots Set the number of shots as [∞] or [2 to 99] Start Interval Set the timing of first shot as [NOW] or [Set Time] Start Time Set the Times of Day if you select [Set time] at [Start Interval]
・Depend on the shooting settings, the time until next shot may longer than time that set at Interval.
・When the [OK] button is pressed, the interval shooting is cancelled.
・It is created and saved new folder for each interval shooting.
・When one of the [MF], [Snap] or [∞] is selected for [Focus] mode at the1 [Focus Settings] menu, the focus point is fixed to the point of first shot.
・It is recommended to use the battery with sufficient power or optional AC Adapter(D-AC116).-
What is the function of [Interval Composite]?
A series of continuous images taken at set intervals is merged in such a way that the bright areas remain.
Use this function when you want to record the trails of light formed by stars and so on during nightscape shooting. It is also possible to keep image between shots
・Set [Drive Mode] at the4 Shooting Settings] menu or [Drive Mode Button] of [Direct Key].
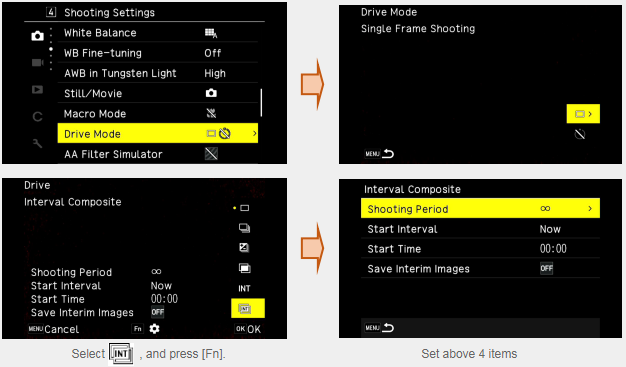
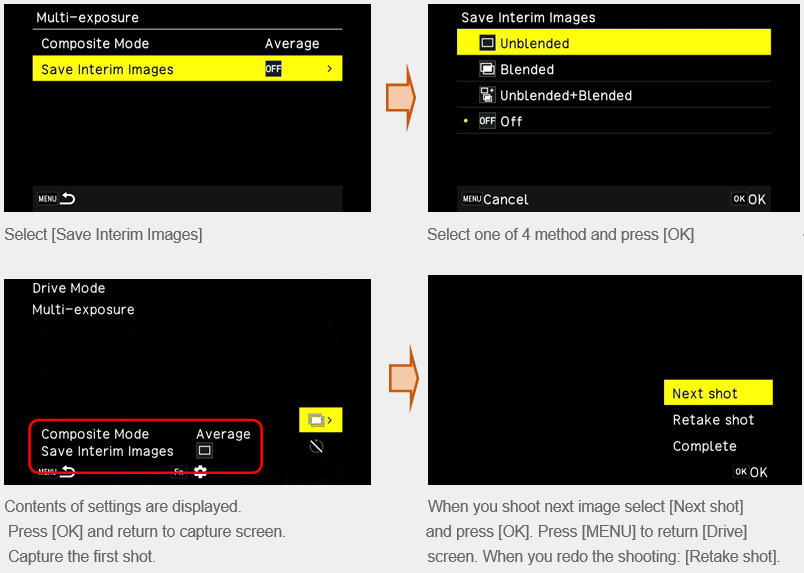
Interval Set interval time from 10 minutes to 24 hours Start Interval Set the timing of first shot as [NOW] or [Set Time] Start Time Set the Times of Day if you select [Set time] at [Start Interval] Save Interim Images Set if save or not images before composite or middle of composite. It is saved as JPEG format for image that middle of composite.
*Please mount the camera on a tripod
*Set exposure, focus mode and white balance and confirm the composition.
It will composite as these settings.
*After first shot by release the shutter, it will continuously release the shutter at minimum interval.
*It is recommended to use Self-Timer mode to avoid the camera shake of first shot in case [Now] is selected for [Start Interval].
*It is recommended to use a memory card with sufficient free space and a high speed memory card.
*You can confirm the image that middle of composite when you press the shutter button halfway.
*When you press the shutter button fully, you can save composite image at that point and can continue and start and save new composite images.
*When press [OK] button, the shooting is ends and composite image is saved.
Caution:
・When the [OK] or Shutter button is pressed during the exposure, that image is not saved.
・If exposure mode is changed or turn off the camera, the interval shooting is cancelled.
・The AF function will not work after 2nd shot.
・The [Slow Shutter Speed NR] of [Noise Reduction] at6 [Image Process Setting] menu and the [Shake Reduction] at 7 [Shooting Assist] menu are fixed to [Off].
Memo:
・It is created and saved new folder for each interval shooting.
・Below settings are fixed to the value of the 1st shot.
ISO Auto: ISO/Tv/Av, Auto White Balance: White Balance-
What is the function of [Slow Shutter Speed NR]?
You can set [On] or [Off] of the noise reduction function which likely to happen at the slow shutter speed. When you set [Slow Shutter Speed NR] of the [Noise Reduction] at the6 [Image Process Settings] menu, the noise reduction processing is carried out.
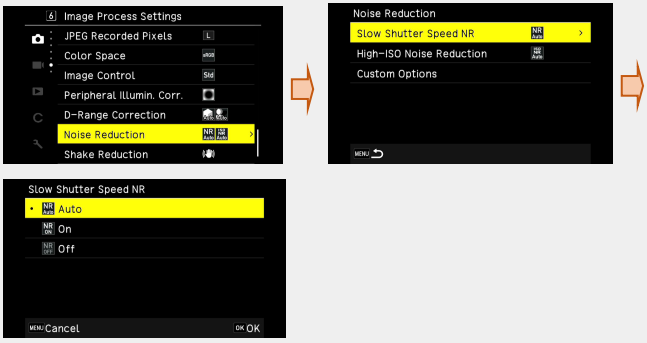
The status lamp will brink during process of noise reductionAuto Process noise reduction on judging of Shutter speed, ISO speed and temperature. On Process noise reduction when the shutter speed is longer than 1 second. Off Not process noise reduction -
What is the function of [High-ISO Noise Reduction]?
You can set the noise reduce function as below.
1. When you set [High-ISO Noise Reduction] of the [Noise Reduction] at the6 [Image Process Settings] menu and [High-ISO Noise Reduction] will display when the Direct Key is pressed.
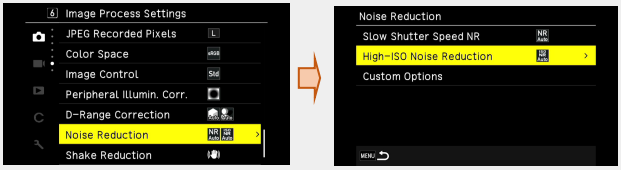
2. Select item by key and press [OK] button
When the [OK] button is pressed, return to [Noise Reduction] display.Auto Correspond ISO, automatically process noise reduction Low/Medium/High Process noise reduction as level of Low, Medium and High Custom Can be set strength of reduction for each ISO sensitivity Off It does not perform noise reduction
When the [Custom] is selected, proceed to the next step No.3.
When the other item is selected, proceed to the step No.5.
3.Select [Custom Options] and press direct key.
The selection of ISO sensitivity will display.
4.Select ISO sensitivity by direct key

5.Press [OK] button.
*It may take longer time to save the processed image than usual when the [Noise Reduction] is set.-
How to operate [ND Filter]?
You can decrease 2 steps of the brightness by using ND filter.
It is useful that when you like to use slower shutter speed without changing the aperture.
The GRlll equipped built-in [ND Filter], you can set whether or not to always use the [ND Filter] at the2 or 2 [Exposure Setting].
・The [ND Filter] can be set to [Fn Button] for [Fn Button Setting] at the C 2 [Customize Controls] menu.Auto The camera judges [On] or [Off] according to the situation. The ND filter is used if the icon is displayed on the shooting screen when the shutter release button is depressed halfway. It cannot be selected at the (Movie) mode.On The ND filter is always used. The icon is displayed on the shooting screen. Off The ND filter is not used.
-
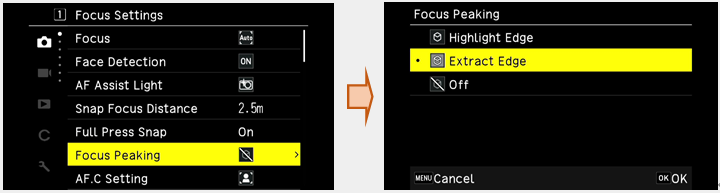
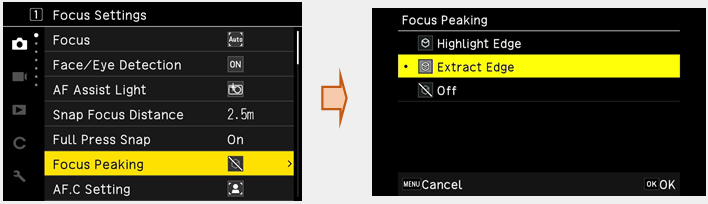
What is [Focus Peaking] function?
Intensifies the outlines and contrast of the focused subjects, make it easier to adjust the focus manually.
・You can set [Focus Peaking] at the1 [Focus Settings] menu.
・Select from [Highlight Edge], [Extract Edge] or [Off].
Screen display of GR III (firmware version 1.41 or earlier)
To update to the latest GR III firmware version, click here.
Screen display of GR IIIx and GR III firmware version 1.50 or later.
-
How can I return the focus frame to the center position after changing the focus frame position?
When the touch panel operation is on, double-tapping the screen will return the focus frame to the center position.
*For the GR III, this function is effective with firmware version 1.30 or later.
To update to the latest GR III firmware version, click here.
Or other method is, If the focus mode is Select AF, Pinpoint AF, Tracking AF, or Continuous AF, the focus frame can be moved by pressing the OK button on the shooting screen, and then pressing and holding the OK button will return the focus frame to the center.-
Is it possible to shoot multiple exposures?
Yes it does. It takes images while compositing them together.
The method of compositing differs depending on the compositing method setting.
[Average]: Compositing with averaged exposure value.
[Adding]: Compositing with adding exposure value.
*If you have the correct exposure setting on one of your shots, it will be overexposed, so take a shot with a lower exposure.
[comparative bright]: Compose the image by replacing only the bright areas compared to the first image.
Set it at the [Drive Mode] of the4 [Shooting Settings] or [Drive Mode Button] of the [Direct Key].
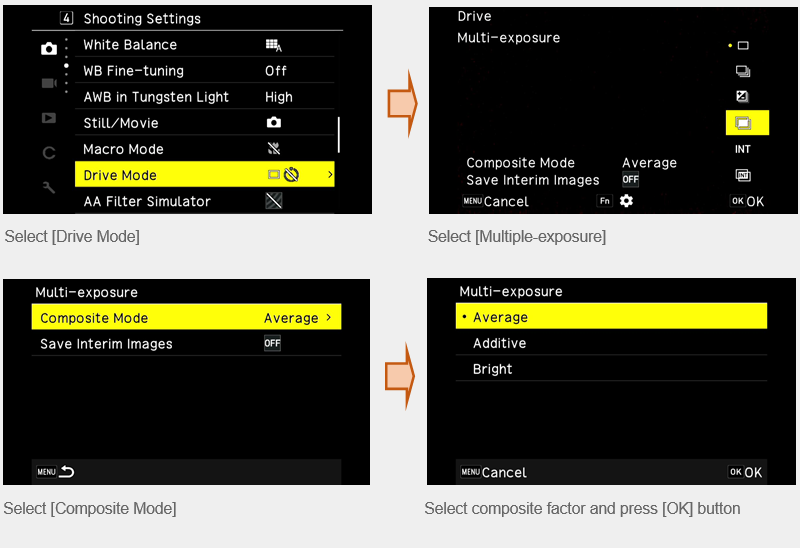
Repeat procedures above when you shoot next image.
When you like to return to previous merged image, select [Retake shot].
When you finish the shooting, select [Complete], then merged image is saved.
The following functions cannot be changed during the Multiple Exposure Shooting.
・3 [White Balance Settings] menu
・4 [Shooting Settings] menu
・5 [Image Capture Settings] menu
・6 [Image Process Settings] menu
-
About Recording Movies Function
Movies with sound can be recorded.
Main Specification:
Focus Settings:File Format MPEG4 AVC/H.264 (MOV) Recorded Pixels Full HD (1920 x 1080 / 60p / 30p / 24p) Sound Built-in stereo microphone Recording Time Up to 25 minutes or 4GB, automatically stops recording if the internal temperature of the camera becomes high
Exposure SettingFocus AF, MF, Snap and infinity Snap Focus Distance 1m, 1.5m, 2m, 2.5m, 5m and infinity Focus Peaking Highlight Edge, Extract Edge and Off MF Auto Magnification On and Off
・It will be captured by P-mode regardless of the position of the Mode Dial. The exposure compensation is availableAE Metering Multi-segment, Center-weighted, Spot and Highlight-weighted ND Filter On and Off
White Balance Settings:
Shooting Settings:White Balance Auto WB, Daylight, Shade, Cloudy, FI.-Daylight Color, FI.-Daylight White, FI.-Cool White, FI.-Warm White, Tungsten, CTE, Manual WB and Color Temperature WB Fine-tuning On or Off AWB in Tungsten Light High or Low
Movie Capture Settings.Still / Movie Still or Movie Macro Mode On or Off
Image Process Settings:Framerate 60p, 30p or 24p Sound Record On or Off
For GR III (firmware version 1.20 or earlier)
To update to the latest GR III firmware version, click here.Image Control Standard, Vivid, Monotone, Hard Monotone, High-Contrast B&W, Positive Film, Bleach Bypass, Retro, Custom 1 and Custom 2 Peripheral Illumination. Correction On or Off Dynamic Range Correction Highlight Correction: Auto or Off
Shadow Correction: Auto, Low, Medium, High or Off
For GR IIIx and GR III firmware version 1.30 or later.
(#1) Please use the GR III with the latest firmware. To update to the latest GR III firmware version, click here.Image Control Standard, Vivid, Monotone, Hard Monotone, High-Contrast B&W, Positive Film, Bleach Bypass, Retro, Cross process (#1), Custom 1 and Custom 2 Peripheral Illumination. Correction On or Off Dynamic Range Correction Highlight Correction: Auto or Off
Shadow Correction: Auto, Low, Medium, High or Off
Shooting Assist:
Movie SR On or Off
*When [Touch AF] is activated in the C 2 [Customize Controls] menu, autofocus can be performed using the touch panel even while recording movies.
*You can record a movie continuously up to 4GB 0r 25 minutes. Recording stops when the memory card or internal memory becomes full. The maximum recording time per shooting depends on the capacity of the memory cards. Shooting may stop even before the maximum recording time is reached.
*The amount of time remaining is calculated based on the amount of memory available and may not diminish at an even rate.
*We recommend using a memory card of Speed Class 6 or higher for recording movies.
*The use of the battery with sufficient power or the optional AC adapter(D-AC166) is recommended.
*If the camera is operated while shooting, the operation sounds are also recorded.-
What is the angle of view for movie recording when the tele conversion lens is attached to the GR IIIx?
When shooting movies with the tele conversion lens (GT-2) attached, the angle of view will be fixed without cropping. The angle of view is equivalent to 60mm in 35mm film format.-
Can I take flash photography?
You can discharge a flash for shooting when a flash unit(optional) is connected to the camera.
・The following flash units can be used.
PENTAX AF540FGZ, PENTAX AF540FGZll, PENTAX 360FGZ, PENTAX AF360FGZll, PENTAX AF201FG-
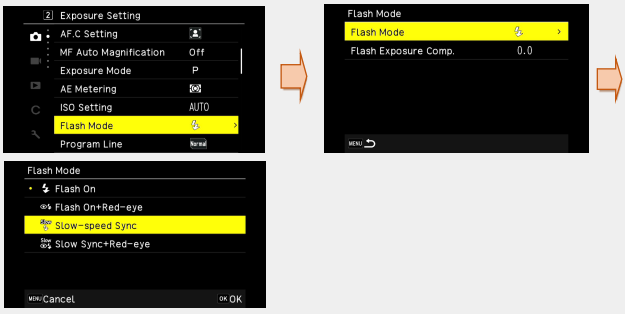
What kind of flash mode available?
The following flash mode are available.
How to set up:Flash On Always fires the flash. (Default setting) Flash On + Red-eye Forces the flash to fire while reducing the Red-eye phenomenon Slow-speed Sync. Fire the flash with the shutter speed slowed. Use when taking nightscape pictures that include people. Use of a tripod is recommended to prevent blur. Slow Sync + Red-eye Fires the flash with the shutter speed slowed while reducing the Red-eye phenomenon.
Select [Flash Mode] at the2 [Exposure Settings] and press the [Direct Key].
Select flash mode and press[OK] button.
-
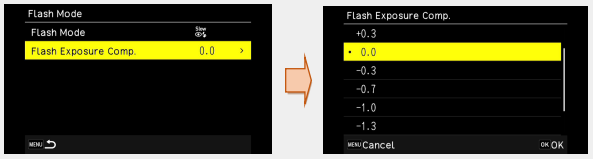
Can the amount of flash light be adjusted by the camera?
Yes.
Select a compensation value with the [Flash Exposure Comp.] at the2 [Exposure Setting] mode. Setting can be made in the range from -2.0EV to +1.0EV at 1/3EV steps.
-
Is it corresponded with the GF-1 flash unit?
No, there is no interlock function. Please use it as the [Other than R type camera] shown in the instruction manual of GF-1.-
Is it compatible with the PENTAX AF160C flash unit?
No, you cannot use it. It may occur incorrect exposure.-
Can the [Wireless Flash Shooting] function be use with the AF540FGZll (AF360FGZll) flash unit?
No, you cannot use it. Please use them at the P-TTL mode.-
What is the X-sync speed ?
It is possible to use all range of shutter speed.
When the shutter speed set at faster, the flash light may become darker, because the time of flash is lit is longer than the time of the shutter is open. If it is a case, please try to slower the shutter speed.-
Is it possible to use manual mode of flash with the compatible flash unit?
When you set the Manual exposure mode with the camera, you can use the Manual mode of the Flash unit.-
Is it possible to use HS mode (High-speed Sync mode) of the compatible flash unit?
No, it is not corresponded. It is corresponded with as fast as 1/2500 second when you set P-TTL mode with the compatible flash unit.-
What is the program line?
When the exposure mode [P (Program AE)] is selected, the following three types of program lines can be selected to determine the exposure.
GR IIIx and GR III (with firmware version 1.50 or later)
*For GR III (firmware version 1.41 or earlier) versions, you can choose between "Normal" and "Open Priority".Normal The camera automatically selects the shutter speed and aperture value at which a standard exposure is obtained. Open priority The camera automatically selects an aperture value as wide open as possible (f/2.8) for a combination of exposure values that provides a standard exposure. Depth priority (deep) The camera automatically selects the exposure value with priority given to the aperture value "F11".
To update to the latest GR III firmware version, click here.
Playback Function
-
Specification of the Playback Function.
A: The main specification are as below.
*In the firmware version 1.50 or later of the GR IIIx and GR III, the monotone function is added to the JPEG image quality adjustment. The filter effect function and the color adjustment function when monotone is selected have been equipped.Playback View Single-images, Multi images (20, 48 frames), Display magnification (up to 16x, 100% view and Quick Zoom view available), Histogram (Y histogram, RGB histogram), Grid display (3x3 Grid, 4x4 Grid), Bright area warning and Auto Image Rotation Base Parameter Adjustment Brightness, Saturation, Hue, Contrast and Sharpness RAW Development Aspect Ratio, JPEG Recorded Pixels, Color Space, White Balance, Image Control, Peripheral Illumination Correction, Sensitivity, High-ISO Noise Reduction and Shadow Correction Edit Resize, Cropping, Level Adjustment, White Balance Adjustment, Color moiré Correction, Base Parameter Adjustment, Movie Edit (Cut) and Movie Edit (Divide)
To update to the latest GR III firmware version, click here.-
What kind of settings are possible at the Playback Setting menu.
Below settings are possible.
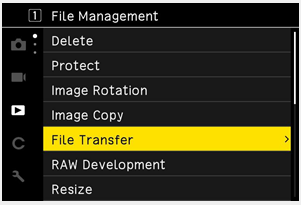
File Management
Delete Delete 1 Image, Delete Multiple Images and Delete All Images Protect Protect 1 Image, Protect Multiple Images and Protect All Images Image Rotation 90° to Left, 180°, and 90° to Right Image Copy You can copy the still images and movies stored in the Internal Memory to a memory card. File Transfer Transfer 1 image and Transfer Multiple images
Image Edit
For GR III firmware version 1.41 or earlier.
Please use the GR III with the latest firmware.RAW Development JPEG Recorded Pixels, Aspect Ratio, Color Space, White Balance, Image Control, Peripheral Illumination Correction, Sensitivity, High-ISO Noise Reduction and Shadow Correction. Specify the settings and save a new JPEG image. Resize JPEG files can be reduced in size. Cropping You can crop a part of JPEG images and then save the images. Levels Adjustment You can correct the brightness and contrast of the highlight, mid-tone and shadow areas in JPEG images WB Adjustment You can correct the white balance of JPEG Images Color Moiré Correction You can correct color moiré in images. Movie Edit (Cut) Saves a range specified with the starting and ending points as a new movie file Movie Edit (Divide) Divided a movie into two files at the specified division point and saves as new files. Base Parameter Adjustment You can adjust Brightness, Saturation, Hue, Contrast and Sharpness in JPEG images.
To update to the latest GR III firmware version, click here.
Image Edit
For GR IIIx and GR III firmware version 1.50 or later.
RAW Development JPEG Recorded Pixels, Aspect Ratio, Color Space, White Balance, Image Control, Peripheral Illumination Correction, Sensitivity, High-ISO Noise Reduction and Shadow Correction. Specify the settings and save a new JPEG image. Resize JPEG files can be reduced in size. Cropping You can crop a part of JPEG images and then save the images. Levels Adjustment You can correct the brightness and contrast of the highlight, mid-tone and shadow areas in JPEG images WB Adjustment You can correct the white balance of JPEG Images Color Moiré Correction You can correct color moiré in images. Movie Edit (Cut) Saves a range specified with the starting and ending points as a new movie file Movie Edit (Divide) Divided a movie into two files at the specified division point and saves as new files. Base Parameter Adjustment You can adjust the image quality and re-save the captured JPEG image by selecting color or monotone.
For color you can adjust Brightness, Saturation, Hue, Contrast and Sharpness in JPEG images.
For monotone, you can adjust brightness, filter effects, color toning, contrast, and sharpness.
Playback Settings
Auto Image Rotation On or Off Playback Order Option File No. or Shooting Date / Time. Playback Sound Volume Adjustable from 0 to 20 -
Developing RAW Images
You can convert RAW images into JPEG format and then save them as new files at the Playback mode. Select [RAW Development] in the 2 [Image Edit] mode and save them.
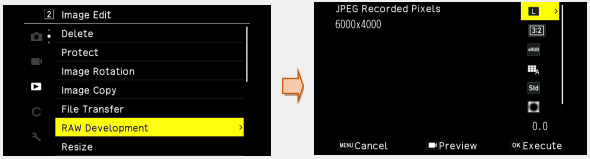
The following settings are available.
JPEG Recorded Pixels / Aspect Ratio / Color Space / White Balance / Image Control / Peripheral Illumination Correction / Sensitivity / High-ISO Noise Reduction / Shadow Correction
*The settings that were set at the time of shooting are initially selected.
You can select only the changeable settings.
Use to select a parameter.
The detailed setting screen appears when is pressed for [White Balance] or [Image Control].
The parameter setting screen reappears when [OK] button is pressed.
When you have finished configuring all of the settings, press [OK] button.
A new JPEG image is saved.-
Specification of LCD Monitor
The main specifications of the GR III and GR IIIx are as follows.
Type 3.0inch TFT color LCD (aspect ratio 3:2), Approx. 1037K dots, Wide viewing angle, Air-gapless tempered glass Touch Screen Capacitive sensing method Adjustments Brightness, Saturation, Blue/Amber, Green/Magenta, Outdoor Viewing setting: -2 to +2 -
What kind of operations can be done by the Touch Panel
For GR III (firmware version 1.30 or earlier)
You can perform operations such as selecting functions and setting the AF point for shooting
You can also pinch in and out during playback to change the magnification or flick to view the previous and next images.
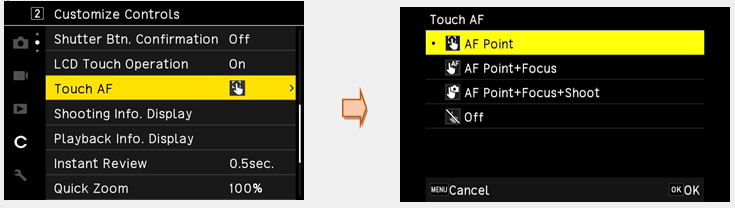
By default setting, only the AF point can be changed using the touch panel.
To perform autofocus and shooting using the touch panel, set [Touch AF] in the C 2 [Customize Control] menu.
Please use the GR III with the latest firmware.AF Point Sets the AF point to the touched pint. AF Point+AF Sets the AF point to the touched point and performs autofocus. AF Point+AF+Shoot Sets the AF point to the touched point, perform autofocus, and shoots. Off Does not use touch AF
To update to the latest GR III firmware version, click here.
For GR IIIx and GR III (firmware version 1.40 or later)
You can perform operations such as selecting functions and setting the AF point for shooting
You can also pinch in and out during playback to change the magnification or flick to view the previous and next images.
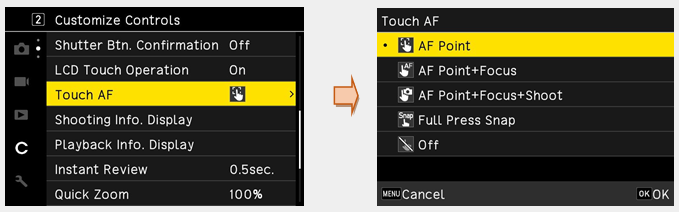
By default setting, only the AF point can be changed using the touch panel.
To perform autofocus and shooting using the touch panel, set [Touch AF] in the C 2 [Customize Control] menu.
AF Point Sets the AF point to the touched pint. AF Point+AF Sets the AF point to the touched point and performs autofocus. AF Point+AF+Shoot Sets the AF point to the touched point, perform autofocus, and shoots. Off Does not use touch AF
PC/Software
-
Which OS are confirmed function with USB(PC) connection.
Following OS are confirmed function.
*This is a confirmation of operation using the latest version of the camera.Windows® Windows® 10 (FCU / CU) (32bit / 64bit) / Windows®8.1(32bit / 64bit) Mac macOS 11 Bigsur / macOS v10.15 catalina / macOS v10.14 Mojave -
How to transfer images to PC?
Connect the camera to PC with the USB cable (I-USB166) that contained with camera.
1. Turn the camera off
2. Open the terminal cover of the camera, and connect the USB cable to the USB terminal.
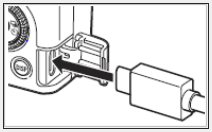
3. Connect the USB cable to the USB port of the computer.
The camera turns on and enters the playback mode.
The camera is recognizes as a device (RICOH GR III or RICOH GR IIIx) by the computer.
When a memory card is inserted, the files on the memory card are displayed.
When a memory card is not inserted, the files in the internal memory are displayed.
4. Copy the captured images to the computer.
5. Disconnect the camera from the computer when the copy is complete.
6. Remove the USB cable from the camera.
*You cannot delete or transfer images in the camera from computer.(Only copy)
Caution:
・Do not remove the USB cable while copying images.
・If the battery level is low, it may take some time until the camera is recognized by computer.
・The USB cable that contained with camera is not corresponded with the USB3.0.
(corresponded with USB2.0)-
Can this camera use as PC camera (web camera)?
No, it cannot.-
Is there any application software for PC included with the camera?
No, there is no application software is contained with the camera.
When developing RAW images, use in-camera RAW development with the DNG images taken with the GR III or GR IIIx stored in the [***RICIOH] folder in the [DCIM] folder of the SD card or use commercially available PC software for RAW development that supports DNG format.
*The *** in "***RICOH" is a three-digit number.-
Can image display with connecting AV device?
Yes. Connect the camera to an AV device such as TVs that equipped with HDMI terminal to display Live View images while shooting or to play back images in Playback mode.
・The USB terminal (Type-C) on this camera supports [DisplayPort Alternate Mode].
When displaying images on AV device that supports [DisplayPort Alternate Mode], please use USB3.1 Type C ⇔ USB3.1 Type C cable.
* The included USB cable is not compatible with USB 3.1. (This cable is compatible with USB 2.0.)
・When displaying images on AV device that support HDMI, please use commercially available HDMI cable that support USB Type C ⇔ HDMI conversion adapter.
Note:
・LCD monitor does not display while connecting with AV device.
You cannot adjust the volume with the camera. Please adjust the volume on AV device side.
・It does not guarantee connection with all AV device.
・Some HDMI conversion adapter may not be usable.
Below HDMI conversion adapters are confirmed operation.
・Model number:AK-A83120A1 (Made by Anker)
・Model number:AK-A8306041 / AK-A83060A1 (Made by Anker)
・Depending on compatibility with the HDMI cable, image may not be output.
Memo:
・Please check the operation manual of your AV device and select the video input terminal to connect the camera.
・For output method, the maximum size is automatically selected that corresponding to AV device and camera.
・It corresponds to resolution of 1080p, 1080i, 720p and 480p. It does not correspond to 640x480.
Communication device connection
-
Can I connect to a communication device and operate the camera from the communication device or import images from the camera?
You can connect the camera to the communication device via Bluetooth® or wireless LAN, and use the dedicated application [Image Sync] to operate the camera from the communication device or import images in the camera
Camera and function of the connection method and Image Sync of the communication device, please refer to the following address
https://www.ricoh-imaging.co.jp/english/products/app/image-sync2/
Memo:
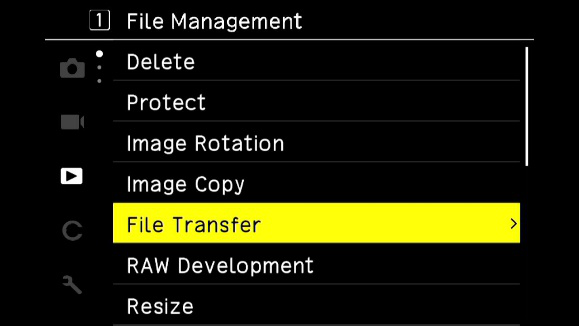
・The captured image is transferred to the communication device by specifying the image in the 1
[File Management] menu, [File Transfer].
1
[File Management] menu, [File Transfer].
・The captured images can also be automatically reserved transfer in the Setup 6 [Wireless Connection] menu [Auto Image Transfer].
Reserved transfer images are transferred when connecting to a wireless LAN by starting the [Image Sync]

・You can use [Image Sync] to switch between Bluetooth® connection and wireless LAN connection.
・When using it on a communication device, please refer to the instruction manual for your device and the camera, and homepage of the [Image Sync].
Caution:
・Bluetooth® is disabled in the following situations.
AV device connected
・Wireless LAN is invalid in the following cases
Movie mode
USB connected
AV device connected
・If the communication device is iOS, you need to connect [Image Sync] first.
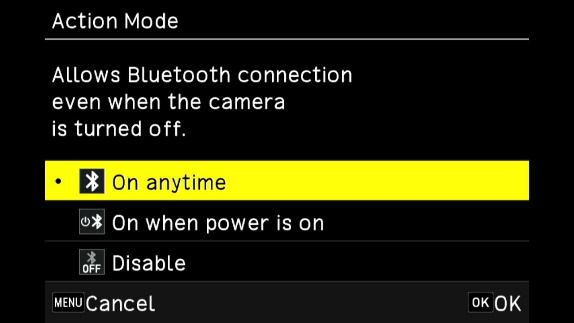
・When [On anytime] is set in the Action Mode of Bluetooth setting, please be careful as it transmits Bluetooth radio waves even when the power of the camera is off.
-
What kind of operation can be done with the communication device?
Connect this GRlll to a communication device via Bluetooth® or wireless LAN, and use the dedicated application [Image Sync] to use the following functions.
・The [Image Sync] is compatible with iOS and Android™. Download from the App Store or Google Play™. Please refer to the download site for details such as supported OS.Remote shooting Display the shooting screen of the camera on the Communication device and operate the communication device to set the exposure and shoot. Image browsing You can display the image stored in the camera on the communication device and import the image. Date & time synchronization Correct date and time of the camera in synchronization with the date and time setting on the communication device.
Memo:
・For the connection method of the camera and the communication device and the function of the [image Sync], refer to the following address.
https://www.ricoh-imaging.co.jp/english/products/app/image-sync2/
・You can operate the camera and adjust time of the camera from the [Image Sync] installed on the communication device.
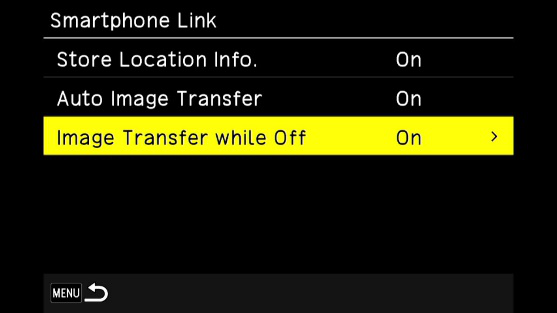
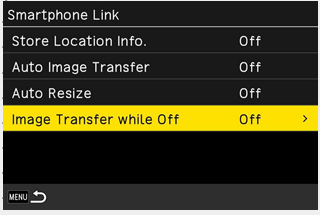
・The following settings can be made at the Setup menu 6 , [Wireless Connection] and [Smartphone Link]
Store Location Info. The location information of the communication device is recorded in the image Auto Image Transfer The captured image is automatically reserved for transfer. Image Transfer while Off Set whether to continue the transfer if the camera is turned off during image transfer.
・When connected to the communication device via Bluetooth®, the wireless LAN is automatically switched on according to the situation.
Print Connection
-
Does the camera support the "PRINT Image Matching III"?
Yes, it does.-
Does the camera support the [PictBridge]?
No, it doesn’t.
Communication device connection
-
Is it possible to connect to a communication device and control the camera or import images from the
device?
By connecting the camera to a communication device via Bluetooth® or wireless LAN, you can control the camera from the communication device using the dedicated application Image Sync, and import images from the camera.
For details on how to connect the camera to the communication device and the functions of Image Sync, please refer to the following address (link).
https://www.ricoh-imaging.co.jp/english/products/app/image-sync2/
Memo:
・The captured images will be transferred to the communication terminal by specifying the images in the 1 File Operation Menu [Transfer].
・You can also reserve automatic transfer of captured images using [Auto Image Transfer] on the Setup menu 6 wireless communication menu.
The images reserved for transfer will be transferred when ImageSync is started and connected to a wireless LAN.
LCD screen of the GR III (firmware version 1.41 or earlier)

Please use the GR III with the latest firmware.
To update to the latest GR III firmware version, click here.
LCD screen of GR IIIx and GR III (firmware version 1.50 or later)
・You can switch between Bluetooth® connection and wireless LAN connection by operating Image Sync.
・For the GR IIIx and GR III (firmware version 1.50 or later), when using Image Sync (version 2.1.8 or later), the Auto Resize (XS size) transfer function has been added.
・When using the camera with a communication device, please refer to your device's user manual, the Image Sync website, and the camera's user manual.
Note:
・In the following cases, wireless LAN is disabled.
Movie mode
During USB connection
・If your communication device is iOS, you will need to connect via Image Sync.
・If you set [Connect even when power is off] in the operation mode of the Bluetooth setting, please note that the Bluetooth signal is transmitted even when the camera is turned off.

-
What are some of the operations that can be done with a communication device?
The following functions are available by connecting the camera to a communication device via Bluetooth® or wireless LAN and using the dedicated application "Image Sync".
Remote shooting The camera's shooting screen is displayed on the communication device, and exposure settings and shooting can be performed by operating the communication device. Image viewing Images stored in the camera can be displayed on the communication device and images can be imported. Date/Time Synchronization Modify the camera's date and time by synchronizing it with the date and time settings of the communication device.
・Image Sync is available for iOS and Android™. Download it from the App Store or Google Play™.
For details on supported OS, please refer to the download site.
Memo:
・For information on how to connect the camera to the communication terminal and the Image Sync function, please refer to the following address.
https://www.ricoh-imaging.co.jp/english/products/app/image-sync2/
・You can control the camera and set the camera's time from Image Sync installed on the communication terminal.
・The following settings can be made in the set up 6 Wireless Communication menu [Smart Phone Link Function].
For GR III (firmware version 1.40 or earlier)
Recording location information The location information of the communication device is recorded in the image. Auto Image Transfer The images you have taken will be automatically reserved for transfer. Image transfer when power is off Sets whether or not to continue transferring images when the camera is turned off during image transfer.
Please use the GR III with the latest firmware.
To update to the latest GR III firmware version, click here.
For GR IIIx and GR III (firmware version 1.50 or later)
Recording location information The location information of the communication device is recorded in the image. Auto Image Transfer The images you have taken will be automatically reserved for transfer. Image transfer when power is off Sets whether or not to continue transferring images when the camera is turned off during image transfer. Auto resize When transferring an image, the image is automatically resized to XS size.
・When connected to a communication device via Bluetooth® , the wireless LAN is automatically turned on and off according to the situation.
Others
-
Can I use a cable switch to take pictures?
Yes. It can be used optional cable switch CA-3 with using included accessories USB cable I-USB166 (Length 65cm). It is capable with B(Bulb) and T(Time) exposure.
・When you want to take a more longer shooting distance, please purchase a commercially available USB cable (Type C ⇔ Type A).-
Can I install a filter (general-purpose product)?
Yes. It can be used 49mm common filter with attaching optional lens adapter GA-1 / GA-2.
・Lens adapter GA-1 : For GR III
・Lens adapter GA-2 : For GR IIIx-
Please tell me about the wide conversion lens (GW-4).
The GW-4 is a dedicated wide conversion lens for the GR III.
It cannot be used with the GR IIIx.
To be used with optional lens adapter (GA-1).
・Remove Ring cap GN-1 when attaching Lens adapter GA-1.
・The Lens adapter GA-1 is required. GW-4 cannot attach to camera directly.
・It is recognized automatically when Wide Conversion lens GW-4 is attached.
Please confirm that [WIDE] is displayed on LCD monitor.
・The filter diameter of the wide conversion lens (GW-4) is 72mm.
・The wide conversion lens (GW-4) comes with a dedicated rubber hood.
・Wide Conversion Lens (GW-1), (GW-2) and (GW-3) are not compatible with the GR III and GR IIIx.
・The lens adapter (GA-1) is designed for use with the GR III only and cannot be used with the GR IIIx.-
Please tell me about the tele conversion lens (GT-2).
The GT-2 is a dedicated tele conversion lens for the GR IIIx.
It cannot be used with the GR III.
To be used with optional lens adapter (GA-2).
・Remove Ring cap GN-2 when attaching Lens adapter GA-2.
・The Lens adapter GA-2 is required. GT-2 cannot attach to camera directly.
・It is recognized automatically when tele conversion lens GT-2 is attached.
Please confirm that [TELE] is displayed on LCD monitor.
Also, when the tele conversion lens (GT-2) is attached, the camera automatically switches to a 50mm crop.
・The angle of view when the lens is mounted is equivalent to 75mm in 35mm film format.
When crop to 71mm, the angle of view is equivalent to 107mm in 35mm film format figures.
・When the tele conversion lens (GT-2) is attached, the crop cannot be switched off.
・The filter diameter of the tele conversion lens (GT-2) is 62mm.
・The tele conversion lens (GT-1) cannot be used with the GR III.
・The lens adapter (GA-2) is designed for use with the GR IIIx only and cannot be used with the GR III.-
Is the included warranty valid overseas?
The attached warranty card is valid only in Japan.-
What new functions have been added to the firmware upgrade of the GR III?
Please refer to the firmware update page for information on enhancements. Click here-
How do I update the firmware on my GR III?
The Firmware Update page provides detailed information on how to update the firmware. Click here