
![]()

How to optimize focusing accuracy with large-aperture lenses
One of the top advantages of digital SLR photography is the unlimited creativity that an array of interchangeable lenses provides.
Large-aperture lenses with a large open aperture (in other words, those with a smaller F number) not only provide superb imaging power, but also create a shallow depth of field, making the subject stand out from the background. In autofocus (AF) mode, however, they demand pinpoint focus on the subject because the in-focus area is very narrow.
On this page, you will learn the functions and settings that will help you greatly in those picture-taking situations where pinpoint focusing accuracy is crucial.
Table of contents
- How to select the in-focus point with large-aperture lenses
- How to make minute focus adjustment in AF mode to bring out the optimum performance of both camera and lens
(1) How to select the in-focus point with large-aperture lenses
Choose a focus point with the narrowest in-focus area
When you have a desired focus point in the image field, choose an AF setting with the narrowest in-focus area. For instance, when you set the AF mode to AF.S (Single), you have a choice of Auto, Zone Select, Select and Spot settings (in order from widest to narrowest areas).
(Reference: PENTAX K-1 Mark II’s status screen)
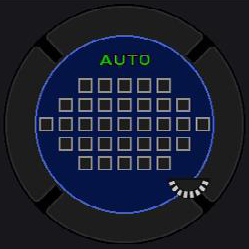
Auto
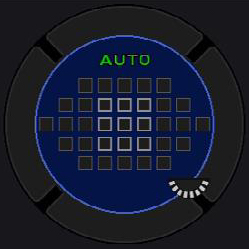
Zone Select
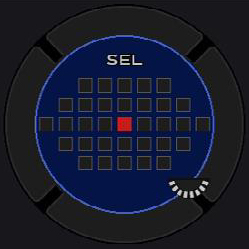
Select
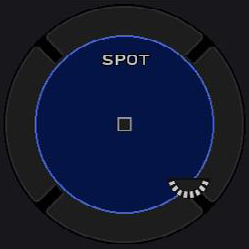
Spot
With the exception of flat subjects such as walls and paintings, most subjects are three-dimensional objects with a certain depth.
If you select an AF setting with a wider in-focus area, the in-focus point may become unsteady because the AF sensor point slightly fluctuates from image to image.
Highlight: The advantage of Spot setting in AF mode
The Spot setting is an autofocus mode that detects the in-focus point using a single AF sensor positioned at the center of the image field.
For PENTAX digital SLR cameras marketed after the PENTAX K-3, the Spot setting detects an area approximately 30 percent narrower than that of the Select setting, which uses a set of middle AF sensors in autofocus operation.
Make good use of the middle AF sensors
Due to the characteristics of phase-detection AF sensors, the middle focus points tend to have better focusing accuracy than the peripheral ones.
AF Point Layout
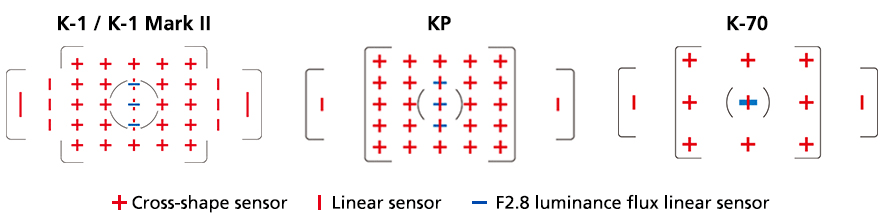
Cross sensor
Positioned in the middle of the finder, this sensor consists of a pair of line sensors aligned in the shape of a cross. The horizontal sensor detects the focusing status of horizontal lines, while the vertical sensor detects that of vertical lines.
Line sensor
Positioned on both ends of the finder, this sensor detects horizontal lines.
Since cross sensors have superior focusing accuracy because of their ability to detect both horizontal and vertical lines, you should prioritize them when pinpoint focus is crucial.
Also, since the middle sensors of the finder are designed to detect an F2.8 light flux with greater accuracy, you can optimize focusing accuracy when using a large-aperture lens, which demands pinpoint focus on the intended spot due to its shallow depth of field. (When a lens with an open aperture slower than F2.8 is mounted on the camera, these sensors function as ordinary cross sensors.)
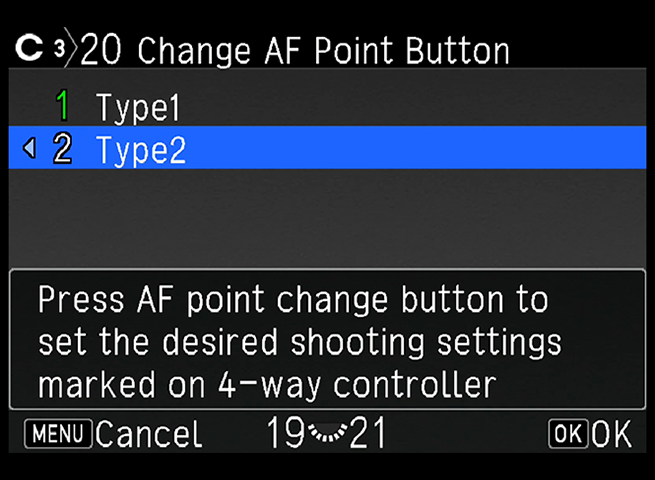
Technical pointer: How to speedily shift the focus point
With PENTAX digital SLR cameras, the default setting of the four-way controller is Direct mode, which provides a selection of white balance value and drive mode. Through pushbutton operation, you can switch the controller function to focus point shift mode.
By changing the setting to Type 2 on the Custom Menu (No. 20 Focus Point Shift Button Operation for the PENTAX K-1 and K-1 Mark II; and No. 18 Four-way Controller Function for the PENTAX KP and K-70), you can prioritize focus point shift mode. Because this lets you shift the focus point with a single action, it is useful in situations where frequent focus point shifts are required.
(Shown: PENTAX KP menu screen)
(2) Making minute focus adjustment in AF mode for the optimum performance of camera and lens
Even if the product passes quality standards when it’s shipped from the factory, it may be necessary to later optimize focusing accuracy due to factors encountered in your photography, such as the subject type, your demand for pinpoint focus, or the characteristics of the lens being used.
To accommodate for such factors, PENTAX digital SLR cameras feature an AF Fine Adjustment function, which lets you set random values on your camera and use them as revised AF values during shooting.
Setting the AF Fine Adjustment function
Items required:
- Camera, lens and subject
Subjects suitable for AF Fine Adjustment function:
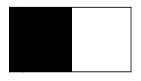
- A flat chart with vivid black-and-white pattern
- Example: Place a target chart like the one below square to the camera’s optical path.
Subjects not suitable for AF Fine Adjustment function:
- Subjects with depth, such as a keyboard, which usually are photographed diagonally
- Spherical objects, which cause the phase-detection AF sensor to shift the in-focus point from image to image
Required camera settings:
In the AF Fine Adjustment function, the AF-related camera settings must be set as follows:
| Setting | Operation | |
|---|---|---|
| 1 | Distance to the subject | As a rule of thumb, we advise you to position the subject at a distance 30 to 40 times the lens’s focal length. Example: For a 50mm lens, set the distance to two meters (40 times the focal length). |
| 2 | Zoom position | When making the adjustments on a zoom lens, we advise you to shift the lens to its telephoto end, because the shallow depth of field at this end makes it easier to detect the in-focus point. |
| 3 | Focus mode setting | Use the middle area of the image field: set to Select setting in AF.S mode, or shift the focus point to the desired spot. |
| 4 | Light source | We advise you to make adjustments in a sunny outdoor location, or under the same conditions as the actual shooting location. Be careful to ensure that direct sunlight doesn’t cause reflections on the target chart. |
| 5 | Subject position | Place the target chart square to the camera’s optical path. |
| 6 | Aperture setting | We advise you to turn the lens’s aperture ring to open aperture position, because the shallow depth of field at this end makes it easier to detect the in-focus point. |
AF Fine Adjustment function: how to judge slightly front-focus and rear-focus situations
- Place an object in front of the target chart, and judge the out-of-focus condition.
- Place a sheet of newspaper on the same plane as the target chart, and judge the blurring condition.
- Bring the subject into focus using the camera’s phase-detection AF system.
- Activate the camera’s Live-view function.
- Turn the focus ring slowly while observing the Live-view image.
- Example: If the subject comes in focus when you turn the focus ring toward the infinity side, this suggests a front-focus situation. If it becomes more blurred, this suggests a back-focus situation.
Based on the captured images, you should make the following adjustments:
(Reference: PENTAX K-1 Mark II menu screen)

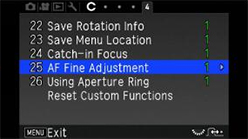
Select the AF Fine Adjustment function. Then, press the right key of the four-way controller to display the mode setting menu as below.
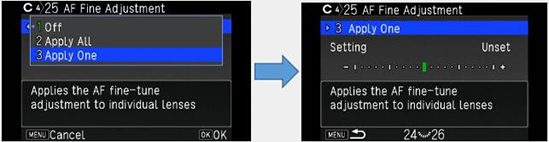
Selection of whole or individual mode
| All | The same revised values are applied to all lenses. |
| One | The revised values are set only for the currently mounted lens (up to 20 settings). |
Conduct test shooting with the currently mounted lens. If you find any discrepancies in focusing, make the following adjustments:
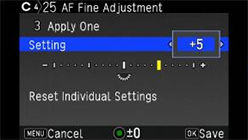
Rear-focus situation: Shift the bar-graph value toward the plus (+) side.
Front-focus situation: Shift the bar-graph value toward the minus (–) side.
Press the OK button to confirm the revised values.
After the adjustments have been made, press the MENU button to return to the shooting menu screen.
By repeating the test shooting and adjustment operations described above, you can shift the focus point to the desired position.
These focus adjustment steps are also effective as your camera’s AF focusing accuracy deteriorates after years of use.
Please take special notice when you find the following tendencies after making AF fine adjustments:
- Many of your lenses demonstrate the identical tendencies and require similar adjustments toward the plus or minus side.
- Pinpoint focusing accuracy cannot be obtained even after you have made the AF fine adjustments.
When these conditions occur, please contact our repair service center.
We have more tricks for you to help deal with certain subjects and photographic situations in autofocus photography. We’ll be sharing these useful pointers with you in upcoming additions to this section.
next >