
PENTAX K-70
Below is a list of frequently asked questions and corresponding answers for the PENTAX K-70 digital camera.
Basic Specifications and Functions
 What are the main features of this product?
There are following features for K-70
* APS-C size CMOS image sensor with 24.24 effective megapixels
The AA-filter-free design optimizes the resolving power of the approximately 24.24 effective megapixels provided by the high-resolution APS-C size CMOS image sensor, while assuring high-speed readout of rich-gradation, 14-bit image data.
*Top sensitivity of ISO 102400
By coupling a newly developed accelerator unit with the high-speed PRIME MII imaging engine, it effectively minimizes noise at all sensitivity levels, and captures rich-gradation, fine-detailed images even in super-high-sensitivity shooting at a top sensitivity of ISO 102400.
*Hybrid AF system
Combination of the phase-matching AF and contrast detection AF works as high-speed AF operation during Live View shooting.
*Dustproof and weather-resistant body for rugged outdoor photography
It combines a compact, easy-to-carry body with a dustproof, weather-resistant construction with 100 sealing parts and outstanding cold-proof performance at temperatures down to -10°C.
*In-body SR mechanism (shake-reduction)
This built-in body SR mechanism provides a compensation effect of 4.5 shutter steps and also corresponded with the panning shot as automatically detects the direction of the camera’s movement and efficiently controls the SR unit to produce the best possible image.
*Pixel Shift Resolution System with motion correction function
This system optimizes the potential of the high-pixel image sensor which has truthful colors and fine details. It is also equipped ON/OFF function of Motion Correction function to minimizes negative effects of moving object during continuous shooting.
• When using this system, we advise stabilizing the camera firmly on a tripod. The user is also advised to use either the self-timer setting of the drive mode, a remote control function, or a mirror lock-up function.
• This system may not correct certain types of subject movement. It does not guarantee that the movement is properly corrected with all subjects.
* AA (anti-aliasing) filter simulator
This simulator provides the same level of moiré reduction as an optical AA filter.
• This simulator works most effectively with a shutter speed of 1/1000 second or slower.
*Evolutional Full HD movie function
During movie recording, you can also use the Continuous AF (AF-C) mode* to keep accurate focus on a moving subject, or take advantage of a new aperture control function** to automatically assure the proper exposure level even when faced with fluctuating lighting conditions.
* The lenses compatible with the AF-C mode are;
smc PENTAX-DA 18-135mmF3.5-5.6ED AL[IF] DC WR
HD PENTAX-DA 55-300mm F4.5-6.3ED PLM WR RE
HD PENTAX-DA 16-85mmF3.5-5.6ED DC WR
smc PENTAX-DA L 18-50mm F4-5.6 DC WR RE
HD PENTAX-DA 18-50mmF4-5.6 DC WR RE
HD PENTAX-DA 20-40mmF2.8-4ED Limited DC WR
HD PENTAX-D FA 28-105mmF3.5-5.6ED DC WR
HD PENTAX-D FA*70-200mmF2.8ED DC AW
HD PENTAX-D FA 150-450mmF4.5-5.6ED DC AW
HD PENTAX-DA 560mmF5.6ED AW
** The aperture control function is available only in combination with the HD PENTAX-DA 55-300mm F4.5-6.3ED PLM WR RE lens
*Vari-angle LCD monitor for easy image viewing from all angles
Since the vari-angle LCD monitor allows for the positioning of the monitor at any desired angle, it makes it easier to compose the image in a wide variety of applications, such as high-angle shooting using stretched arms or low-angle shots taken from ground level.
*Personalizing your camera with favorite settings
You can customize the operation by assigning the desired functions to the set of buttons, including the Fx1 and Fx2 buttons, and the three USER Mode positions of the Mode dial. It also provides a choice of menu items and the order of their listing displayed on the control panel.
The following camera settings are initially assigned to the USER Modes as default.
U1: “CLEAR TONE”, U2: “HDR LANDSCAPE”, U3: “ASTROPHOTO”
*For easy transfer of captured images to a Smartphone
It provides a set of wireless LAN (Wi-Fi) functions to support operations using mobile devices such as Smartphone and tablet computers.-
What is included in the K-70 kit?
The K-70 includes the following:
Items marked with a (*) can also be purchased separately.- Hot shoe cover FK(*) - Eyecup FR(*) - Body mount cover - Strap O-ST132(*) - Software (CD-ROM) S-SW168 - Start Guide - Rechargeable lithium-ion battery D-LI109(*) - Battery charger D-BC109(*) - AC plug cord D-CO2(J) -
Are there any other necessary items that are not included in the kit?
The kit does not come with an SD Memory Card, so please prepare an SD Memory Card with the necessary capacity.
You can connect the camera to a TV or other device and display the Live View image or play back captured images on the monitor by using the commercially available HDMI cable (typeD).
*There is no display will come up on the camera when the camera is connected with a AV device.
Make sure to have a commercially available USB cable equipped with a micro B terminal if planning to connect the camera to a computer.
*You cannot operate the camera while it is connected with a computer.-
What optional accessories are available for this camera?
Available optional accessories are as follows:
- Cable Switch CS-310
- GPS Unit O-GPS1
- Hot Shoe Cover FK
- Eyecup FR
- ME Viewfinder Cap
- Strap O-ST132
- Rechargeable Lithium-ion Battery D-LI109
- Battery Charger Kit K-BC109 (includes the Battery Charger D-BC109 and an AC plug cord)
- Body Mount Cap K
*The included body mount cover is not available as an optional accessory.
- AC Adapter Kit K-AC168(J)
- Hand Strap O-ST128
- Magnifying Eyecup O-ME53
- Remote Control F
- Remote Control Waterproof O-RC1
-
What display languages are available for text and messages on the LCD monitor?
There are 20 display languages available, Japanese, English, French, German, Spanish, Portuguese, Italian, Dutch, Danish, Swedish, Finnish, Polish, Czech, Hungarian, Turkish, Greek, Russian, Korean, Simplified Chinese, Chinese Traditional.-
What is the exterior of the camera made of?
The camera has an engineering plastic exterior.-
Is the K-70 designed to be water-resistant/dust-proof?
Yes. There are about 100 different sealing components used in the dials, buttons, joints and retractable parts of the camera, making it both dust-proof and water-resistant.
*For best protection against water or dust, use the camera with the Hot Shoe Cover FK, the Sync Socket 2P Cap and the Battery Grip Contact Cover attached.-
If the water resists lens set with K-70, is it used in the rain?
When an AW- or WR-series lens* is mounted, the K-70 and its lens forms a remarkable digital imaging system totally resistant to demanding environmental factors.
However, it is not recommended to use these units in the rain for long time. When you are going to shoot in the rain continuously, it is recommended to use with rain cover etc.
*AW: All Weather, WR: Water Resistant
*A sealing is being also done around the joint and the operating parts, but when it's left while getting wet, there is a possibility to flood gradually. So if it is got wet, a drop of water will be wiped up briskly. About the lens, it is also recommend operating a zooming etc. after a drop of water is wiped up.-
Does the K-70 have any features that help prevent dust from collecting on the image sensor?
Yes. The SP coating on the image sensor helps prevent dust from collecting on the image sensor. Furthermore, DR (the Dust Removal mechanism: activate image sensor) removes dust from the sensor unit.-
Where is the audio microphone located?
The microphone is located at both side of the top cover.
Addition to this, it is equipped a terminal for external microphone, so that you can reduce operation noise during recording if you connect commercially available stereo microphone with it.
The following specifications are recommended for external microphones.
Plug Stereo mini plug (Φ3.5mm) Format Stereo electrets condenser Power Plug-in Power Method (operating voltage of 2.0V or lower.) Impedance 2.2kΩ 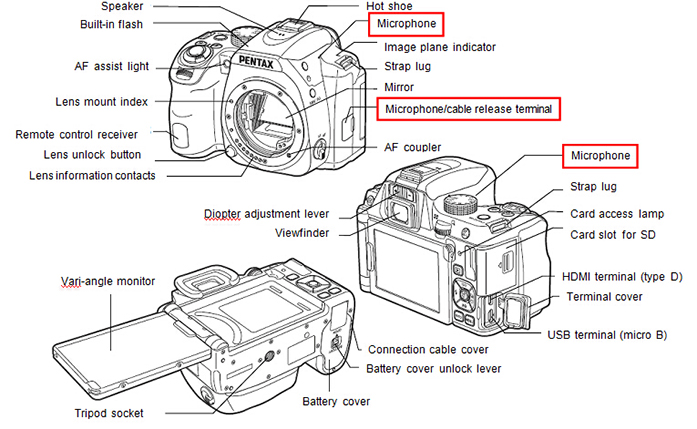
-
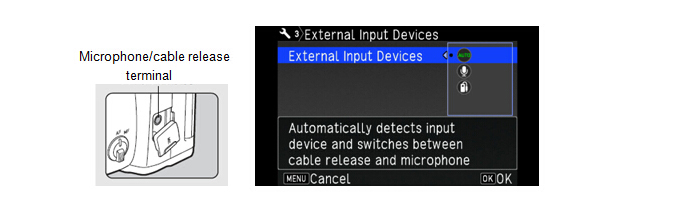
Can I use the Cable Switch with this camera?
Yes, you can connect the optional Cable Switch CS-310 to the microphone/cable release terminal on the camera. When the cable release is connected, sounds are recorded with the built-in microphone.
You can set the device to connect in [External Input Devices] of the Setting 3 menu. Normally, you do not need to change the default setting ([Auto Select]).
Viewfinder / LCD Monitor / Related Auto Focus
-
Specification for the viewfinder?
The specifications of the viewfinder are as follows.
Type Pentaprism Finder. Coverage (FOV) Approx. 100% Magnification Approx. 0.95x (50mmF1.4 at infinity) Eye-Relief Length Approx. 20.5mm (From the view finder frame.)
Approx. 22.3mm (From the center of lens.)Diopter adjustment Approx. -2.5 to +1.5m -1 Focusing screen User changeable Natural- Bright- Matte III focusing screen -
Is the focusing screen changeable?
Yes, in addition to the standard AF Frame Matte MF-60 attached to the camera, the AF Divided Matte ML-60, AF Scale Matte MI-60 and Plain Matte ME-60 are also available.-
Is there the Superimpose available?
Yes, displays the active AF point in red in the viewfinder.-
Specification for the LCD monitor?
The specification of the LCD monitor is as follows.
Type Wide viewing angle, TFT color LCD, Air-gapless, Tempered glass, Vari-Angle Size 3.0 inch (aspect ratio 3:2) Dots Approx. 921K dots. Adjustment Brightness, Saturation and Colors adjustment. Outdoor monitor ±2 step adjustment. Night Vision
Red Light
LCD DisplaySelect ON/OFF at [Setting 2] menu -
Characteristic of Outdoor View Setting
Brightness level can be instantly adjusted to the lighting level of a shooting location, it also features a red-lighted monitor display function, which works friendly to the photographer’s eye when it has become accustomed to a dark location during astronomical photography.
-
Specification for the Auto Focus system
The specification of AF System shooting with Viewfinder:
In [Hold AF Status], you can set whether to immediately reactivate autofocus or to maintain the focus for a certain amount of time before reactivating autofocus when the subject happens to move out of the selected focusing area after being focused, default setting is [Low].Type TTL Phase-matching autofocus Focus Sensor SAFOX X, 11 points (9 cross type focus points in the center) AF Mode AF.A / AF.S /AF.C AF Active Area 
Brightness Range EV-3 - EV18 (ISO100, at normal temperature) AF.S Setting Focus- Priority / Release- Priority 1st Frame Action in AF.C Auto / Focus- Priority / Release- Priority Action in AF.C Cont. Auto / Focus- Priority / fps- Priority Hold AF Status Off / Low / Medium / High AF Assist Light Dedicated LED AF assist light
The specification of AF System shooting with Live View
When [Focus Peaking] is set to [On], the outline of the subject in focus is emphasized, and this makes it easier to check the focus. This function works in both AF and MF modes.Type Hybrid AF *1 = TTL Phase–matching AF + Contrast-detecting AF AF Active Area Face detection / Tracking / Auto / Select / Spot Focus Peaking On / Off
*1 To assimilate a contrast-detection AF sensor with superior focusing accuracy and a phase-matching AF sensor positioned on the image sensor’s surface, this innovative hybrid system optimizes the benefits of both AF systems to assure high-speed, pinpoint AF focusing on the subject.-
How to set the AF Fine Adjustment?
You can set AF Fine Adjustment as the procedures below.
■Setting procedures of AF Fine Adjustment
1. Preparation
Camera, Lens, Object(Chart)*
*As below sample, prepare the flat chart which has a clear contrast of black and white and place it to parallel with the camera.

Caution: Following object and method of capturing are not suitable for AF Fine Adjustment.
・Capture the object which has depth such as keyboard diagonally.
・The spherical object which will easily changes the focus point.
2. Setting of the camera
Items Contents 1 Distance As a guide, set the chart from camera about 30 to 40 times of focal length. (Ex.) f=50mm x40 =2m(2000mm) 2 Zoom Position
*in case of Zoom lensRecommended telephoto end which has narrower depth of field and easy to find focus point. 3 Focus point Set the center of SEL with AF.S mode or user’s favorite focus point. 4 Light source Outdoor with sunlight or same as actual capture condition. Observe not to reflect any direct light on the target chart. 5 Condition of the object Set the target chart to parallel with the camera. 6 Diaphragm Recommended fully opened aperture which has narrower depth of field and easy to find focus point.
3. Method of AF Fine adjustment (Judgment of Front Focus or Back Focus)
1. Capture the object in front of the target chart, then judge the Front or Back Focus.
2. Capture the newspaper or etc. set at same distance with the target chart and see focus condition.
3. Use [Phase Matching AF] for focusing.
Press [LV] button to set Live View node.
While watching the expanded image of LCD, turn the distance ring of the lens slowly to judge.
(Ex.) If the target in focus when you turn the distance ring toward the infinity, then it will be [Front focus], if it is out of focus, then it will be [Back focus].
According to the result of above captured image, proceed below adjustment.
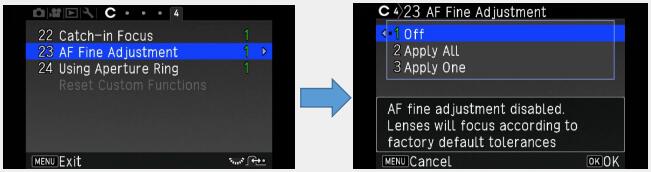
Select AF Fine Adjustment of Custom Menu 4, press right key, the Setting Menu will be appeared.
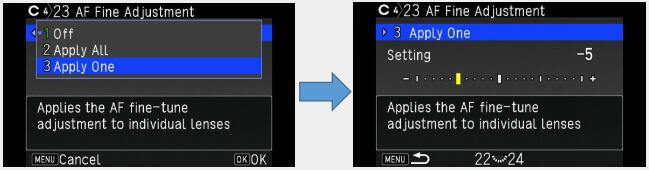
Select [2 Apply All] or [3 Apply One]
Apply All Apply adjusted value for all lenses Apply One Apply adjusted value only for attached lens(Max. 20 kinds of lenses)
If there are constant declination of focus point, apply below adjustment.
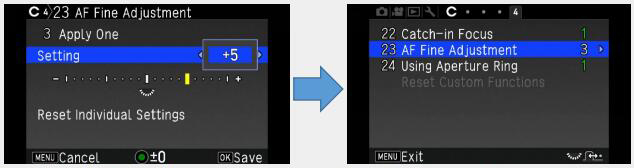
Back Focus…Adjust toward [+] side
Front Focus…Adjust toward [-] side
Press OK button to fix the adjustment valuePress Menu button to return Capture mode
Shake Reduction Mechanism
-
Method and performance of Shake Reduction Mechanism
The built-in PENTAX-original SR (Shake Reduction) mechanism, the PENTAX K-70 effectively minimizes camera shake and delivers sharp, blur-free images, even in camera-shake-prone conditions such as when using a telephoto lens, shooting low-light scenes with incident light only, or photographing sunset scenes. Using a high-accuracy gyro sensor, it provides compensation effect of 4.5 shutter steps*. When taking a panning shot, this mechanism automatically detects the direction of the camera’s movement, and efficiently controls the SR unit to produce the best image possible without requiring any mode switching.
*Measured in conformity to CIPA standards, using a smc PENTAX-DA 18-135mm F3.5-5.6ED AL[IF] DC WR lens at a focal length of 135mm.-
Will the Shake Reduction (SR) function work with other manufacturer’s lenses?
The Shake Reduction mechanism will function even when lenses made by other manufacturers are used, but the effectiveness of the results cannot be guaranteed.
*Malfunctions and such resulting from the use of lenses made by other manufacturers are not applicable for warranty repair service even if they occur during the applicable warranty period.-
Are there any lenses that the Shake Reduction (SR) function cannot be used with?
No. This function can be used with all lenses that can be attached to the camera.
*When a DA, DA L, D FA, FA, FA J or F lens is used, information such as focal length is obtained automatically when the Shake Reduction function is used.
When information such as focal length cannot be obtained by lenses other than those mentioned above, the [Input Focal Length] setting screen will appear when the camera is turned on. Set the focal length of the lens.
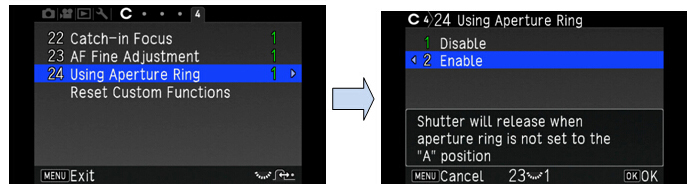
*When a lens without an A position is used or the aperture ring is set to a setting other than the A position, set [24 Using Aperture Ring] to [2 Enable] in the [Custom 4] menu.
Movies
-
What are the specifications for movie recording?
The main specifications of movie recording are as follows.
*When recording a movie with sound, camera operation sounds are also recorded.File Format MPEG-4, AVC / H.264 (MOV) Recorded Pixels Full HD: (1920x1080, 60i / 50i / 30p / 25p / 24p)
HD: (1280x720, 60p / 50p)Focus Hybrid AF with TTL Phase–matching AF and Contrast-detecting AF,
AF Mode: AF Single(AF.S), AF Continuous(AF.C)
AF Area: Multiple AF points, Select, Spot
Focus Assist Light: ON /OFFSound Built-in stereo microphone, External microphone (Stereo recording compatible). Recording Sound Level adjustable. Recording Time Up to 25 minutes or 4GB; automatically stops recording if the internal temperature of the camera becomes high. Custom Images Auto select, Bright, Natural, Portrait, Landscape, Vibrant, Radiant, Muted, Flat, Bleach Bypass, Reversal Film, Monochrome, Cross Processing Cross Processing Random, Preset 1-3, Favorite 1-3. Digital Filter Extract Color, Replace color, Toy Camera, Retro, High Contrast, Shading, Invert Color, Unicolor Bold, Bold Monochrome
*When recording a movie with an image processing function such as Digital Filter applied, the movie file may be saved with some frames omitted.
*If the internal temperature of the camera becomes high during recording, recording may be terminated to protect the camera circuitry.
*When a retractable lens is attached, recording stops if the lens is retracted during recording and an error message is displayed.
*In a Movie mode, the Wi-Fi function is disabled.-
Does the autofocus system operate while movies are being recording?
In the default setting, the auto focus does not work even if pressed the shutter button half way during the movie recording.
In the AF-S setting of the AF mode, the user can activate the AF system by pressing the AF button.
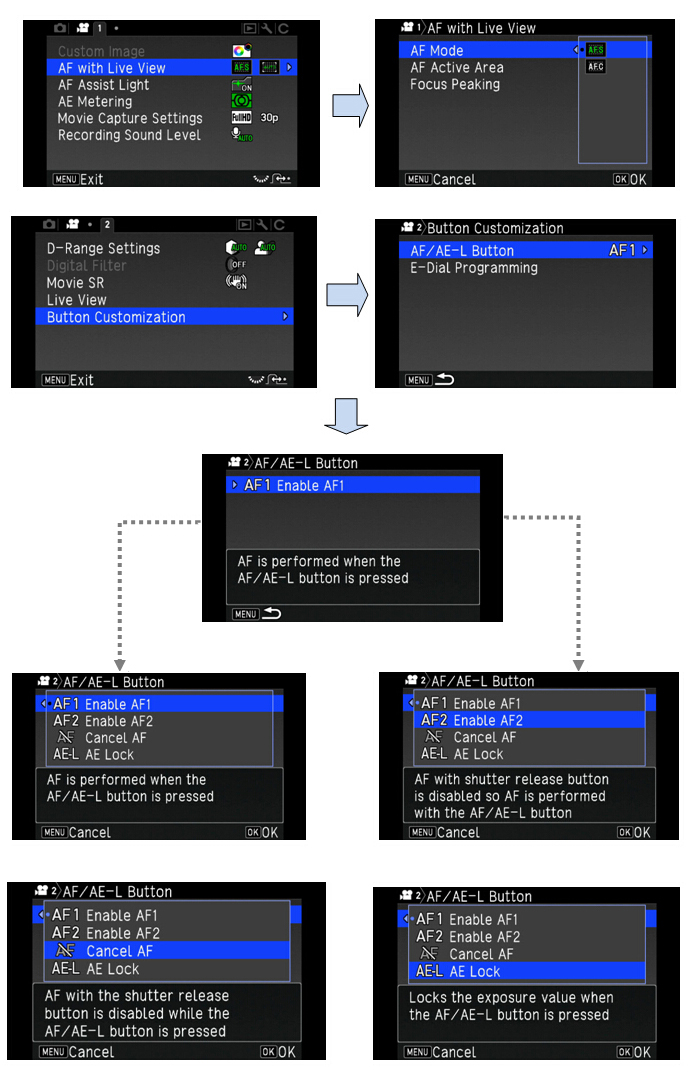
When attached the compatible lens*1, the [AF.C] mode can be selected at [Movie 1] menu, [AF with Live View] and [AF Mode]. In the [AF.C] setting, the camera automatically shifts the in-focus point in relation to the subject’s movement.
When [AF Mode] is set to [AF.C], the [AF/AE-L] button operation varies as follows depending on the setting assigned to [AF/AE-L] in [Button Customization] of the [Movie 2] menu.
*1 Compatible lens[Button Customization] setting Autofocus operation when
[AF/AE-L] button is pressedEnable AF1 / Enable AF2 Pressing [AF/AE-L] button performs autofocus based
on the [AF Mode] settingCancel AF Pressing [AF/AE-L] button stops autofocus and
pressing [AF/AE-L] button again, restarts autofocus
smc PENTAX-DA 18-135mmF3.5-5.6ED AL[IF] DC WR
HD PENTAX-DA 55-300mmF4.5-6.3ED PLM WR RE
HD PENTAX-DA 16-85mmF3.5-5.6ED DC WR
smc PENTAX-DA L 18-50mm F4-5.6 DC WR RE
HD PENTAX-DA 18-50mmF4-5.6 DC WR RE
HD PENTAX-DA 20-40mmF2.8-4ED Limited DC WR
HD PENTAX-D FA 28-105mmF3.5-5.6ED DC WR
HD PENTAX-D FA* 70-200mmF2.8ED DC AW
HD PENTAX-D FA 150-450mmF4.5-5.6ED DC AW
HD PENTAX-DA 560mmF5.6ED AW
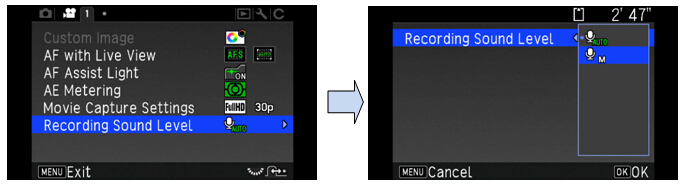
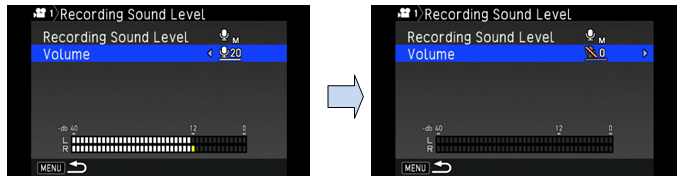
-The sound volume for recording a movie can be set in [Recording Sound Level] of the [Movie 1] menu. When [Manual] is selected, the sound volume can be set from 0 to 20.
-If you don’t like to record AF operating sound of the lens, set the [Volume] to [0].
*A movie can be recorded continuously for up to 4 GB or around 25 minutes. When the SD Memory Card is full, recording stops and the movie is saved.
-
Can I adjust the shutter speed or aperture value in Movie recording?
You can set them under condition below.
P / Av / TAv / M The camera operates in the selected exposure mode. (The aperture value can be changed only before shooting. When set to [M] mode, the sensitivity can also be changed.) U1, U2 or U3 The camera operates according to the saved exposure mode. Other modes The camera operates in [P] mode. -
The range of sensitivity for Movie recording?
ISO100 to 12800 at [M] mode.-
Are there any restrictions on capacity or shooting time for recording movies?
You can record movies continuously up to 4 GB or 25 minutes.
*If the internal temperature of the camera becomes high during movie recording, the recording may be terminated to protect the camera circuitry.-
Can the external microphone to be used with the K-70?
Yes, it can.
You can connect a commercially available stereo microphone to the microphone/cable release terminal on the camera.
Using an external microphone can help to reduce the possibility of recording camera operation sounds.
The following specifications are recommended for external microphones.
You can also connect the optional Cable Switch CS-310 to the microphone/cable release terminal on the camera. When the Cable Switch is connected, sounds are recorded with the built-in microphone.Plug Stereo mini plug (ø3.5 mm) Format Stereo electrets condenser Power Plug-in Power Method (operating voltage of 2.0 V or lower) Impedance 2.2 kΩ
Image Processing
-
What image recording formats are used?
The camera records images the versatile JPEG format or the high-quality and fully editable RAW (PEF/DNG) format. You can also select JPEG + RAW (PEF / DNG) and record in both formats simultaneously.-
Can image rotation information be saved for images while the camera is held vertically or horizontally?
Yes, it can.
You can select ON/OFF at the [Custom 3] menu, [20 Save Rotation Info].-
What is the Pixel Shift Resolution System?
By using the SR (Shake Reduction) mechanism, the Pixel Shift Resolution System captures four images of the same scene by shifting the image sensor by a single pixel for each image, then synthesizes them into a single, super-high-resolution composite image. This innovative system obtains all RGB color data in each pixel to deliver beautiful images with far more truthful colors and much finer details, without any hint of false color. This system also reduces high-sensitivity noise to a minimum. The electronic shutter is activate when capture the image by this system to reduce the camera shake.
Set at [Capture 3] menu of [Pixel Shift Resolution].
When shooting is performed, captured four images are displayed in turn, and then they are merged into a single image.Motion Correction On Corrects mosaic-pattern noise when a moving object is detected, and creates a composite image. Motion Correction Off Creates a composite image by combining the entire range of image. Off Does not use Pixel Shift Resolution.
Caution:
*This function cannot be used in the following situations.
・In B mode.
・In movie mode.
*This function cannot be used in combination with some other functions. (Below figure)
*While this function is used, [Shake Reduction] of the [Capture 4] menu is fixed to [OFF].
Memo:
*If a moving object exists in the frame, mosaic-pattern noise may appear in the image. In such case, select [Motion Correction On].
*When taking pictures with Pixel Shift Resolution, use a tripod and mount the camera on it securely. The use of Self-timer, Remote Control or Mirror Lock-up Shooting is recommended.
Restrictions on the combinations of Pixel Shift Resolution function
O: Available X: Not availablePixel Shift Resolution Flash × D
r
i
v
e
M
o
d
eContinuous Shooting × Bracketing × Mirror Lock-up Shooting ○ Multi-exposure × Interval Shooting × Interval Composite × Interval Movie Record × Star Stream × HDR Capture × AA Filter Simulator × ASTROTRACER × -
What is the AA-filter Simulator function?
By using the SR mechanism, AA(Anti-Aliasing) Filter Simulator effectively minimizes the moiré patterns often generated on subjects with fine, repetitive patterns, and the false colors commonly generated at the edges of high-contrast images, applying microscopic vibrations to the image sensor unit at the sub-pixel level during image exposure. It lets you choose the desired visual effect based on your creative intentions -between the filtering effect of the AA simulator and the higher resolving power of an AA-filter-free design.
*Set at [Capture 4] menu, [Anti-Aliasing Filter Simulator]
OFF Prioritizes the resolution Type1 Takes pictures while balancing the resolution and moiré reduction. Type2 Prioritizes the moiré reduction. Bracketing Takes consecutive 3 images in order of [Off], [Type1], and [Type2].
Caution:
* This function cannot be used in some capture modes or in combination with some other functions.
* [Bracketing] cannot be selected in the following situations.
-When [Moving Object], [Pet] or [Kids] of [SCN] mode is selected.
-In [B] mode.
*[Bracketing] can be used when the drive mode is set to [Single Frame Shooting], [Self-timer] (12 seconds, 2 seconds), or [Remote Control] (now, after 3 seconds).
*When [HDR Capture] in the [Capture 3] menu is set, [AA Filter Simulator] is fixed to [Off].
*When the shutter speed is faster than 1/1000 seconds, the full effect of this function cannot be achieved.-
What is the Clarity control function?
It is an image-processing tool useful in expressing the luster of metal or the clarity of the sky or water. It allows you to adjust the smoothness of the subject’s surface and express desired texture or clearness.
Set at [Capture 3] menu, [Clarity] and there are choice of nine levels (between -4 and +4 settings).
Caution:
- This function cannot be used in combination with some other functions.-
What is the Skin Tone correction?
It helps you reproduce the subject’s face with soft skin texture and healthy skin tone, while retaining a high-resolution description of the subject’s hair and outfit and the background.
* The Skin Tone correction function makes compensation only when the camera detects a face in the image
* It also can be selected at in-body RAW file development
Set at [Capture 3] menu, [Skin Tone] for Type1, Type2 or OFF.
Type1 Compensate the color and brightness of the skin. Type2 Addition to the Type1, the skin tone will be created more smoothly. -
Is it possible to correct the Color Fringe?
Yes, it can be set at RAW Development of the Mode Plallet.
Color Fringe Correction/OFF
Color Fringe Correction/ON
・The Color Fringe Correction can be set with the [RAW Development].
・There are four type of correction level (Auto, Low, Medium and High).
Select [RAW Development] and press OK button
Select [Singe image] and press OK button
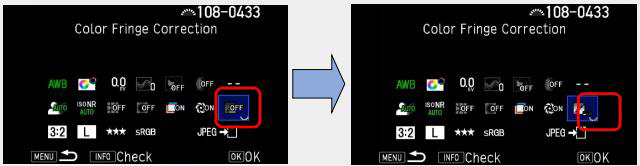
Select [Color Fringe Correction] by 4-way key
Turn Rear e-dial to select level of correction
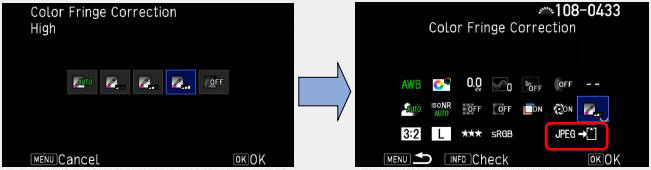
Or press OK button and select level of correction by 4-way key.
Select [Save] and press OK button.
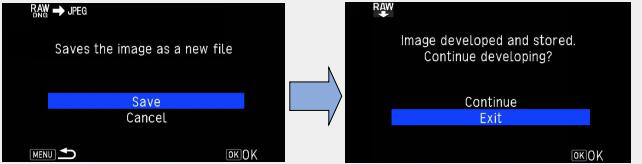
Select saved and press OK button.
When you complete RAW development, select [Exit] or if you continue the development, select [Continue].
-
What is the Digital Filter function?
It enables you to change the color tone of an image or to modify an image in other ways.
The Digital Filter can be applied during capture or playback mode.
Caution:Capture(Still) Extract Color, Replace Color, Toy Camera, Retro, High Contrast, Shading, Invert Color, Unicolor Bold, Bold Monochrome Capture(Movie) Extract Color, Replace Color, Toy Camera, Retro, High Contrast, Shading, Invert Color, Unicolor Bold, Bold Monochrome
* This function cannot be used in some capture modes or in combination with some other functions.
* Depending on the filter used, it may take longer to save images.
Caution:Playback mode Base Parameter Adj., Extract Color, Replace Color, Toy Camera, Retro, High Contrast, Shading, Invert Color, Unicolor Bold, Bold Monochrome, Tone Expansion, Sketch, Water Color, Pastel, Posterization, Miniature, Soft, Starburst, Fish-eye, Slim, Monochrome
*Only JPEG and RAW images captured with this camera can be edited with the digital filters.
* RAW images captured using HDR Capture or Pixel Shift Resolution cannot be processed with Digital Filter.
Memo:
*Up to 20 filters, including the digital filter used during shooting, can be applied to the same image.-
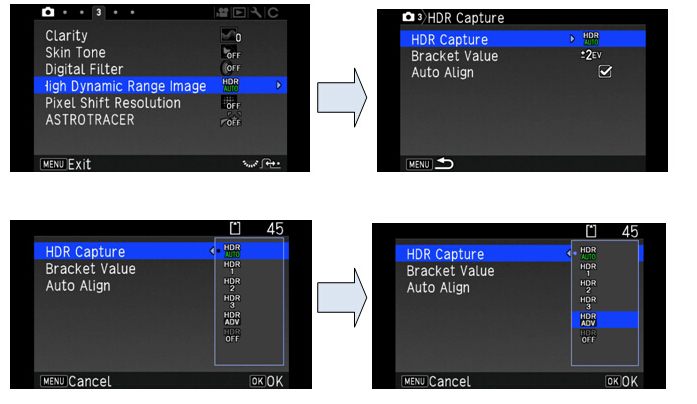
What is the HDR mode function?
The HDR (High Dynamic Range) mode synthesizes a single, rich-gradation image from three separate images(Standard / Under / Over) taken at different exposure levels. It delivers an image similar to the one seen by the naked eye, by minimizing whitewashed highlights and pitch-black shadows even in extreme high-contrast scenes.
This mode is suitable for Landscape photography, and it is recorded by JPEG file.-
How much difference for the effected result at mode selection of the HDR capture, and how it is come into result when you set to A-HDR mode?
You can choose HDR1, HDR2 or HDR3 at the [HDR Capture] of the [Capture 3] menu. A larger figure has a wider dynamic range.
If you choose [HDR AUTO], depend on the difference of tone, the camera automatically set the adjusting range.
You can also choose the Advanced HDR (HDR ADV) mode, which creates a dramatic photographic expression by adopting the technologies used in the Clarity control function.
Memo
*HDR Capture is not available in [B] and [Movie] mode.
*This function cannot be used in combination with [Clarity Control], [Skin Tone Correction], [Digital Filter], [Pixel Shift Resolution], [ASTROTRACER] or [AA Filter Simulator] functions.
*You can set the range in which to change the exposure from [±1EV], [±2EV] or [±3EV] in [Bracket Value].
*When [Auto Align] is set to [On], it is automatically compensate a slight gap between frames which may occurred at hand-held shooting.
*When [Auto Align] is set to [Off], [Shake Reduction] of the [Capture 4] menu is fixed to [OFF].
*When the drive mode is set to [Interval Shooting] or [Interval Movie Record], [Auto Align] is fixed to [Off]
*The flash is not discharged at the HDR Capture mode.
*For HDR Capture, multiple images are combined together to create a single image, so it may take time to save the image. During the image saving, [Data being processed] is displayed and you cannot take next shot until process is completed.
Regarding the lens to be used
-
Please tell me about the function when various lenses are used.
All exposure modes are available when a D FA, DA, DA L, FA or FA J lens is used, or when a lens with an A position used with the aperture ring set to the A position.
When other lenses than above are used, or a lens with an A position is used in a position other than A, the following restrictions apply.
*1. Lenses with a maximum aperture of F2.8 or faster. Only available aperture ring set at the A position.√: Available #: Restricted X: Not available Lens
[Mount type]
/FunctionD FA
DA
DA LFA*6
FA JF*6 A M
P[KAF]
[KAF2]
[KAF3]
[KAF4][KAF]
[KAF2][KAF] [KA] [K] Autofocus (Lens only)
Autofocus (with AF Adapter 1.7x) *1√
-√
-√
--
#-
#Manual Focus
(with Focus Indicator)*2√ √ √ √ √ Quick-Shift Focus System #*4 × × × × Focus point selection mode [Auto] √ √ √ #*8 × AE Metering [Multi-segment] √ √ √ √ × P / Sv / Tv / Av / TAv mode*3 √ √ √ √ #*9 M mode √ √ √ √ # P-TTL auto flash*3 √ √ √ √ × Automatic obtainment of lens focal
length information√ √ √ x x Lens Correction √*5 #*7 x x x
*2. Lenses with a maximum aperture of F5.6 or faster.
*3. Available when using Built-in flash, AF540FGZ, AF540FGZll, AF360FGZ, AF360FGZll, AF201FG, AF200FG or AF160FC.
*4. Only available with compatible lenses.
*5. Distortion Correction and Peripheral Illumination Correction are disabled when a DA FISH-EYE 10-17mm lens is used.
*6. To use a FA SOFT 28mm F2.8 lens, FA SOFT 85mm F2.8 lens or F SOFT 85mm F2.8 lens, set [24 Using Aperture Ring] to [Enable] in the [Custom 4] menu. Pictures can be taken with the aperture you set, but only within a manually adjustable aperture range.
*7. The Lens Correction is available with the following FA lenses.(Only Distortion Correction and Lat-Chromatic-Ab Adj. are available when the aperture ring is set to a position other than A.)
FA* 24mm F2 AL[IF], FA 28mm F2.8AL, FA 31mm F1.8 Limited, FA 35mm F2 AL, FA 43mm F1.9 Limited, FA 50mm F1.4, FA 77mm F1.8 Limited, FA* 85mm F1.4 [IF], FA* 200mm F2.8 ED[IF], FA* MACRO 200mm F4 ED, FA* 300mm F2.8 ED[IF], FA* 300mm F4.5 ED[IF], FA* 400mm F5.6 ED[IF], FA* 600mm F4 ED[IF], FA* 28-70mm F2.8 ED[IF], FA* 80-200mm F2.8 ED[IF] and FA*250-600mm F5.6 ED[IF]
*8. Fixed to [Spot] AF mode.
*9. Av with the aperture set to wide open. (The aperture ring has no effect on the actual aperture value.)
Caution:
*When the aperture ring is set to a position other than A, or a lens without an A position or accessories such as an auto extension tube or auto bellows are used, the camera does not operate unless [24. Using Aperture Ring] is set to [Enable] in the [Custom 4] menu.
*When a retractable lens is attached and is not extended, you cannot take pictures or set some functions. If the lens is retracted during shooting, the camera stops working.
Lens Names and Mount Names
Mount Lens Name Lens Type MF S S 35mm full-frame size. K K A A AF KAF D FA 35mm full-frame size/APS-C size DA APS-C size, Without the aperture ring DA L APS-C size, Without the aperture ring FA 35mm full-frame size, Power zoom not compatible FA J 35mm full-frame size, Without the aperture ring F 35mm full-frame size KAF2 DA APS-C size, Built-in lens AF compatible, Without the aperture ring FA 35mm full-frame size, Power zoom not compatible KAF3 D FA 35mm full-frame size/APS-C size DA APS-C size, Dedicated for Built-in lens AF, Without the aperture ring KAF4 DA APS-C size, Electromagnetic diaphragm control, Without the aperture ring
*DA lenses with a motor and FA zoom lenses with a power zoom are categorized for the KFA2 mount.
(Of these lenses, the lenses without an AF coupler are categorized for the KAF3 mount, and without a Diaphragm lever are categorized for the KAF4).
*FA single focal length lenses, DA and DA L lenses without a motor, and DFA, FA J and F lenses are categorized for the KAF mount. (The power zoom function is not compatible with this camera.)
-
The characteristics of the KAF4 mount?
The camera corresponded with KAF4 mount is control the diaphragm with the electric signal and motor, not with mechanical lever. Therefore, the cameras which are not corresponded with the KAF4 mount cannot control the diaphragm, result of this, the exposure of the image may not be correct.
The K-70 and later models are corresponded with KAF4 mount as it is, but the other models need update the firmware version to coop with KAF4 mount.
The models that subjected firmware version up:
K-1, K-3ll, K-S2 and K-S1-
What kinds of corrections are available with the “Lens Correction”
The following features can be set in [Lens Correction] of the [Capture 4] menu.
Distortion correction Reduces distortions occurring due to lens properties. Peripheral Illumin. Corr. Reduces peripheral light fall- off occurring due to lens properties. Lat-Chromatic-Ab Adj. Reduces lateral chromatic aberrations occurring due to lens properties. Diffraction Correction Corrects blur caused by diffraction when using a small aperture.
*The Distortion correction and the Peripheral Illuminate correction can be saved on the control panel.
*Corrections can only be made when a compatible lens is attached. The features are disabled when using an accessory such as a rear converter that is attached between the camera and the lens.
*When [File Format] is set to [RAW] or [RAW+], correction information is saved as a RAW file parameter and you can select whether to apply the correction to the images when developing them. For the RAW Development function, [Color Fringe Correction] can also be set.-
Can the Power Zoom function of FA* lens and FA Zoom lens be used with K-70?
No, it cannot-
Can the S (screw) mount lenses be used with the K-70?
Yes, you can use them combination with the Mount Adapter K.
*The Focus Indicator does not operate unless [24 Using Aperture Ring] is set to [Enable] in the [Custom 4] menu.
-
Can the 645 format lenses be used with the K-70?
Yes, you can use below lenses combination with the 645 Lens Adapter K.
*A645, 645(LS lens), FA 645 lenses and HD D FA645 35mm F3.5 AL [IF].
*DA645 and D FA 645 lenses which do not have the aperture ring cannot be used with the K-70.
*The camera does not operate and display [F- -] blink in the LCD panel unless [24 Using Aperture Ring] is set to [Enable] in the [Custom 4] menu and focus mode is set to [MF].-
Can the 67 format lenses be used with the K-70?
Yes, you can use them combination with the 67 Lens Adapter K.
*The camera does not operate and display [F- -] blink in the LCD panel unless [24 Using Aperture Ring] is set to [Enable] in the [Custom 4] menu.-
Are there any restrictions for function of capture mode when selected [Enable] in [24 Using Aperture Ring] of the [Custom 4] menu?
There are following restrictions.
Lens Restriction D FA, FA, F, A, M
(lens only or with accessories such as Auto Extension Tube K which is equipped with automatic diaphragm)The aperture is fixed to wide-open.
The shutter speed changes in relation to the open aperture value, but an exposure deviation may be occurred.D FA, FA, F, A, M, S
(accessories with manual diaphragm such as Extension Tube K)Picture can be taken with the set aperture value but an exposure deviation may be occurred. Lens with manual diaphragm such as Reflex lens(lens only) FA SOFT 28mm, FA SOFT 85mm, F SOFT 85mm (lens only) Picture can be taken with set aperture value in the manually adjustable aperture range.
Memo:
*If the aperture ring set to a position other than A, the camera operates in Av mode regardless of the mode dial setting except when set to M or B mode.
*[F- -] appears for the aperture indicator in the status screen, Live View screen and viewfinder.
*How to achieve the Correct Exposure with Aperture Ring not set to A position.
1. Set the mode dial to M.
2. Set the aperture ring to the desired aperture.
3. Press Green button.
The current shutter speed will be set.
4. If the correct exposure cannot be achieved, adjust the ISO sensitivity.
*The Shake Reduction function operates by obtaining the lens information such as focal length. Set the focal length when using a lens that the focal length information cannot be automatically obtained.
1. Set [24 Using Aperture Ring] to [Enable] in the [Custom 4] menu.
2. Turn the camera off.
3. Attach a lens to the camera and turn the camera on.
The [Input Focal Length] screen appears.
4. Use [Up▲] or [Down▼] button to set focal length.
Press [Left◀] to select a value from the list
When using a zoom lens, select the actual focal length which the zoom is set to.
5. Press [OK] button.
The camera returns to standby mode.
*You can set the focal length at [Capture 4] menu, [Input Focal Length].
-
Can I use other manufacturers’ replacement lenses with the K-70?
Lenses from other manufacturers can be attached if they are K-mount lenses. However, responsibility for such use shall fall squarely on the user. We shall accept no responsibility or liability for problems arising from the use of such lenses. We will assume no responsibility or liability for accidents, damages, malfunctions and inaccuracy of focusing or exposure resulting from the use of lenses made by other manufacturers.
Camera Shooting Function
-
Please tell me about the specifications of the drive mode.
The main specifications of drive mode, fps and number of frames in continuous shooting are as follows.
*The data based on when use the rechargeable lithium-ion battery (D-LI109)Drive Mode [Still Image]:
Single frame, Continuous (H, L), Self-timer (12s, 2s, continuous), Remote Control (immediate, 3 sec., continuous), Bracketing (2, 3 or 5 frames), Mirror Lock-up (possible to use with Remote Control), Multi-exposure(continuous, Self-timer, possible to use with Remote Control, ), Interval shooting, Interval Composite, Interval Movie Record, Star Stream.
[Movie]:
Remote Control
*Bracketing, Interval shooting, Interval Composite, Interval Movie Record and Star Stream mode are possible to use with Self-timer or Remote Control.Continuous Shooting Max. Approx. 6.0 fps, JPEG (L: ★★★ at Continuous H): up to approx. 40 frames, RAW: up to approx. 10 frames
Max. Approx. 3.0 fps, JPEG ( L: ★★★ at Continuous L): up to approx. 100 frames, RAW: up to approx. 16 frames
* At ISO100Multi-Exposure Composite Mode(Average/Additive/ Bright)
Number of Shots: 2 to 2000 timesInterval Shooting [Interval shooting]
Interval: 2s to 24h
Standby: min./1s to 24h
Number of shots: 2 to 2000 times
Start Interval: Immediate / Self-timer / Remote Control / Set Time(Set Start Time)
[Interval Composite]
Interval: 2s to 24h
Standby: min./1s to 24h
Number of shots: 2 to 2000 times
Start Interval: Immediate / Self-timer / Remote Control / Set Time(Set Start Time)
Composite mode: Average/Additive/ Bright
Save Process: On / Off
[Interval Movie Record]
Recorded Pixels: 4K / FullHD / HD
File format: Motion JPEG(AVI)
Interval: 2s to 24h.
Standby: min./1s to 24h
Number of shots: 8 to 2000 times (8 to 500 times at 4K)
Start Interval: Immediate / Self-timer / Remote Control / Set Time(Set Start Time)
[Star Stream]
Recorded Pixels: 4K / FullHD / HD
File format: Motion JPEG(AVI)
Standby: min./1s to 24h
Number of shots: 8 to 2000 times (8 to 500 times at 4K)
Start Interval: Immediate / Self-timer / Remote Control / Set Time(Set Start Time)
Fade-out: OFF / Weak / Medium / Strong
*The number of recordable images for continuous shooting may differ depending on the transfer speed of SD Memory card to be used. The data above based on when use the SD Memory card with UHS-I, class 10.-
Can a remote control be used with this camera?
Yes, it can. The optional remote control waterproof O-RC1 and Remote Control F are available for use with this camera.
You can select [Immediate release], [3 Sec. delay] or [Remote Continuous Shooting].-
Is it equipped Slow Shutter Speed Noise Reduction? If so, is there [Off] setting available?
Yes, it is. You can select [AUTO], [ON] or [OFF] in [Slow Shutter Speed NR] of [[Noise Reduction] in the [Capture 2] menu.
AUTO Applies Noise Reduction according to the shutter speed, sensitivity, and internal temperature of the camera. ON Applies Noise Reduction when the shutter speed is slower than 1 second OFF Does not apply Noise Reduction at any shutter speed. -
Is it equipped Preview function?
Yes, it is. You can set [Optical Preview(with viewfinder)] or [Digital Preview(with monitor)] in [Button Customization] of the [Capture 5] menu.
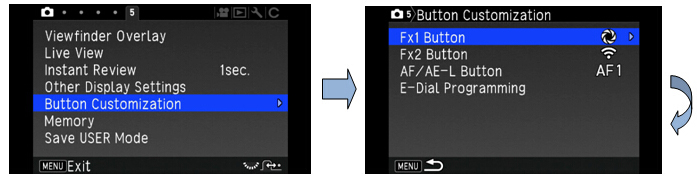
Select [Button Customization] of the [Capture 5] Select [Fx1 Button] and press right key.
menu and press right key.
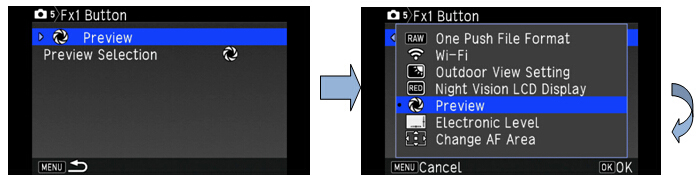
Press right key at [Preview] (already selected) Select [Preview] from the customize menu.
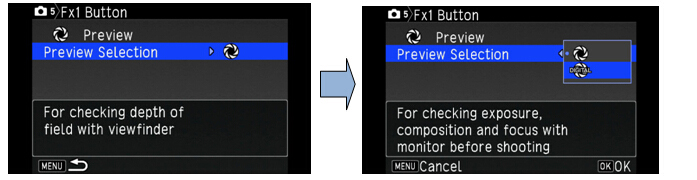
Press right key at [Preview Selection] Select [Optical Preview] or [Digital Preview]

Select details of display when set to [Digital Preview]-
Is there Bulb(B) exposure mode available with this camera?
Yes, if you set the mode dial at [B], you can use Bulb exposure mode.
When the shutter button is fully pressed and while pressing, exposure continued.
To enable the timed exposure, press Green Button, and then use Front Dial to set the exposure time.
You can set the exposure time within the range from 10" to 20'00".
You can select [Type1] or [Type2] at [Bulb(B) Mode Options] of [Custom 1] menu.
Type1: Press and hold shutter button for exposure. Releasing the shutter button stops exposure.
Type2: Press shutter button to start exposure. Press again to stop exposure.
Memo:
* When performing the bulb exposure, use a tripod and mount the camera on it securely.
The use of the optional remote control unit or cable release is recommended.
* The drive mode cannot be set to [Continuous Shooting], [Bracketing], or [Interval Shooting].-
Does the K-70 have an AF assist light?
Yes. The camera has a dedicated AF assist LED light.
You can set [ON] or [OFF] at [AF Assist Light] of [Capture 1] menu.-
Is Face Detection function available in Live View mode, and how many faces can be detected?
When [AF Active Area] is set to [Face Detection] in [AF with Live View] of [Capture1] menu, Contrast AF + Face Detection mode is activated. Up to 16 faces can be detected at a time.-
Does this camera equipped Fine-Tune function of AF?
Yes, connect to an AV device, such as TVs, equipped with an HDMI terminal to display Live View images while shooting or to playback images in playback mode.
Make sure to have a commercially available HDMI cable equipped with an HDMI terminal (type D).
Caution:
*While the camera is connected to an AV device, nothing is displayed on the camera monitor. Also, you cannot adjust the sound volume on the camera. Adjust the volume on the AV device.
*By default, the maximum resolution supported by both the AV device and camera is automatically selected. If it fails to play back images properly, change the setting in [HDMI Out] of the [Setting 3] menu.
*While the camera in the [HDMI out] situation, [Outdoor View Setting] and [Night Vision Red Light LCD Display] are disabled to set.
*If you intend to use the camera continuously for a long period, the use of the optional AC adapter kit is recommended.-
Can this camera records the image while connecting and displaying on an AV device?
Yes, you can precisely fine-tune your lenses with the camera’s autofocus system by selecting [Off], [Apply All] or [Apply One] at [23 AF Fine Adjustment] of [Custom 4] menu.
-
If the lens is exposed to strong light such as sunlight, will it affect the image sensor of camera or other function?
The sunlight is focused at inside of the camera then cause of burn or damage and furthermore, it may cause a fire.
When taking a backlight photograph, fully remove the sun from the angle of view and do not leave the camera at place exposed to direct sunlight with removing the lens cap.-
What kinds of capture mode in the Interval shooting?
-
There are following setting items available for the Interval Shooting mode.
Capture mode:

Interval Shooting Takes pictures at set intervals and saves them. 
Interval Composite. Takes pictures at set intervals and merges them into a single image. 
Interval Movie Record. Takes still pictures at set intervals and saves them as a single movie file (Motion JPEG, file extension: AVI). 
Star Stream Takes still pictures with the Interval Composite and save them as a single movie file (Motion JPEG, file extension: AVI).
Shooting condition:
Recorded pixels Select from [4K], [FullHD] or [HD] (Only for Interval Movie Record and Star Stream) Interval Select from 2 seconds to 24 hours. Standby Interval Select from minimum time or 1 second to 24 hours. Number of shots Select from 2 to 2000 times (Recorded pixels [4k] – Select from 2 to 500 times)
For [Interval Movie Record] and [Star Stream] – Select from 8 to 2000 times. (Recorded pixels [4k] – Select from 8 to 500 times)Start Interval Select when and how to take the first picture from [Now], [Self-timer] or [Set Time]. Start Time Set the shooting start time when [Start Interval] is set to [Set Time]. Composite Mode Select from [Average], [Additive] or [Bright]. (Only for [Interval Composite]) Save Process Select ☑ to save images in the middle of processing. (Only for [Interval Composite]) Fade-out Select fade-out effect level of light trails. (Only for [Star Stream])
Low level: Light trail become longer
High level: Light trail become shorter
*Shooting procedures:
1. Select [INT] on the Drive Mode screen and press ▼.
2. Use ◀▶ to select [Interval], [Interval Composite], [Interval Movie Record] or [Star Stream].
3. Press [INFO] button.
4. Set the shooting condition.
5. Press [OK] button.
The screen of step 1. appears again.
6. Press [OK] button.
The camera returns to standby mode.
7. Press the shutter button.
When [Start Interval] is set to [Now], the first picture is taken. When set to [Set Time], shooting starts at the set time.
To cancel shooting, turn the main switch to [OFF].
After the specified numbers of shots are taken, the camera returns to standby mode.
Memo:
*For [Interval] and [Interval Composite] shooting, a new folder is created and the captured images are saved there. When another drive mode is used after interval shooting, a new folder is created again.
*The shortest time that can be set for [Interval] is 5 seconds when [Digital Filter], [Clarity] or [Skin Tone] is set, and 10 seconds when [HDR Capture] is set
*The second and later exposures start at the intervals set in [Interval]. If the exposure time is longer than the time set in [Interval], some of the pictures that are supposed to be taken at the set intervals are not actually taken. For example, if the time set in [Interval] is 2 seconds and the exposure time is 3 seconds, the first exposure has not yet finished at the time the second exposure is supposed to be started (2 seconds after shooting has started), and so the second picture is not taken. As the result, Interval Shooting ends before the specified numbers of shots are taken. In such cases, you can set [Standby Interval] in [11 Interval Shooting Options] of C2 menu so that every picture is taken at the set intervals after each exposure ends. The screen displayed in step 4 varies depending on the [11 Interval Shooting Options] setting.
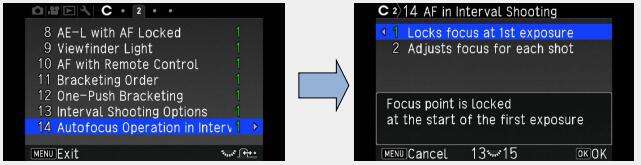
*For [Interval] and [Interval Composite], the focus position is locked at the first picture is taken. When performing autofocus for each exposure, set [12 AF in Interval Shooting] to [Adjusts focus for each shot] in the C2 menu.
*For [Interval Composite] and [Star Stream] mode, set the camera on a fixed support such as tripods during shooting.
*For [Interval Movie Record] mode, [Shake Reduction] of the Capture 4 menu is fixed to [OFF].
*For [Star Stream] mode, [Clarity], [Skin Tone], [Digital Filter], [HDR Capture] and [Pixel Shift Resolution] of Capture 3 menu and [Shake Reduction] and [Horizon Correction] of Capture 4 menu are fixed to [OFF]
*For [Star Stream], the camera operates in [Manual] mode regardless of the mode dial setting.
*For [Interval shooting], set the [Horizontal Correction setting] to [OFF].
Flash Function
-
Specification for Flash function
Specification for Flash are as below
Built-in Flash Built-in retractable P-TTL pop-up flash Guide number: approx. 12 (ISO100/m) Angle of view coverage: equivalent to 28mm lens in 35 mm format Flash Modes Auto Flash Discharge (Auto Picture, Scene Mode), Auto Flash + Red-eye Reduction (Auto Picture, Scene Mode), Flash On, Flash On + Red-eye Reduction, Slow-speed Sync, Slow-speed Sync + Red-eye Reduction, Trailing Curtain Sync, Manual Flash Discharge (FULL to 1/128 power) Sync. Speed 1/180 seconds Flash Exposure
Compensation-2.0~+1.0EV External Flash P-TTL, Leading Curtain Sync, Trailing Curtain Sync, Contrast Control Sync*, High-speed Sync, Wireless Sync*
* Available with two or more dedicated external flash units
*The flash modes that can be selected vary depending on the capture mode.
*1 The built-in flash cannot be used for some scene modes.Capture Mode Selectable Flash Mode AUTO / SCN*1 
P / Sv / Av 
Tv / TAv / M / B 
* You cannot take pictures while the built-in flash is being charged. If you want to take pictures while charging the flash, set [8 Release While Charging] in the [Custom 2] menu.
* Depending on the lens being used, the use of the built-in flash may be limited.
* When the built-in flash is used in Av mode, the shutter speed automatically changes over a range from 1/180 seconds to a slow shutter speed depending on the lens being used. The shutter speed is locked at 1/180 seconds when a lens other than a DA, DA L, D FA, FA J, FA, or F lens is used.
* When the built-in flash is used in Tv, TAv or M mode, any desired shutter speed of 1/180 seconds or slower can be set.
* The built-in flash is optimum for a subject at a distance from approx. 0.7 m to 5 m. Vignetting may occur when used at a distance closer than 0.7 m (this distance varies slightly depending on the lens being used and the sensitivity setting).-
Guide Number for built-in flash?
Guide number for built-in flash is approx. 12 (ISO100/m)
The built-in flash is optimum for a subject at a distance from approx. 0.7 m to 5 m.
Vignetting may occur when used at a distance closer than 0.7m
This distance varies slightly depending on the lens being used and the sensitivity setting
Guide Number
Sensitivity Guide Number Sensitivity Guide Number ISO 100 Approx. 12 ISO 6400 Approx. 96 ISO 200 Approx. 17 ISO 12800 Approx. 136 ISO 400 Approx. 24 ISO 25600 Approx. 192 ISO 800 Approx. 34 ISO 51200 Approx. 272 ISO 1600 Approx. 48 ISO 102400 Approx. 384 ISO 3200 Approx. 68 -
Are there any restrictions on the built-in flash that depending on which lens being used?
Depending on the lens being used, the use of the built-in flash may be limited as below.
When the flash is used at distances closer than 0.7 m, it causes vignetting in the picture corners, light is distributed unevenly and the picture may be overexposed, regardless of the lens used. The built-in flash cannot be regulated and fully discharges when A lenses not set to the A position, lenses manufactured prior to the A lenses or soft focus lenses are used.
(As of July 2016) Lens Restrictions when using the built-in flash DA FISH-EYE 10-17mm F3.5-4.5 ED [IF]
DA 12-24mm F4 ED AL
DA 14mm F2.8 ED [IF]
DA 15mm F4 ED AL
D FA 15-30mm F2.8 ED SDM WR
FA★ 300mm F2.8 ED [IF]
DA★ 560mm F5.6 ED AW
FA★ 600mm F4 ED [IF]
FA★ 250-600mm F5.6 ED [IF]
The built-in flash is not available due to vignetting. F FISH-EYE 17-28mm F3.5-4.5 Vignetting may occur if the focal length is less than 20 mm. DA 16-45mm F4 ED AL When the focal length is less than 28 mm, or when the focal length is 28 mm and the shooting distance is 1 m or less, vignetting may occur. DA★16-50mm F2.8 ED AL [IF] SDM When the focal length is 20 mm or less, or when the focal length is 35 mm and the shooting distance is less than 1.5 m, vignetting may occur. DA 17-70mm F4 AL [IF] SDM When the focal length is less than 24 mm, or when the focal length is 35 mm and the shooting distance is 1 m or less, vignetting may occur. DA 18-250mm F3.5-6.3 ED AL [IF] Vignetting may occur if the focal length is less than 35 mm. DA 18-270mm F3.5-6.3 ED SDM Vignetting may occur if the focal length is less than 24 mm. D FA 24-70mm F2.8 ED SDM WR Vignetting may occur if the focal length is less than 36 mm. FA★ 28-70mm F2.8 AL Vignetting may occur if the focal length is 28 mm and the shooting distance is less than 1 m. FA SOFT 28mm F2.8
FA SOFT 85mm F2.8The built-in flash always discharges fully. -
The available functions when using an External Flash?
Use of the following external flashes (optional) enables a variety of flash modes, such as P-TTL auto flash mode.
*1 Available only when using a DA, DA L, D FA, FA J, FA, F, or A lens. When using a lens with an aperture ring, set the aperture ring to the A position.√: Available #: Restricted X: Not available Compatible Flash/Camera Function Built-in Flash AF540FGZ
AF540FGZⅡ
AF360FGZ
AF360FGZⅡAF201FG
AF200FG
AF160FCRed-eye reduction flash √ √ √ Auto Flash Discharge √ √ √ Automatic switch to the flash sync speed √ √ √ Automatic setting of the aperture value in P or Tv mode √ √ √ P-TTL auto flash √*1 √*1 √*1 Slow-speed Sync flash √ √ √ Flash Exposure Compensation √ √ √ AF assist light of the external flash × √*2 × Trailing Curtain Sync flash*3 √ √ #*4 Contrast Control Sync flash #*5 √ #*6 Slave flash × √ × High-speed Sync flash × √ ×
*2 AF assist light is not available with the AF540FGZ or AF360FGZ.
*3 Shutter speed of 1/90 seconds or slower.
*4 Available with the AF201FG.
*5 When combined with the AF540FGZ, AF540FGZ II, AF360FGZ, or AF360FGZ II, 1/3 of the flash discharge can be output by the built-in flash and 2/3 can be output by the external flash.
*6 Available only when combined with the AF540FGZ, AF540FGZ II, AF360FGZ, or AF360FGZ II
Caution:
*Never press 1 on the camera when any external flash unit is attached to the camera. The built-in flash will hit the external flash. If you want to use both at once, connect them using an extension cord.
*Flashes with the reversed polarity (the center contact on the hot shoe is minus) cannot be used due to the risk of damaging the camera and flash.
*Do not combine with accessories that have a different number of contacts, such as Hot Shoe Grip, as a malfunction may occur.
*Combining with flashes from other manufacturers may cause equipment breakdown
Memo:
*With the AF540FGZ, AF540FGZ II, AF360FGZ, or AF360FGZ II, you can use the high-speed sync flash to discharge a flash and take a picture at a shutter speed faster than 1/180 seconds. Set the capture mode to Tv, TAv or M.-
Is there a sync socket for professional flashes available for this camera?
There is no x-sync socket on the camera.
It can be added by attaching the Hot Shoe Adapter 2P to the camera’s hot shoe.
However, be aware that some professional flashes use extremely high voltages. The use of such flashes may cause the camera to breakdown.
Wi-Fi Function
-
Standards of Wi-Fi function?
The standards of Wireless LAN are as below.
Standards IEEE 802.11b/g/n (standard wireless LAN protocol) Frequency (Center Frequency) 2412 to 2462 MHz (channels: Ch 1 to Ch 11) Security Authentication: WPA2
Encryption: AES-
What kind of function can be used with the Wi-Fi function?
The following function can be used by directly connecting the camera to a communication device via Wi-Fi and using the dedicated application “Image Sync”.
*Image Sync supports iOS and Android, and can be downloaded from the App Store or Google Play.Remote Capture Displays the Live View image of the camera on the communication device, and enables controlling exposure settings and shooting by operating the communication device. Image View Displays the images saved on the memory card inserted in the camera on the communication device and import the images to the communication device.
For supported OS and other details, refer to the download site.
Memo:
*When the Wi-Fi function is enabled, the icon(white) indicating the wireless LAN status is displayed on the status screen and Live View screen. When the icon(gray) is displayed, a connection with the communication device is not established correctly.
*Even after the Wi-Fi function is enabled, it returns to an inactive state when the camera is turned off and on again. Also, when the camera enters Movie mode, the Wi-Fi function is disabled.
*Auto Power Off is not available while a Wi-Fi connection is established or images are being transferred.
If Auto Power Off is activated while a connection is not established or during standby, the Wi-Fi function is disabled. The function is enabled when the camera recovers from Auto Power Off.
*The Wi-Fi function is disabled during the USB connection.
Caution:
*Do not attempt to use the Wi-Fi function in a location where the use of wireless LAN devices is restricted or prohibited, such as on airplanes.
*When using the Wi-Fi function, observe local laws and regulations governing radio communication.
*If a memory card with a built-in wireless Lan function (such as an Eye-Fi card or a Flucard) is used, radio wave interference may occur. When this occurs, disable the Wi-Fi function of the camera.-
Setting of Wi-Fi function
The Wi-Fi function is disabled when the camera is turned on.
Enable the function using one of the following methods.
*Setting from the menus
*Using the Wi-Fi/Fx2 button
When the Wi-Fi function is enabled, a beep sounds and the icon(white) indicating the wireless LAN status is displayed on the status screen and Live View screen. When icon(gray) is displayed, a connection with the communication device is not established correctly.
Memory Cards
-
Which type of Memory Cards can be used with this camera?
The SD Memory Cards, SDHC Memory cards and SDXC memory cards(UHS-I) are usable.
-
Which SD Memory Cards have been tested for compatibility?
Compatibility with the K-70 has been tested with memory cards from the below manufacturers.
- Panasonic, Toshiba, and SanDisk
SD Memory Cards with capacities of 1 GB and 2 GB
SDHC Memory Cards with capacities of 4 GB, 8 GB, 16 GB, and 32 GB
SDXC Memory Cards with capacities of 64 GB
- SanDisk
SDXC Memory Cards with capacities of 128 GB, 256GB and 512GB
As of July, 2016
*The information above is given for the convenience of customers and does not guarantee complete compatibility with the K-70.
*Corresponded with UHS-I speed class.
*Use a high-speed memory card when recording movies. If the write speed cannot keep up with the recording speed, writing may stop during recording.-
Can a miniSD Card or microSD card be used through a memory card adapter?
Proper operation of a memory card used through an adapter cannot be guaranteed.
Use a regular SD Memory Card (SD/SDHC/SDXC).-
Does the performance of the SD Memory Card used affect the shooting interval or other functions of the camera?
When using SD Memory Cards with slow transfer rates, the start-up time, the number of images for continuous shooting, and the continuous movie recording time may be affected.
(The card rated transfer speed for class2 and 2MB/sec. are may be affected)-
How many shots can be taken by each capacity of the SD memory card?
The approximate of number of storable images is as follows.
*The number of storable images may vary depending on the subject, shooting conditions, selected capture mode and memory card, etc.
[Approximate number of recordable still pictures]
*When using an 8GB memory cardRecorded pixels JPEG RAW ★★★ ★★ ★ PEF DNG L:24M(6000x4000) 528 1192 2339 151 151 M 14M(4608x3072) 889 1996 3837 - - S 6M(3072x2048) 1964 4309 7923 - - XS 2M(1920x1280) 4723 9824 16374 - -
*Recordable movie is up to 4GB or 25 minutes at one time.[Approximate movie recordable time] *When using an 8GB memory card Recorded pixels Full HD HD 1920x1080 1280x720 60i 50i 30p 25p 24p 60p 50p 8GB 00:32’15” 00:38’21” 00:32’15” 00:38’21” 00:39’51” 00:32’15” 00:38’21” -
Are there any precautions that need followed when using SD Memory Cards?
Please note the below points.
- Cards that have not yet been used or that have been used on other devices, such as on another camera or a computer, must first be formatted on the K-70 before use.
- Do not remove an SD Memory Card or turn the camera off while recording data or playing back images or audio, or while the camera is connected to a computer via a USB cable.
- Do not bend an SD Memory Card or subject it to violent impacts. Do not leave cards in locations where they will be exposed to water, moisture, or high temperatures.
- Avoid using or storing cards in places where they may be exposed to static electricity or electrical interference.
- Data saved to SD Memory Cards that have been left unused for long periods of time or that have been damaged may become unreadable and lost. Important data should be backed up regularly.-
Can the SD memory card with Wi-Fi function(Eye-Fi card) or the Wi-Fi function of FLU card be usable with this camera?
No.
Battery and Power sources
-
What type of batteries can be used with the K-70?
Use the dedicated Rechargeable Lithium-ion Battery D-LI109 to power the camera.
-
Can the AA type of batteries be used with the K-70?
No, the AA type batteries cannot use with K-70.-
Is there an optional Battery Grip available for K-70?
No, there is no Battery Grip available for K-70.-
How many photos can I take and how long can I play back images?
The numbers of photos that can be taken and available playback time with D-LI109 are as follows.
*The image storage capacity (normal recording and flash use 50%) is based on measuring conditions in accordance with CIPA standards, while other data is based on our measuring conditions. Some deviation from the above figures may occur in actual use depending on the selected capture mode and shooting conditions.(with fully charged D-LI109) Battery Type Temperature Normal Shooting
(without flash usage)Flash Photography Playback Time D-LI109 23℃ Approx. 480 50% Use 100% Use Approx. 270min. Approx. 410 Approx. 410
Memo:
*The battery level may not be displayed properly if the camera is used at low temperatures or when performing Continuous Shooting for a long time.
*Battery performance temporarily decreases as the temperature decrease. When using the camera in cold criminates, have extra batteries at hand and keep them warm in your pocket. Battery performance will return to normal at room temperature.
*Have a extra batteries ready when traveling overseas or taking a lot of pictures-
Are there any precautions or suggestions to follow regarding charging, use, and storage the Rechargeable Lithium-ion Battery D-LI109?
Yes. Please pay attention to following points.
- To keep the battery in optimum condition, avoid storing it in a fully charged state or in high temperatures.
- Charging the battery a day before use or on the day of use is recommended.
- If the D-LI109 battery is left inserted and the camera is not used for a long time, the battery will over-charge and shorten the battery’s life. Be sure to remove the battery from the camera when storing the battery.
- The AC cord that contained with this product is dedicated for Battery Charger D-BC109.
Please do not attempt to connect with the other device.-
Is there an optional AC adapter available?
Yes, the AC Adapter Kit K-AC168(J) is available (sold separately).-
Can I use the AC adapter overseas?
The AC Adapter Kit K-AC168(J) (sold separately) works in the range from 100V AC to 240V AC (50/60 Hz), which should allow the adapter to be used in almost any overseas country, although a plug converter may need to be used depending on the type of electrical outlet in use in a specific country. Do not attempt to use a commercially available transformer or similar device with the charger and adapter as doing so may cause them to become damaged.
Plug adapters can be found at travel goods stores and similar shops.
Playback and Editing images
-
Can the camera be connected to a TV for playback of images on a TV screen?
You can connect the camera to a TV or other device with a HDMI terminal and play back captured images or display the Live View images on the connected TV or devices.
During displayed the image on the AV device, the image will not be displayed on the camera monitor. And you will not be able to adjust the volume on the camera. Adjust the volume on the AV device.
Memo:
*Check the operating manual of the AV device and select a suitable input terminal for connecting the camera.
*By default, the maximum resolution supported by both the AV device and camera is automatically selected. If it fails to playback images properly, change the setting in [HDMI Out] of the [Setting 3] menu.
*If you intend to use the camera continuously for a long period, the use of the optional AC adapter kit is recommended.-
Can images be resized or trimmed on the camera directly?
Only JPEG files captured with this K-70 can be resized and trimmed.
Images that already resized or trimmed to minimum size cannot be done.-
What is the [Highlight Alert] function?
When this function is activated, areas in the image that are too bright and have lost gradation detail will blink on the monitor during playback and Instant Review.-
Can movies be edited on the camera?
Movies can be divided up and unwanted segments can be deleted directly on the camera.
Also, you can capture a single frame from a movie and save it as a JPEG still picture.-
Can the camera be connected to a TV in an overseas country for playback of images on a TV screen?
Yes, you can, if you use the commercially available HDMI Cable (Type D) to connect the camera and the TV with HDMI terminal.
Computer Connection and Software
-
What are the system requirements for the contained software [Digital Camera Utility 5]?
-
Following systems are required for connection with a computer and using the software.
*Windows®
*To playback movies on a computer that were shot with this camera is required the software that can playback MOV file or AVI file.OS Windows® 10 (32bit/64bit) / Windows® 8.1(32bit/64bit) / Windows® 8 (32bit/64bit) / Windows® 7 (32bit/64bit) CPU Intel® Core™ 2Duo or more or more 4GB or more HDD Approx. 100 MB or more at a time of installation and startup, Approx. 10 MB/file for JPEG files or approx. 30 MB/file for RAW files for saving image files. Display monitor 1280 x 1024 pixels, 24bit color or above
・Macintosh
OS Mac OS X 10.11 / 10.10 / 10.9 / 10.8 / 10.7 CPU Intel® Core™ 2Duo or more Memory 4GB or more HDD Approx. 100 MB or more at a time of installation and startup, Approx. 10 MB/file for JPEG files or approx. 30 MB/file for RAW files for saving image files. Display monitor 1280×1024 pixels, 24bit color or above
*Note that you will need the QuickTime viewer in order to play back movies on a computer. You can be downloaded QuickTime from the following address.
http://www.apple.com/jp/quicktime/download/ -
Does the camera support PictBridge?
No, it does not.-
Will the settings made in the menus be erased if the camera battery is removed?
Settings other than Date Adjustment are saved even when the battery is removed. Even with Date Adjustment, if the battery remained inserted in the camera for over 24 hours, the settings will be saved for over 48 hours even when the battery is removed.
Trouble shooting
-
I cannot save any images. Why would this happen, and how can I fix it?
Check the below potential issues and suggestions for fixing the problem to resolve it.
- If the message "Memory card full" appears
The SD Memory Card is full and no more images can be saved to it. Insert a new SD Memory Card or delete unwanted files. You may be able to save more images to the card if you change the image quality level or the number of recorded pixels.
- If the message “Memory card error” appears
The SD Memory Card has a problem, and image capture and playback cannot be performed on the camera from the card. You may still be able to view the contents of the Memory Card on a computer, however.
- If the message “Card is not formatted” appears
The SD Memory Card you have inserted is unformatted or has been formatted on a computer or another device and is not compatible with this camera. First format the SD Memory Card before attempting to use it with the camera.
- If the message “Card is locked” appears
The write-protect switch on the SD Memory Card you have inserted is locked. You can still operate the menus, switch between modes, and play back the images on the card in such cases.-
When the built-in flash is used, the exposure becomes overexposed. How can this be fixed?
When the aperture ring is set to a setting other than the A position to change the exposure manually, or a lens without an A position or a soft lens is used, the built-in flash cannot control the exposure and will fully discharge every time and the exposure may be overexposed.
*The built-in flash can be used as an auto flash for DA, FA J, DA L lenses, and A, F, FA, D FA lenses when the aperture ring is set to the A position.-
How do I turn off the Guide Display on the monitor?
Uncheck the [Guide Display] in [Other Display Settings] of the [Capture 5] menu.-
The [Input Focal Length] function cannot be selected. Why is this, and how can it be activated?
The [Input Focal Length] setting menu does not appear when lenses are used that support the automatic acquisition of lens information such as focal length (for example DA, D FA, FA, F lenses) because [Focal Length] is set automatically.-
None of the [Input Focal Length] setting options matches the focal length of the lens. What setting should be used?
Use the closest setting to the actual focal length of the lens used.
(For example, select [18] for a 17 mm lens or [100] for a 105 mm lens.)-
Portions of an image on the monitor blink red when I try to play back the image on the camera. What would cause this to happen?
When [Highlight Alert] is On in the [Playback 1] menu, bright (overexposed) portions blink red.-
Is the included warranty card valid overseas?
The included warranty card is only valid within Japan.