
RICOH PX FAQs - By Product
[Question] How do I download images from the camera to a Windows computer using the supplied DL-10 software?
The [DL-10] software allows you to download pictures all at once in a camera automatically when you connect a camera to a computer.
The DL-10 will automatically create [Digital Camera] folder in [My Documents] folder. With the default settings, the downloaded pictures are saved into a new folder assigning the captured date, which is located in the [Digital Camera] folder. (If you were previously using Caplio Software, the files will continue to be saved in the [Caplio] folder.) Set the correct date and time on the camera before shooting.
![]() If the DL-10 is not yet installed, see below.
If the DL-10 is not yet installed, see below.
[How to install the supplied software (for Windows):]
* See the FAQ below for the OS compatibility on the supplied software.
[What is the different between RICOH PX and CX5 ? -- DL-10 / picture download software]
DL-10 operating procedure : How to download pictures in the camera all at once.
-
- 1Check that the camera power is off.
- 2Check that DL-10 is activated.

- 3Connect the supplied USB cable to the computer's USB port.
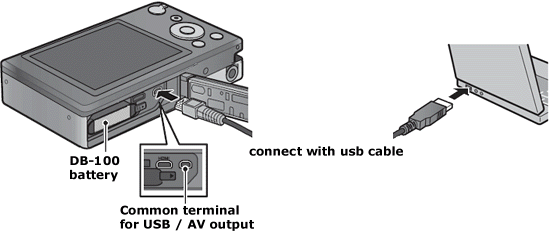
- 4Connect the USB cable to the USB terminal of your camera. It is the common terminal for USB port / AV output (gray).
- 5 The power of the camera comes on. You will be asked to choose an option for USB connection.
Choose [Computer] option within 30 seconds. Otherwise, the camera will go into the charging mode if no action is taken for 30 seconds.
![Choose [Computer]](/english/r_dc/support/faq/bp/px/img/usb_pc04.gif)
 During charging, the camera controls cannot be used and the camera will not function as a mass storage device. In the case, disconnect the USB cable and start over from step 3.
 - 6DL-10 automatically starts to download images.
- [Note]
If the following dialog box appears, select the action you want to perform from the list.
- •If you click [Open folder to view files] and [OK], the folder containing the files that have been downloaded using DL-10 will be displayed.
- •If you click [Take no action] and [OK], the dialog box disappears.
![If you click [Take no action] and [OK], the dialog box disappears.](/english/r_dc/support/faq/bp/docs09/img/EDC08331_01.gif)
- If you select the "Always do the selected action" check box, this dialog box will not appear when you next connect your camera to the computer.
- [If the picture downloads will not start automatically,]
- •Click the [Save] button in the DL-10 window. (Only if this is your first time connecting your camera to a computer.)
-
![Click the [Save] button in the DL-10 window. (Only if this is your first time connecting your camera to a computer.)](/english/r_dc/support/faq/bp/docs09/img/EDC08331_03.gif)
- •Restart the computer and perform Steps 1 to 5 again.
- •Check if the [Saves automatically when connected to USB] check box in the [Option Settings] dialog box for DL-10 is selected.
If you select the "Always do the selected action" check box, this dialog box will not appear when you next connect your camera to the computer.
- 7When the "Transfer has completed." message appears, you can see the folder that the images have been downloaded to.
With the default settings, the downloaded pictures are saved into a new folder assigning the captured date, which is located under [My Document] - [Digital Camera] folder. - Remember the saved location , then click [OK].
- 8If you have installed Media Browser software (supplied software), it will automatically start. You can check the downloaded images using this software.
- 9When image transfer is completed, disconnect the camera and the computer. Double-click the "Safely Remove Hardware" icon on the right end of the task bar.

- 10Select "USB Mass Storage Device" and click [Stop].
![Select "USB Mass Storage Device" and click [Stop].](/english/r_dc/support/faq/bp/docs09/img/EDC07076_03.gif)
- 11Check that "USB Mass Storage Device" is selected, and click [OK].
![Check that "USB Mass Storage Device" is selected, and click [OK].](/english/r_dc/support/faq/bp/docs09/img/EDC07076_04.gif)
- 12Check that "USB Mass Storage Device" has disappeared, and click [Close].
![Check that "USB Mass Storage Device" has disappeared, and click [Close].](/english/r_dc/support/faq/bp/docs09/img/EDC07076_05.gif)
- 13Disconnect the USB cable.
[Memo]
- •If the USB cable is disconnected without disabling the connection, the Unsafe Removal of Device screen may be displayed. Be sure to stop the connection before removing the USB cable.
- •Do not disconnect the USB cable during image downloading. Make sure that downloading has completed, disable the connection, and then disconnect the cable.
- •When images are transferred to a computer, they are saved under new file names. File names in the camera are not used.
- •The images are saved under consecutively numbered file names in order to avoid duplication of file names.
- •Even if the images are saved in different folders, their file names are still consecutively numbered. You cannot initialize the numbers.
- •If you transfer images to a computer using DL-10, their file names are still saved as [RIMG****.jpg] (where **** is a number), even if [Card Sequence No.] is set to [On].
Date created: June 28, 2011
Date modified: --
Product: RICOH PX
Operating system: Windows 7, Windows Vista, Windows XP
Category: Software operations
Useful LINKs:
Do you need other information? Please click any link you want from the following.Related Links
Quick Links