CX3 FAQs - By Product
[Question] About the Shooting menu operations.
In order to configure respective shooting setting options, go to the Shooting menu. Pressing the [MENU] button in a shooting mode will display the Shooting menu.
| 1 | Turn the mode dial to a shooting mode. |
 |
|
| 2 | Press the [MENU] button. |
![Press the [MENU] button.](/english/r_dc/support/faq/bp/docs09/img/EDC09005_01.gif)
|
|
| The [Shooting] menu will be appear. Displayed items will vary depending on a shooting mode. | |

|
|
|
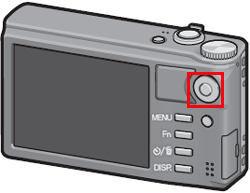
With the [SCENE mode] or [Continuous mode], press the [ADJ./OK] button either to
For the details on the SCENE mode or the Continuous mode operations, see the links below.
|
|
|
3
|
Press the [ADJ./OK] button
|
 |
|
|
4
|
Pressing the [ADJ./OK] button
The following is the example that the [Picture Quality/Size] option is selected. |
 |
|
| 5 |
Press the [ADJ./OK] button
|
| 6 |
Press the [ADJ./OK] button. Or press to
Or some setting menu will return to the Shooting menu. In this case, press the [MENU] button once again, then it will return to the shooting screen . |
| Selecting method of an option may vary depending on feature. | |
The items that can be set for each shooting mode are shown below.
[Setting options in the Shooting menu]| Setting items | Options [Default] |
|---|---|
| Picture Quality/Size | [ |
| Focus | [Multi AF], Spot AF, Face-Pri.AF, Continuous AF, Multi-trgt AF, MF, Snap, ∞(Infinity) |
| Pre-AF | [OFF], On |
| Exposure Metering | [Multi], Center, Spot |
| Image Settings | Vivid, [Standard], Cust. Settings, Black & White, Sepia |
| Noise Reduction | Off, [AUTO], Weak, Strong, MAX |
| Flash Exposure Compensation | +2.0, +1.7, +1.3, +1.0, +0.7, +0.3, [0.0], -0.3, -0.7, -1.0, -1.3, -1.7, -2.0 (1/3EV increments) |
| Auto Bracket | [OFF], On, WB-BKT, CL-BKT, FOCUS-BKT |
| Time Exposure | [OFF], 1 second, 2 seconds, 4 seconds, 8 seconds |
| Custom Self-Timer | Pictures : from 1 to 10 pictures [2 pics] Interval : from 5 to 10 seconds [5 sec.] |
| Interval Shooting | [0 sec.], 5 seconds to 1 hour |
| Camera Shake Correction | Off, [On] |
| Slow Shutter Limit | [OFF], 1/2 sec., 1/4 sec., 1/8 sec. |
| Date Imprint | [OFF], Date, Date and Time |
| Exposure Compensation | +2.0, +1.7, +1.3, +1.0, +0.7, +0.3, [0.0], -0.3, -0.7, -1.0, -1.3, -1.7, -2.0 (1/3EV increments) |
| White Balance | Auto, [Multi-P Auto], Outdoors, Cloudy, Incandescent Lamp, Incandescent Lamp2, Fluorescent Lamp, Manual Settings |
| ISO Setting | [AUTO], ISO 80, ISO 100, ISO 200, ISO 400, ISO 800, ISO 1600, ISO 3200 |
| Restore Default | -- |
| Dynamic Range Expansion *1 | [AUTO], Very Weak, Weak, Medium, Strong |
| Plus Normal Shooting *1 | [OFF], On |
| Movie Size *2 | [ |
| Focus (Movie mode) *2 | [Multi AF], Spot AF, Face-Pri.AF, Continuous AF, Snap, ∞(Infinity) |
| Density *3 | Deep, [Normal], Light |
| Picture Quality/Size (Text mode) *3 | [ |
- *1)The options at the Dynamic Range Double shot mode.
- *2)The options at the Movie mode.
- *3)The options at [TEXT] in the SCENE mode.
[Note] In the SCENE mode, it differs items in the Shooting menu from the chart above.
Answer ID:
EDC03099
Date created: February 3, 2010
Date modified: --
Product: CX3
Operating system: --
Category: Hardware specifications
Date created: February 3, 2010
Date modified: --
Product: CX3
Operating system: --
Category: Hardware specifications
Useful LINKs:
Do you need other information? Please click any link you want from the following.
Related Links
Quick Links


