RICOH R10 LCD Adjustment file rewriting procedure
The following instructions will guide you through the process of rewriting your camera's LCD adjustment file of color balance.
1. Confirm the version of the camera's current LCD adjusted value
| Please check the version of the camera's current firmware before beginning this rewriting. |
|||
| 1. | Turn off the camera and turn the mode dial to [SCENE] Mode. | ||
 |
|||
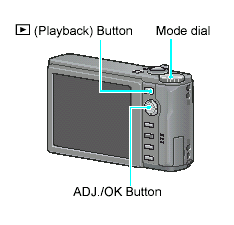
| 2. | While pressing the ADJ./OK button |
||
| 3. | A table like the one below will be displayed on the LCD. The ADJD field shows the current version of your camera's LCD adjusted value. The following example indicates the version 1.17. | ||
|
|||
| Note:This screen will be displayed for about 20 seconds. | |||
2. Preparations
In order to complete this firmware update, you will need:
After these preparations are complete, you are ready to update your camera's LCD adjustment file.
- 1.A RICOH R10 camera.
- 2.A fully charged battery (DB-70).
- 3.An SD memory card to store the files on (this cannot be performed using the camera's internal memory)
- 4.A USB cable to connect between the RICOH R10 and a computer.
- 5.A computer that has a USB port.
- 6.Remove the other USB devices before this update.
After these preparations are complete, you are ready to update your camera's LCD adjustment file.
3. Rewriting procedure
3-1) Extract the download file
- 1.Download the Adjustment file from this page to your computer. Double click or right-mouse click and select [Open] on the download file. A dialog screen will appear, then click [OK].
- 2.The file is extracted to the folder [r10adj-xxx], 'XXX' is a version number. Find the [elanuch8] that is located in the folder.
3-2) Copy the Adjustment file to an SD card from a computer
- 1.For a Windows user: If DL-10 is active, right-mouse click on the DL-10 icon in the task bar, and click [Exit].
- 2.Turn off a camera, and insert an SD card in the camera, and format the card in a camera.
- 3.Turn off the camera again, and connect the camera to a computer via the USB cable. The camera will turn the power on. If the DL-10, or iPhoto is activated, exit them before update.
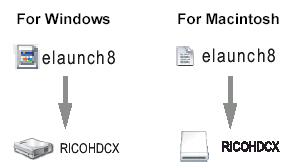
- 4.Copy the file [elaunch8] into [RICOHDCX] in [My Computer]. The camera volume name will differ depending on your OS. e.g. [Removable Disk], etc.

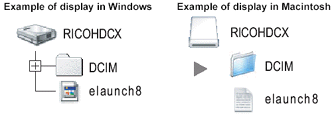
- 5.Open [RICOHDCX] in [My Computer], and confirm that the file is copied as below. You can remove your camera with a proper method.

- *If you have a memory card reader/writer and you are familiar with a computer, you can copy the [elaunch8] by using a memory card reader/writer, without connecting a camera to a computer.
3-3) Rewriting the adjustment file
- 1.Turn off the camera and turn the mode dial to [SCENE] Mode.

- 2.While pressing the ADJ./OK button
 , hold down the
  (Playback) button for 2 -3 seconds. The confirmation message to execute will appear in the LCD.
 - 3.Press the ADJ./OK button
 , to select [Yes], and press the ADJ./OK button.
 - 4.The update starts and will be completed in several seconds. The camera will automatically turn off and restart.
- •If you fail updating this method even if you have tried all things in this page, please contact to the original store where you purchased the camera, or contact a Ricoh service center.
- •You can delete the adjusted value file copied in an SD card if you need. Formatting a card will delete the file.
Instructions in the other languages (The PDF version)


