
![]()
How do you optimize the finishing-touch settings for portraits?
In portrait photography, the most important factors are the expression of skin colors and the description of overall tones. In this article, I will explain how you can optimize the finishing-touch settings for portraits using PENTAX digital SLR cameras.
Table of contents
1.PENTAX Custom Image function, for the instant setting of the desired finishing touch
2.Selecting the ideal Custom Image mode for portraits
3.Minute adjustment of Custom Image parameters to fine-tune the finishing touch
4.Using the Skin Tone Correction function
1.PENTAX Custom Image function, for the instant setting of the desired finishing touch
PENTAX digital SLR cameras are equipped with the Custom Image function, which lets you change the finishing touches of your image, just as if you were replacing one type of film with another. This ease of changing the finishing touch depending on the subject or scene is available only with digital cameras. PENTAX cameras also provide a fine-tuning function that allows for more minute and flexible adjustment of the parameters of each Custom Image mode — to exactly what you want to see.*
* These features and functions are related to PENTAX digital SLR cameras marketed at the time of this article’s publication, in October of 2018. Older models may not provide some of the Custom Image modes or parameters.
All 12 Custom Image modes, apart from Auto Select, provide a set of user-adjustable parameters. Each Custom Image mode is initially set to default values to provide the finishing touch designed to visualize a particular imaging theme.
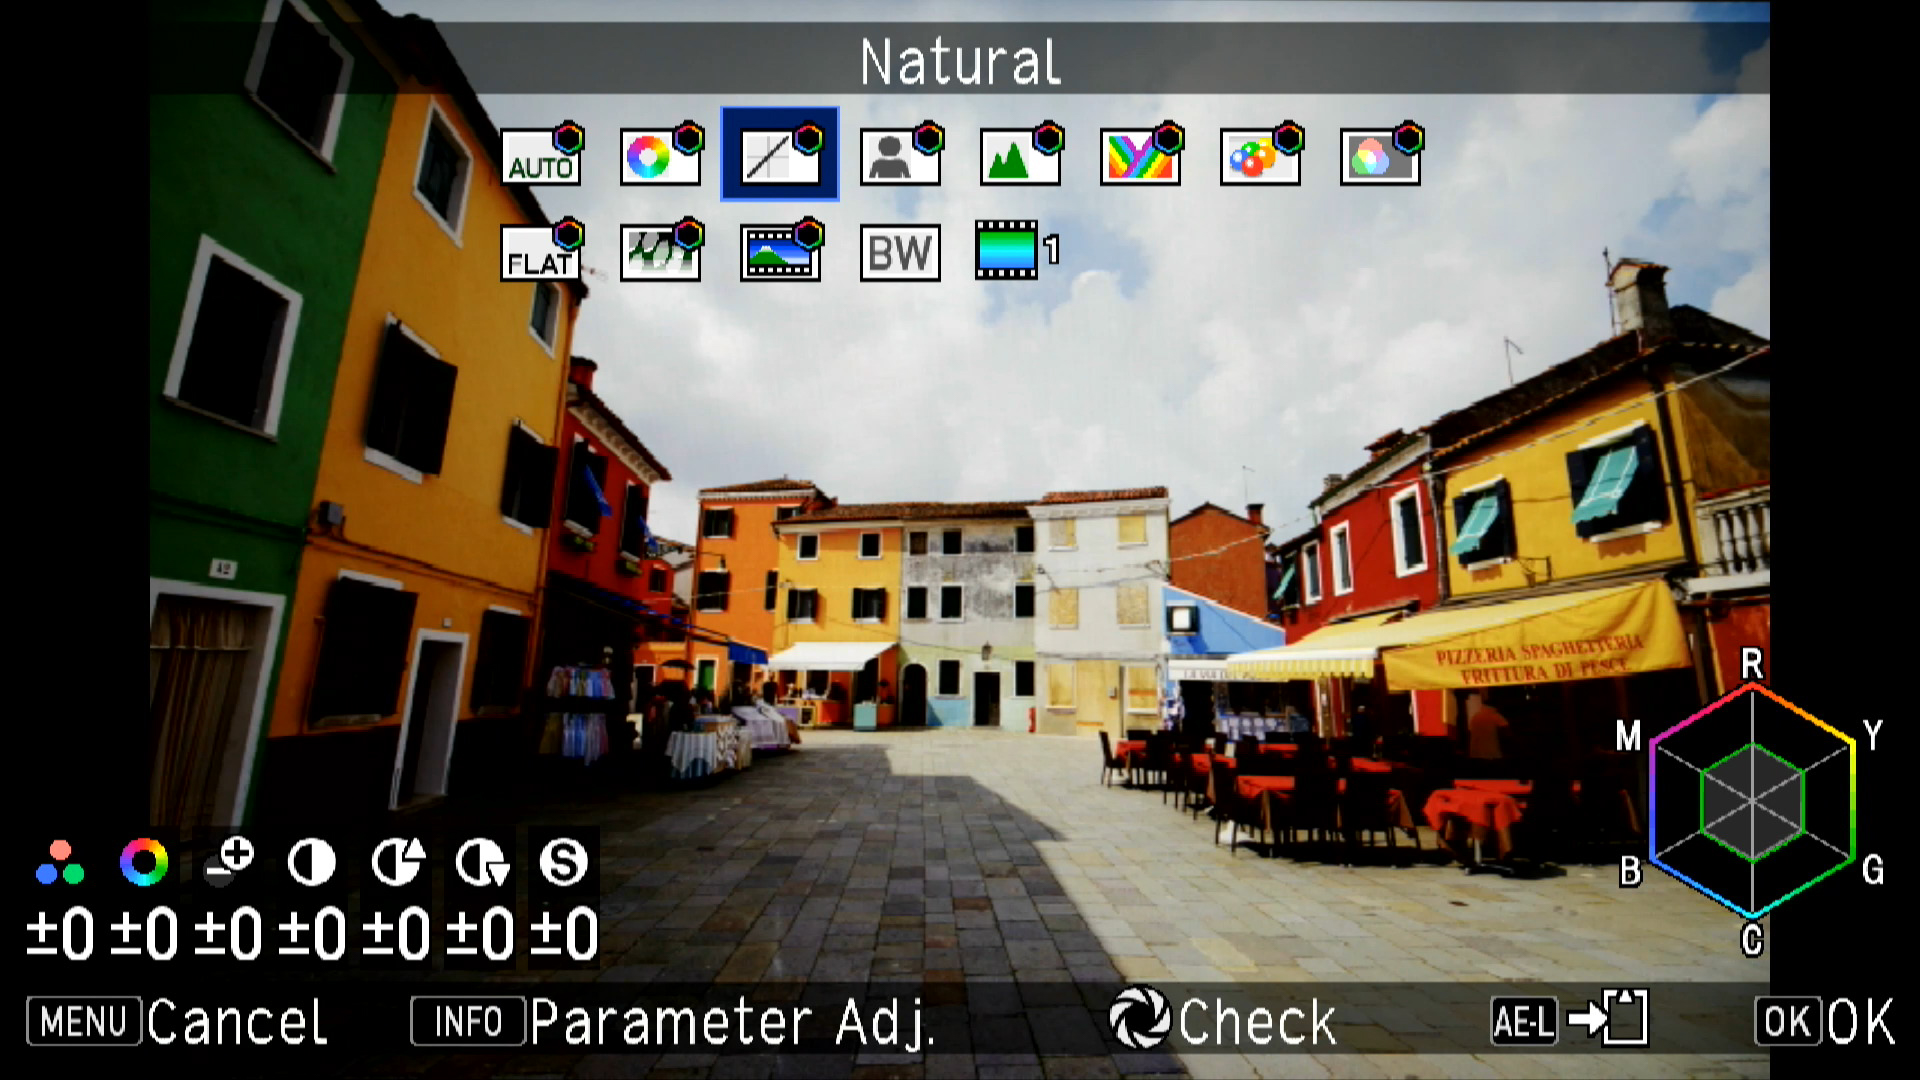
Custom Image Natural mode parameter control screen
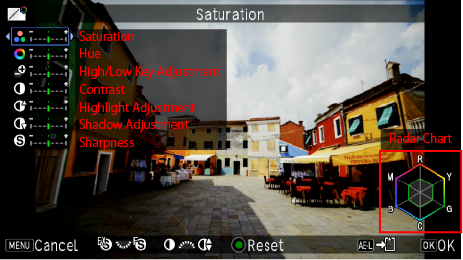
Radar chart : Provides a relative display of a color tendency — which colors are more emphasized than others — using a color wheel. Each Custom Image mode has a different combination of R (red), Y (yellow), G (green), C (cyan), B (blue) and M (magenta) to create a distinctive color expression.
Saturation : Adjustment of the strength of primary colors.
Hue : Adjustment of the strength of color hues. When you enhance the hue, the shades on the color wheel shift clockwise. When you diminish it, the shades on the color wheel shift counterclockwise. (In the Muted and Bleach Bypass modes, the menu is switched to Toning.)
High/Low Key Adj (hereinafter called Key) : Adjustment of middle-tone brightness, without affecting the brightest and darkest areas of an image.
Contrast : Adjustment of the differences in brightness levels. Shifting contrast toward plus (+) side emphasizes the difference between light and dark areas. Shifting it toward minus (–) side diminishes this difference.
Highlight : Adjustment of the brightness in mid-range to highlight areas.
Shadow : Adjustment of the brightness in mid-range to shadow areas.
(When you choose a minute parameter adjustment mode by e-dial operation, the Highlight and Shadow parameters will be displayed on the menu.)
Sharpness : Adjustment of the outline of a subject: When sharpness is shifted toward + side, the subject outline is emphasized. When it is shifted toward – side, the subject outline is weakened. (The type of sharpness control can be changed by e-dial operation.)
2.Selecting the ideal Custom Image mode for portraits
Let’s compare four Custom Image modes commonly selected for portraits.
Comparison of Custom Image modes
(Parameters set at default)

Bright: (Saturation: 0, Key: 0, Contrast: +1, Sharpness: +1)

Natural: (Saturation: 0, Key: 0, Contrast: 0, Sharpness: 0)
Portrait: (Saturation: 0, Key: 0, Contrast: 0, Sharpness: 0)
Flat: (Saturation: 0, Key: 0, Contrast: -4, Sharpness: 0)
This comparison shows that the finishing touch differs considerably from one mode to another, even if the original image is identical.
Brightness : This Custom Image mode is the most frequently selected setting as default by PENTAX digital SLR cameras users. It recreates true-to-life colors close to memory colors. Because of the low brightness level of B (blue), it reproduces deep-blue skies. Ideal for most nature and scenic images, this all-purpose mode renders typical PENTAX colors.
In portraiture, this mode tends to emphasize yellow in skin-color reproduction, because it is programmed to depict Y (yellow) more vividly. Of the four Custom Image modes, it is the only mode which has a default setting of +1 for both contrast and sharpness. This means that it produces an image with an overall impression that is sharp and crisp.
Natural : This mode is based on the finishing touch featured in the PENTAX *ist D — the first PENTAX digital SLR camera model. Its well-balanced image rendition is ideal for all kinds of subjects.
Portrait : Incorporated as a portrait-specific option, this mode is programmed to emphasize M (magenta). This means that it reproduces healthy skin colors.
This mode has been incorporated in most PENTAX digital SLR cameras since the PENTAX K20D, which first featured the Custom Image function. In models after the PENTAX 645Z, it provides a more truthful rendition of skin colors.
If you have trouble selecting a Custom Image mode for portrait photography, try this mode first.
Flat : This Custom Image mode is designed with retouching in mind. The default contrast level is set at -4 to produce a flat image. Since it does not emphasize any particular color, it assures true-to-life color reproduction, making post-shooting retouching work simple and effortless.
Next, let’s compare the four Custom Image modes by shifting the Saturation, Key, Contrast and Sharpness levels to 0.
Comparison of Custom Image modes
(Parameters set to 0)

Bright (Saturation: 0, Key: 0, Contrast: 0, Sharpness: 0)

Natural (Saturation: 0, Key: 0, Contrast: 0, Sharpness: 0)

Portrait (Saturation: 0, Key: 0, Contrast: 0, Sharpness: 0)

Flat: (Saturation: 0, Key: 0, Contrast: 0, Sharpness: 0)
By shifting all four parameters to 0, the difference in the four images is in color tone only.
Note: Even when Saturation and Hue are set at the identical level, the color tone varies from one Custom Image mode to another. On the other hand, Contrast, Key, Highlight, Shadow and Sharpness show identical characteristics when their parameters are set to 0.
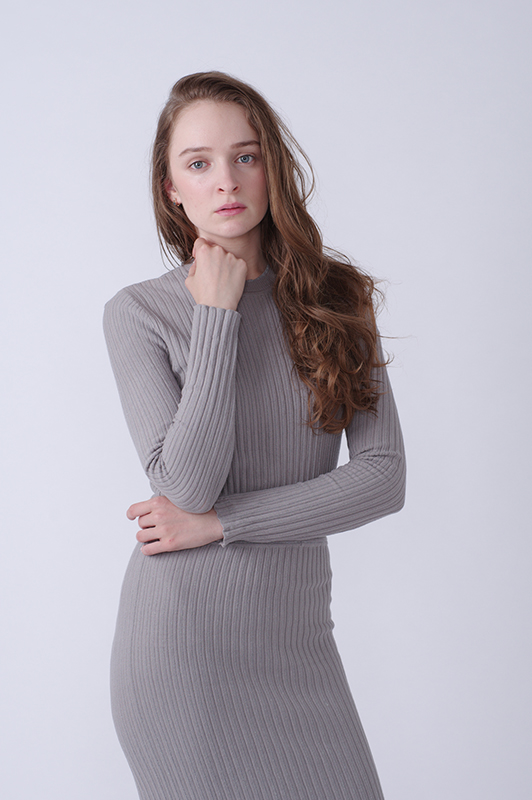
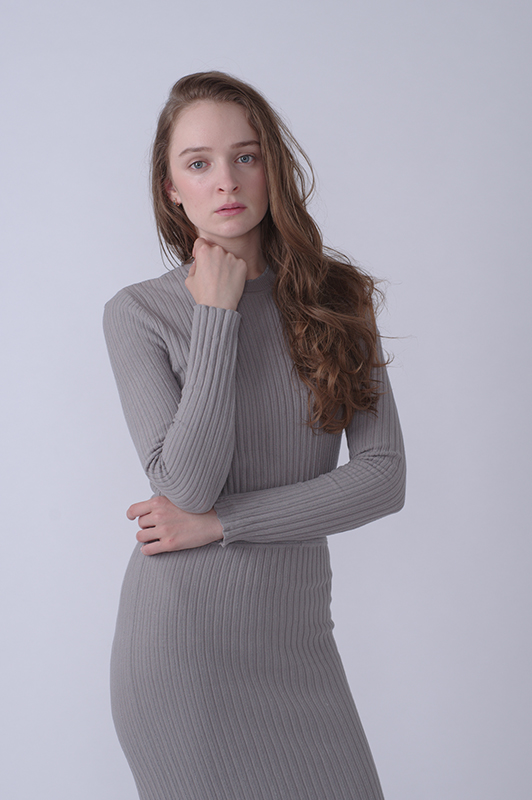
A comparison clearly shows the difference in color for the subject’s skin, lips, hair and grey dress.
The finishing touch of the Portrait mode shows a clear texture, while that of the Flat mode recreates the original colors most faithfully. Depending on the Custom Image mode selected, you may or may not be able to obtain the desired colors. The image rendition may also be affected by the subject or shooting environment, so I suggest you experiment with different Custom Image modes under varying situations.
3.Making minute adjustment of Custom Image parameters to fine-tune the finishing touch
A soft-toned finishing touch is sometimes preferred in portrait photography. In this case, you should lower the contrast between light and shade. To be more concrete, you must take steps such as lowering the Contrast level, enhancing the Shadow level, or enhancing the Key level.
Let’s take a look at images captured with the same Custom Image mode, while shifting some of the parameters.
Comparison of images captured at different parameters
(Images captured in Portrait mode)

Bright (Saturation: 0, Key: 0, Contrast: 0, Sharpness: 0)
Natural (Saturation: 0, Key: +1, Contrast: 0, Sharpness: 0)
Portrait (Saturation: 0, Key: 0, Contrast: -2, Sharpness: 0)

Flat: (Saturation: 0, Key: 0, Contrast: 0, Sharpness: +4)
Key : Enhancing the Key level produces high-key images.
Contrast : Lowering the Contrast level reduces the difference in brightness between light and shade, creating a softer impression.
Shadow : Enhancing the Shadow level brightens the shaded areas to create a lively atmosphere.
As you can see in the images above, each parameter affects different areas of the image. The light source at the shooting location and exposure settings may also affect the parameter settings. PENTAX digital SLR cameras are designed to display the last image captured on the monitor. Based on this original image, you can take advantage of a unique function in which you can select a Custom Image mode and/or adjust Custom Image parameters, while previewing the outcome of mode changes and/or parameter shifts on the image. Use this function effectively, and you can effortlessly obtain the proper settings. The white balance level can also be set in the same manner.
Sample of Custom Image mode selection screen
Technical pointer: Portrait photography in distinctive Muted and Bleach Bypass modes
The default setting of the Muted mode provides low saturation and contrast levels, creating mellow, high-key images. The Bleach Bypass mode features low saturation and high contrast, creating nostalgic images resembling old photo prints.
Like other Custom Image modes, both the Muted and Bleach Bypass modes provide a parameter control function, even though the Hue parameter is changed to Toning.
By simultaneously controlling the Toning parameter in the Muted mode, you can capture a nostalgic image like the one below. Or you can create a hard-toned, arresting image in the Bleach Bypass mode. So you should experiment with distinctive portrait expressions available only to PENTAX cameras.
Sample of Muted mode image with Toning parameter engaged
(Saturation: +1, Key: +3, Contrast: -3, Sharpness: -2, Tone: green)
4.Using the Skin Tone Correction function
First incorporated in the PENTAX K-1, the Skin Tone Correction function* was developed using advanced Clarity Control technology. It shifts the Hue level, and uses the subject’s skin tone and texture detected by the Face Detection function to automatically optimize the Saturation level for a gentle texture and a healthy tone.
* The Skin Tone Correction function is available only with the PENTAX K-1 Mark II, K-1, KP and K-70.
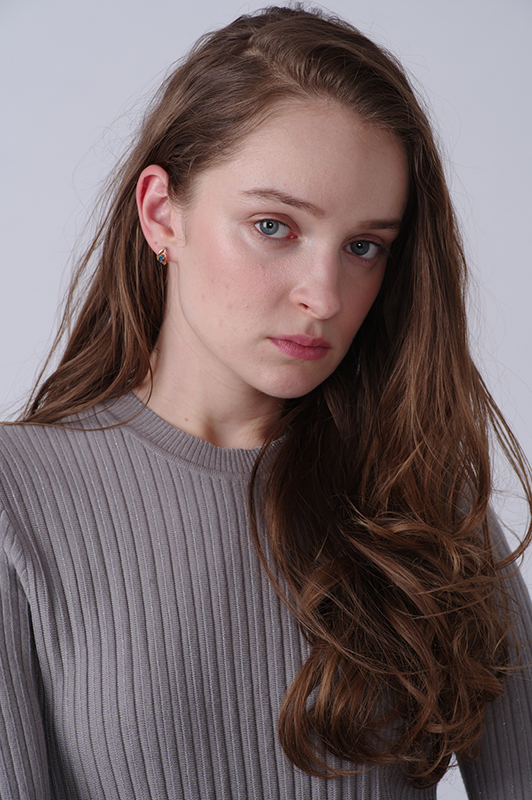
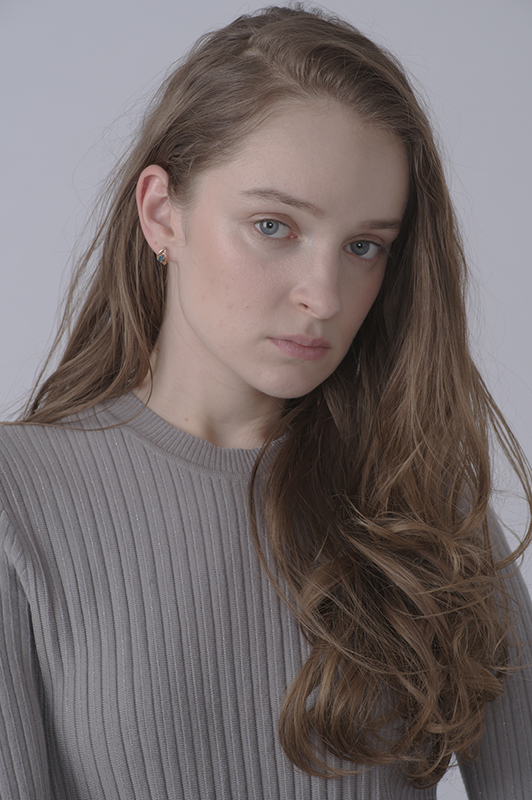
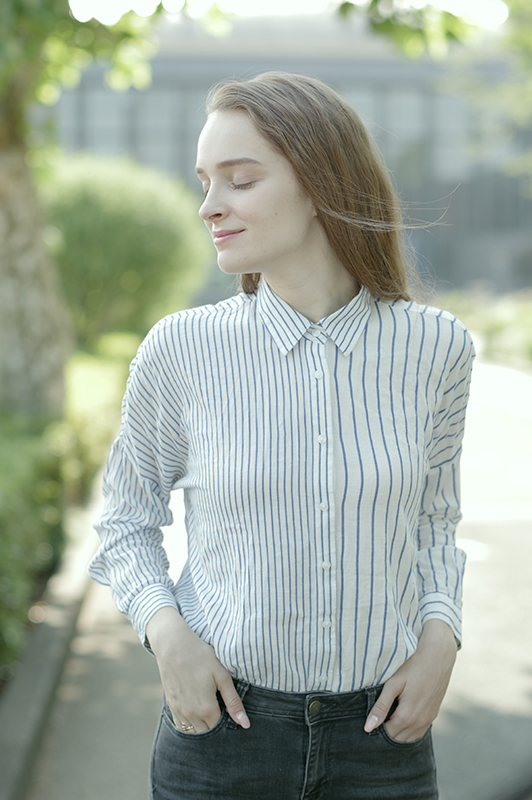
Comparison of images captured with the Skin Tone Correction function at OFF and ON (Type 1)

Type 1 effects : This mode lowers the clarity level to soften shaded areas. The shadows are depicted brighter, while the highlights are expressed with a tender, slightly blurred finishing touch. The camera also makes minute adjustment of the subject’s skin-tone and saturation levels, producing slightly magenta-tinted images.
Type 2 effects : This mode sets the clarity level lower than Type 1, which smoothens the subject skin texture and hides liver spots. This mode does not affect areas which should remain sharp, such as the background and the subject’s hair, so that you can avoid the burden of retouching work later.
Since the Skin Tone Correction function performs an advanced process to retain smooth skin-tone transitions, there may be a slight delay after the image is captured when using this function. Continuous shooting speed may also be slower. Keep these factors in mind when you are engaged in fast-action shooting.
You can also apply the Skin Tone Correction function during in-camera RAW-data development. Use this function wisely, depending on your preferred shooting style.
I have introduced some of the finishing touch applications that are useful in portrait photography using PENTAX digital SLR cameras. Add these applications to your preferred settings to capture lively, attractive portraits.
< previous