
GXR FAQs - By Product
[Question] Setting image quality and color (Image Settings).
The GXR allows you to control picture quality by changing vividness (color depth), contrast, sharpness, and color. The Vivid, Standard, Natural, Black & White, B&W (TE), Setting 1, or Setting 2 are selectable.
(A symbol is displayed on the screen if anything other than [Standard] has been selected.)
| Option | Screen display | Description |
|---|---|---|
| Vivid | |
Take strong and vivid photos with heightened contrast and sharpness and maximum vividness. |
| Standard | Normal contrast, sharpness, and vividness. The Std symbol is displayed at the DIRECT*1 Screen only. |
|
| Natural | Creates a softer image than [Standard] with decrease in contrast, sharpness, and vividness. | |
| Black & White | |
Take photos in black and white. Contrast and sharpness can be adjusted manually in 9 levels. |
| B & W (TE)*2 | |
Create monochrome photos with a sepia, red, green, blue or purple tint for the toning effect. In addition, vividness, contrast, and sharpness can be adjusted manually in 9 levels. |
| Setting 1 | |
You can set the original image quality by adjusting [Vividness], [Contrast], [Sharpness] and [Individual Color Settings]. [Vividness], [Contrast] and [Sharpness] can each be adjusted in 9 levels. In [Individual Color Settings], there are options for [Hue] and [Vividness], and each of them can be adjusted with [Orange], [Greens], [Blues], [Reds] and [Magenta]. These color settings also have 9 levels. In the Setting 1/2, there is also [Recall Settings] option, which allows you to recall the value of image settings. |
| Setting 2 | |
- *1See the FAQ below.
- *2[TE] : "Toning Effect".
The procedures for changing Image settings are shown below.
| The Shooting menu will not be displayed if no camera unit is attached to the GXR body. |
| 1 | Press the [MENU/OK] button in a Shooting mode. ![1 Press the [MENU/OK] button in a Shooting mode.](/english/r_dc/support/faq/bp/docs10/img/EDXR01005_01.gif) The shooting menu appears. 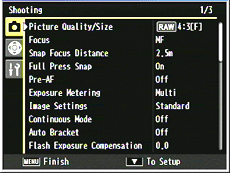 In the SCENE mode select the [MODE] tab by pressing [Fn1] button. Then press [-] button once to display the Shooting menu.  For the SCENE mode: |
| 2 | Press [+] or [-] button to select [Image Settings], and then press [Fn2] button. |
| 3 | Choose an option with [+] or [-] button. |
| 4 | Press the [MENU/OK] button. Or, press [Fn1] button and then press the [MENU/OK] button. The selected option is fixed and the screen returns to the shooting screen. |
![2 Press down or up to select [Image Settings], and then press right.](/english/r_dc/support/faq/bp/docs10/img/EDXR01012_03.gif)
- •If [Black & White], [B & W (TE)], [Setting 1] or [Setting 2] has been selected in step 3, individual adjustments are available. The procedures for these settings are shown below.
How do I adjust contrast and sharpness settings?
- •In the Setting 1/2, there is also [Recall Settings] option. This option allows you to recall the value of image settings. You can change the recalled value, and register the changed value to Setting 1 or 2. The procedures for these settings are shown below.
How do I adjust contrast and sharpness settings?
- •[Image Settings] has been assigned to the ADJ. lever as default.
| Answer ID: | EDXR03013 |
| Date created: | July 2, 2010 |
| Date modified: | July 7, 2010 |
| Product: | GXR (RICOH LENS P10 28-300mm F3.5-5.6 VC) |
| Operating system: | -- |
| Category: | Hardware operations |
Useful LINKs:
Do you need other information? Please click any link you want from the following.
Related Links
Quick Links