
CX3 FAQs - By Product
[Question] Can I adjust the brightness and contrast of a still image in a camera? (level compensation)
You can use either [Auto] or [Manual] mode to correct the brightness and contrast in still images that you have shot, and then record the corrected images. In [Manual] mode, you correct the image while adjusting the histogram. You can select [Auto] if you do not quite understand the histogram but still want to correct the brightness and contrast. Select [Manual] if you want to make fine adjustments to the histogram by yourself.| • | You can use level compensation only for still images shot using this camera. |
| • | If the selected file cannot be compensated, an error message will be displayed and it will return to the Playback menu. |
| • | In order to cancel Level compensation, press the DISP. button. |
| • | You cannot use Level compensation for movies or MP files. |
| • | This function may not have any effect for images shot using [Text Mode] in scene mode, or images shot when [Image Settings] is set to [Black & White] or [Sepia]. |
| • | While you can use Level compensation repeatedly, the image is recompressed each time and there will be some decline in image quality. |
The procedures for this operation are shown below.
| 1 | Press the playback button.  |
| 2 | Press the [ADJ./OK] button ![2 Press the [ADJ./OK] button up and down and to the right and left to display the file you want to correct.](/english/r_dc/support/faq/bp/docs09/img/EDC09005_02.gif) |
| 3 | Press the [MENU] button when the file you want to correct appears. ![3 Press the [MENU] button when the file you want to correct appears.](/english/r_dc/support/faq/bp/docs09/img/EDC09005_01.gif) |
| 4 | The playback menu appears. Press the [ADJ./OK] button ![4 The playback menu appears. Press the [ADJ./OK] button down to select [Level Compensation], and then press the button to the right.](/english/r_dc/support/faq/bp/docs09/img/EDC09033_01.gif) • Press the [ADJ./OK] button • If you select a file that cannot use Level compensation, the error message like below appears and it returns to the playback menu. 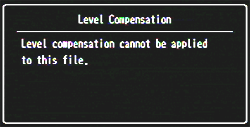 |
Further steps differ depending on the selected option (Auto or Manual).
Correcting Images Automatically
| Select [Auto] and press the [ADJ./OK] button The original image appears at the upper left of the screen and the correct image is shown on the right. ![5 Select [Auto] and press the [ADJ./OK] button to the right. The automatic Level compensation screen appears.](/english/r_dc/support/faq/bp/docs09/img/EDC09033_02.gif) • Press the [DISP.] button if you want to cancel Level compensation. |
|
| Press the [ADJ./OK] button. Messages appear during the correction process, and then the corrected image is recorded. The original image remains unchanged. ![6 Press the [ADJ./OK] button. Messages appear during the correction process, and then the corrected image is recorded. The original image remains unchanged.](/english/r_dc/support/faq/bp/docs09/img/EDC09033_07.gif) |
|
Correcting Images Manually
| 1 | Select [Manual] and press the button to the right The original image appears at the upper left of the screen, the histogram is at the lower left, and the corrected image is shown on the right. ![Select [Manual] and press the button to the right. The manual Level compensation screen appears.](/english/r_dc/support/faq/bp/docs09/img/EDC09033_03.gif) • If you select a file that cannot use Level compensation, the error message appears and it returns to the playback menu. • Press the [DISP.] button if you want to cancel Level compensation. |
||||||||
| 2 | Press the [MENU] button to switch between points on the histogram. ![Press the [MENU] button to switch between points on the histogram.](/english/r_dc/support/faq/bp/docs09/img/EDC09033_04.gif) A histogram shows the number of pixels on the vertical axis and the brightness on the horizontal axis, ranging from shadows (dark areas) on the left through mid-tones to highlights (bright areas) on the right. Each time you press the MENU button, the selected point switches from the left point, to the middle point and then to the right point. 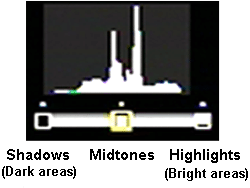 Pressing the Fn (Function) button at this point displays the operation explanation screen. Pressing the Fn button again returns the display to the previous screen.  |
||||||||
| 3 | Press the [ADJ./OK] button Moving the left or right point moves the middle point also. [Each point and effect of the level compensations]
Sample correction methods Example 1) To adjust the overall image brightness: Select the middle point and move it to the left to brighten the entire image. Selecting the middle point and moving it to the right darkens the entire image. 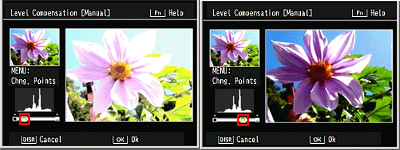 Example 2) To correct an overexposed image: Press the [MENU] button to select the left point. Then press the [ADJ./OK] button 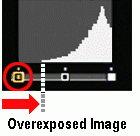 Example 3) To correct an underexposed image: Press the [MENU] button to select the right point. Then press the [ADJ./OK] button Example 4) To boost the contrast in an image: By aligning the left and right points with the respective ends of the histogram peaks, you can create an image with clearly defined bright and dark areas. 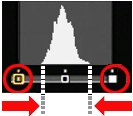 In this point, by moving the middle point to the left or right, you can then adjust the overall image brightness. If an image is lacking in contrast, the histogram peaks are concentrated toward to the center. |
||||||||
| 4 | Press the [ADJ./OK] button. Messages appear during the correction process, and then the corrected image is recorded. The original image remains unchanged. |
||||||||
Answer ID: EDC03033
Date created: March 12, 2010
Date modified: December 9, 2010
Product: CX3
Operating system: --
Category: Hardware operations
Date created: March 12, 2010
Date modified: December 9, 2010
Product: CX3
Operating system: --
Category: Hardware operations
Useful LINKs:
Do you need other information? Please click any link you want from the following.Related Links
Quick Links