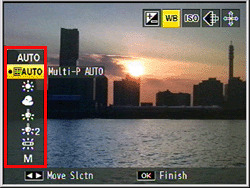
CX6 : Details on the White balance modes.
You can choose a white balance mode so that a white subject will appear white. The default white balance mode is [Multi-P AUTO]. Change the setting in situations where the white balance is difficult to adjust effectively, such as when shooting an object of a single color or when shooting under multiple light sources.
White Balance Modes
| Symbol | Mode | Description |
|
-- (no symbol) |
Auto | Adjusts the white balance automatically. |
|
|
Multi-P AUTO | The camera automatically selects the optimal white balance according to the conditions of sun and shade or the flash illumination range. |
|
|
Outdoors | Select this when shooting outdoors (sunny) and white balance fails to adjust properly. |
|
|
Cloudy | Select this when shooting in cloudy weather or shade and white balance fails to adjust properly. |
|
|
Incandescent 1 | Select this when shooting under incandescent light and white balance fails to adjust properly. |
|
|
Incandescent 2 | Select this when shooting under incandescent light and white balance fails to adjust properly (more reddish than [Incandescent 1]). |
|
|
Fluorescent | Select this when shooting under fluorescent light and white balance fails to adjust properly. |
|
|
Manual | Adjust the white balance manually. |
The above symbols are displayed on the picture display after white balance mode settings have been made. The symbols are not displayed if [Auto] has been set as the white balance mode.
The white balance setting changes are available in the Shooting menu, or by using the [ADJ./OK] button.
About the Shooting menu operations.
Operating procedure with the [ADJ./OK] button
- 1 Press the [ADJ./OK] button when in shooting mode.
![1 Press the [ADJ./OK] button when in shooting mode.](/english/r_dc/support/faq/bp/cx6/img/adjok_btn.gif)
- 2 Push the [ADJ./OK] button right or left
 until the White balance mode menu appears.

- 3 Push
 to select a setting other than [M] (Manual Settings). You can also now shoot by pressing the shutter release button.

- 4 Press the [ADJ./OK] button. The symbol of the selected white balance mode appears on the picture display.
![4 Press the [ADJ./OK] button.](/english/r_dc/support/faq/bp/docs10/img/EDC03014_02.gif)
* [Cloudy] is selected in above example.
![]() Note
Note
- • The white balance may not be adjusted correctly for a subject that is not sufficiently white, or that is mostly dark. In this case, add something white to the subject.
- • When shooting with the flash, the white balance may not be adjusted correctly if [AUTO] is not selected. In this case, switch to [AUTO] to shoot with the flash.
- • Limitations on the white balance settings, see the FAQ below.
- Available [Shooting menu] chart in each shooting mode.
Manual Settings
- 1 Select [M] (Manual Settings) in the above Step 3.
- 2 Point the camera at a piece of paper, or something white, under the lighting conditions for your picture.
- 3 Press the [DISP.] button.
The white balance is set when you press the [DISP.] button.
![3 Press the [DISP.] button.](/english/r_dc/support/faq/bp/cx6/img/disp_btn.gif)
- 4 Press the [ADJ./OK] button.
The manual settings symbol appears on the picture display.
The screen is displayed with the white balance that was set in Step 3. If the result is not as expected, repeat the steps to change the settings as many times as required.
Date created: December 5, 2011
Date modified: --
Product: CX6
Operating system: --
Category: Hardware operations
Do you need other information? Please click any link you want from the following.
Related Links
Quick Links


