When you take a photo at a seat near the window with a nice view, you tend to include the outside view into the photo as a background as well as the wine and champagne. As a result, you forget to consider the "color" of the wine and champagne in the glasses.
Unless you can capture the deep red of the wine and the golden color of champagne, even if you find a "cool" composition, the photo will no longer give you a "delicious" impression.
The leading players are the dishes and drinks on the table, and the background comes in second however nice it is. First, look for a position or an angle at which the colors of the drinks in the picture look vibrant while moving the glasses on the table.
You should not forget what the leading player is particularly when you are seated near a window at a good location.
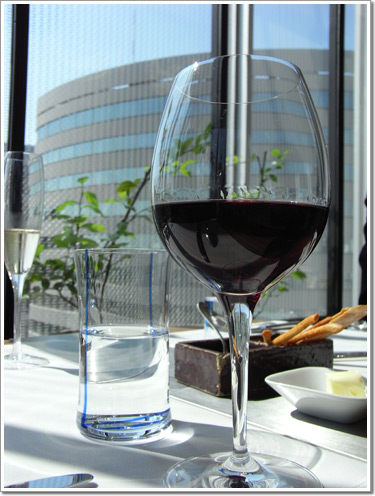
[Bad example]
Taken with: R8 ●1/620 sec ●F3.6 ●ISO100 ●EV-0.0 ●WB:MANUAL
The color of the wine became an intense black because I tried too hard to include the glasses and the view in the same composition.
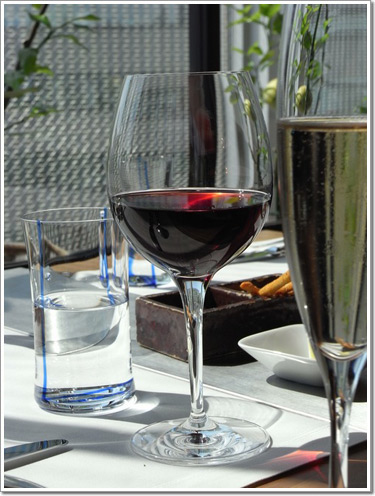
[Key point to shoot pictures beautifully]
Taken with: R8 ●1/470 sec ●F3.6 ●ISO100 ●EV-0.0 ●WB:MANUAL
What you should do first is look for a position or angle at which you can shoot the wine to reflect its clear color. After finding a good position, remove unnecessary objects from the surrounding area and finalize the composition.
* Mistakes you are prone to make at a seat near a window
[Bad example]
Taken with: R8 ●1/380 sec ●F3.6 ●ISO100 ●EV-0.0 ●WB:AUTO
You are prone to make these mistakes at the seat near a window. You intended to shot a picture avoiding backlight, but the plate is completely in the shade, and the color includes a shadow.
[Good example]
Taken with: GR DIGITAL II ●1/380 sec ●F3.5 ●ISO100 ●EV-0.0 ●WB:AUTO
Even in this case, look for a position at which the clear color can be obtained while moving the plate on the table. Near the window where the plate extends a shadow is good, however it is important to look for a position where beautiful "color" can be captured.
When various kinds of dishes are placed on a table at a restaurant, you sometimes want to photograph "this subject only" or "a picture with depth". If you hold your camera vertically in such a case, excessive information will be included on the right and left, possibly not allowing you to bring out the subject you want to photograph.
In a case such as this, hold your camera vertically, and try a "vertically-oriented shot". This eliminates the excessive information on the right and left and creates a picture with only the desired subject in focus.
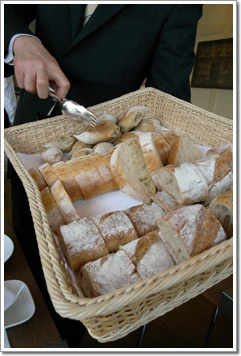
[Example of vertically-oriented shot (1)]
Taken with: GR DIGITAL II ●1/133 sec ●F3.5 ●ISO80 ●EV-0.0 ●WB:MANUAL
The theme is "a basket full of bread served by a waiter". The vertically-oriented shot can pass on only this information.
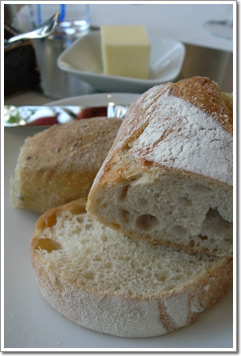
[Example of vertically-oriented shot (2)]
Taken with: GR DIGITAL II ●1/189 sec ●F3.5 ●ISO80 ●EV-0.0 ●WB:MANUAL
You want to photograph bread and butter. In such a case, eliminate the unnecessary information on the right and left using a vertically-oriented shot.
[Shooting a same subject vertically and horizontally (horizontal shoot)]
Taken with: GR DIGITAL II ●1/143 sec ●F3.5 ●ISO80 ●EV-0.0 ●WB:MANUAL
A largish glass bowl and a small square plate placed on a large plate. The picture looks mediocre if you photograph them horizontally, and you will have a hard time angling your camera......
[Shooting a same subject vertically and horizontally (vertical shoot)]
Taken with: GR DIGITAL II ●1/125 sec ●F3.5 ●ISO80 ●EV-0.0 ●WB:MANUAL
By using a vertically-oriented shot, you can capture vegetables and mousse in the bowl clearly. The small square plate can be shot clearly.
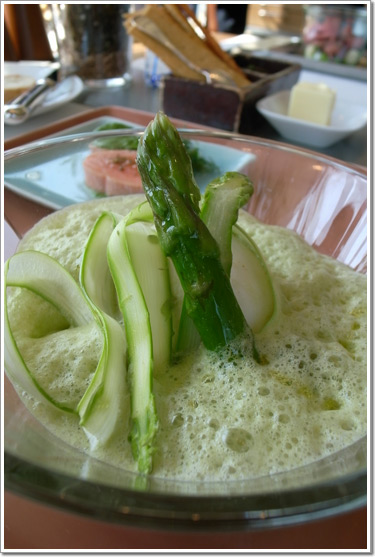
[Shooting a same subject vertically and horizontally (vertical shoot 2)]
Taken with: GR DIGITAL II ●1/97 sec ●F3.5 ●ISO80 ●EV-0.0 ●WB:MANUAL
If you want to photograph the dish on the square plate, take one more picture as a different cut. You do not have to try to put two kinds of dishes on one plate in one frame as this will make both look mediocre.
[Reminder for vertically-oriented shooting (bad example)]
Taken with: GR DIGITAL II ●1/570 sec ●F7.1 ●ISO100 ●EV-0.0 ●WB:AUTO
The key point for vertically-oriented shooting is to hold your camera at a slightly higher position. The above example, however, was taken at too high a position, which could not create a three-dimensional and sumptuous effect.
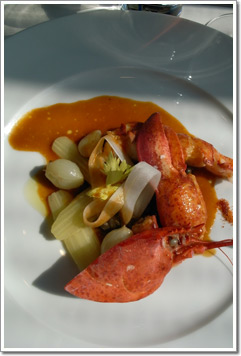
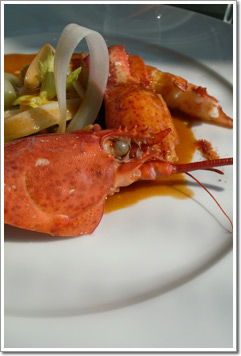
[Reminder for vertically-oriented shooting (good example)]
Taken with: GR DIGITAL II ●1/620 sec ●F7.1 ●ISO100 ●EV-0.0 ●WB:AUTO
An example of expressing the sumptuousness of the lobster. Look for a slightly higher position where you can express bulges and three-dimensional appearance of the object. Next, make the appearance of the object look much bigger and more voluminous in a composition that does not allow the entire plate to be captured in one frame.
<<Basics for vertically-oriented shot>>
The key to good vertically-oriented shooting is to hold your camera at a slightly higher position than required to photograph a desired subject. If you take a picture from a low position, subjects in front of your camera will be zoomed in on, and ones behind your camera will not be photographed.
<<Application of vertically-oriented shot>>
If you want to emphasize the beautiful long stalk of a glass or the full length of a wine bottle impressively, hold your camera at a position lower than the subject. Slightly incline the top of your camera you are holding vertically backward, and take a picture from a low angle in a position looking upward so as to zoom in on the bottom of the stalk. This allows you to shoot the beautiful long stalk of the glass or the entire bottle.
Even if you photograph the same subject, the message of the picture changes dramatically depending on what you focus on.
Passing on an atmosphere or image or explaining the material used;
according to your purpose, try changing the position you focus on.
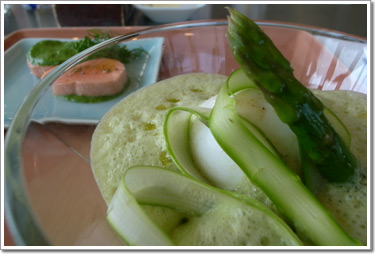
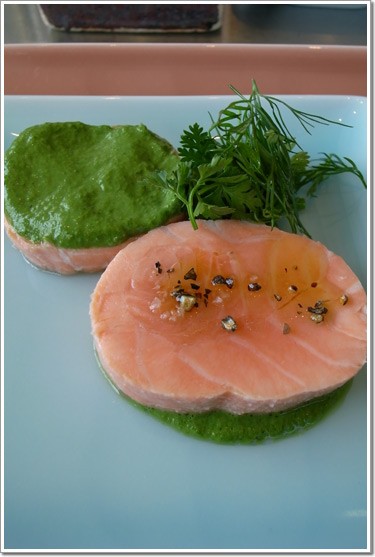
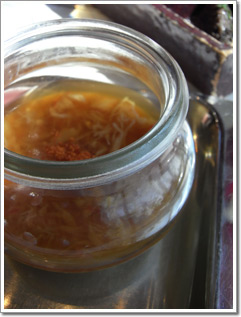
[Passing on the "atmosphere" of a dish contained inside a jar]
Taken with: R8 ●1/310 sec ●F3.6 ●ISO100 ●EV-0.0 ●WB:AUTO
To take a picture of a dish inside a jar so as to present a nice image, focus on the brim of the jar. The contents of the jar look blurred, but you can pass on the velvety atmosphere of the contents.
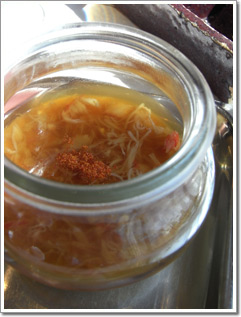
[Explaining a dish contained inside a jar]
Taken with: R8 ●1/217 sec ●F3.6 ●ISO100 ●EV-0.0 ●WB:AUTO
Focusing on the object makes clear what is included in the jar. Instead of having to use words, the picture explains the contents of the jar.
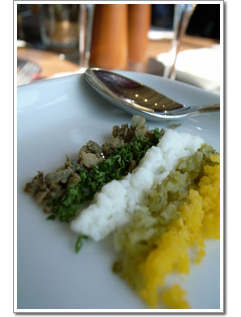
"Color" is one of the important elements that makes you feel "It looks delicious". When the color of the main dish is not clear, utilize the "color" of the attached vegetables effectively. A picture of dishes that include three colors: red, yellow, and green, look delicious by itself. If there are these three colors on the plate, try taking a photo of the main dish at an angle where all three colors can be in one frame.
[Bad example]
Taken with: R8 ●1/620 sec ●F5.4 ●ISO100 ●EV-0.0 ●WB:AUTO
The "color" is given on the upper right of the plate. But, you focused on the main dish only, and took a picture with less consideration of the color. As a result, the picture presents a rather lonesome impression.
[Good example]
Taken with: R8 ●1/570 sec ●F5.4 ●ISO100 ●EV-0.0 ●WB:AUTO
Look for an angle where the "color" can be suitably included in one frame by turning the plate. As compared with the picture on the left, the dish in this picture looks more delicious, doesn't it?
Taken with: R8 ●1/440 sec ●F5.4 ●ISO100 ●EV-0.0 ●WB:AUTO
This is a case where red, yellow, and green elements are featured in appropriate amounts. This just happened and came easy.