In digital cameras, ISO speed is a number that indicates sensitivity to CCD or CMOS light. You might have heard of CCD and CMOS before – they are basically the digital equivalent of film in normal film cameras. ISO values come in numbers such as 100 and 400. A higher (larger) value means that the camera is sensitive to light, letting you shoot in dark environments, capture quickly-moving subjects, and also prevent blurring caused by hand movement. However, higher values also generate more noise and reduce image quality. With a lower (smaller) ISO value, on the other hand, you probably won't be able to get good results in dark settings, but your images will be more refined and detailed.
It might be easier to understand these differences by looking at some examples. Let's compare.
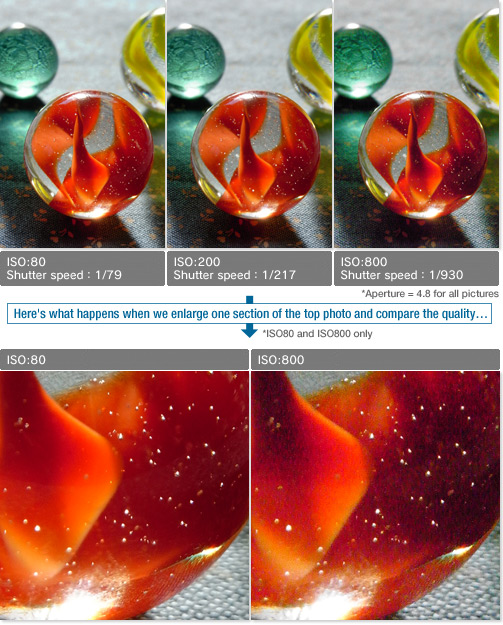
How Different ISO Values Affect an Image
Ricoh digital cameras can be configured to 8 different ISO speed levels: ISO80 (GR DIGITAL III and GX200: ISO64), 100, 200, 400, 800, 1600, AUTO, and AUTO-HI. Let's look at a few examples of photos taken at ISO80, 200, and 800.
*May vary according to model. Refer to your camera's manual for more information.
Photo: Nao Nishitsuji ●R10
You'll notice that a lower ISO value slows down the shutter speed, thus making the image quality more refined and detailed, while increasing the ISO value speeds up the shutter speed and creates a grainier look. The graphic below shows the advantages and disadvantages of low and high ISO values.
You don't really need to spend racking your brain trying to understand all this complicated information, though – usually, all you have to do is leave ISO in the AUTO setting, and the camera will automatically adjust to the environment and select the optimal value. When you're shooting in a dark setting, the AUTO-HI (high-sensitivity setting)* is a big help, as it automatically shifts the value to the appropriate level. So, when do you need to set and change the ISO value manually? Let's find out.
Using ISO
With ISO in the AUTO setting, the camera will automatically select the best ISO value. When you want to take higher-level pictures, though, we recommend choosing the ISO manually.
If you make the ISO lower, you'll be able to take more finely-textured pictures – when you just want to get refined image quality, it's a great idea. Lowering the ISO value also slows down shutter speed, so it's best to use a tripod to prevent blurring caused by hand movement.
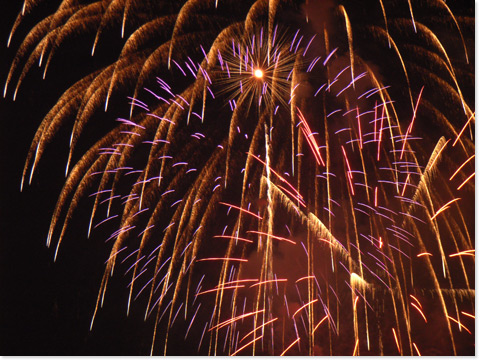
Another good time to lower the ISO is when taking pictures of fireworks in the summer. "Wait," you might be thinking, "even though it's dark?" Actually, by lowering the ISO and deliberately making the shutter speed slower*, you can capture the trails of light that fireworks leave behind, like the ones in picture 2. The important thing to remember is that a slow shutter speed is not always a bad thing – just remember to have your tripod handy. On the other hand, setting the ISO to a higher value makes it easier to take photos of quickly-moving subjects in bright settings, like picture 3 illustrates. If you tried to take this photo with ISO in the AUTO setting, the subject would be blurry.
*When you want to make the shutter speed slower than a certain level, select from long exposure settings.
To capture the trails of light during fireworks, you have to make the shutter speed slower. I slowed down the ISO so the scene wouldn't be too bright, selected an appropriate shutter speed*, and shot.
*When you want to make the shutter speed slower than a certain level, select from long exposure settings.