
Software Download > RDC-7 Firmware upgrade procedures
There are following three steps to upgrade the firmware of your RDC-7. Please read procedures carefully before upgrade the firmware.
A: Requirements for Firmware Upgrade
B: Precautions
C: Upgrade procedure
[Confirmation]
Sep 1. Copy the firmware to a SmartMedia card- Step 2. Rewrite the firmware to the RDC-7
- Step 3. Rewrite the fixed data to the RDC-7
A: Requirements for Firmware Upgrade
-
1)SmartMedia card(2MB - 32MB)
*Never use 64MB card. Cannot upgrade the firmware properly when you use 64MB card.) -
2)PC card adapter or FlashPath
*The device to access to SmartMedia card from the PC is required. - 3)AC adapter (AC-3)
B: Precautions
- *Do not unplug the AC adapter during operation.
- * If you lose power off during operation, please repeat the following procedures. Contact our service office if the camera fails to operate when you repeat the procedure.
C: Upgrade procedure
[Step 1 : Copy the firmware to a SmartMedia card]
- 1) Download firmware onto the PC hard disk from the download page.
-
2) Extract the downloaded file on PC. (The downloaded file is self-extract format.)
[Windows] Double click "dc-7.exe".
[Macintosh] Extract "dc-7.hqx" using StuffIt Expander or a similar application. Depending on the application, extracted file will be "dc-7.sea". In this case, please double click the "dc-7.sea" file to make "dc-7" folder.
-NOTE-
* Download and extract on a hard disk, not on a card reader or removable disk.
* Never move or delete folders on the SmartMedia card. - 3) Format SmartMedia card with the RDC-7. (Select "Format" menu from "SET" mode.) Executing format will make "Dcim" folder on the SmartMedia.
4) Copy the downloaded files to the SmartMedia card. Copy "Shapphire.bin" file and "radj" folder from the newly created "dc-7" folder to the root directory of SmartMedia card.
*Do not copy the dc-7 folder itself.
Root folder of the SmartMedia card
|
|-- Dcim
|-- Sapphire.bin
|-- radj
---- |--radj0001.adj
You are ready to upgrade once you copy the firmware and fixed data on the SmartMedia card. The RDC-7 firmware rewriting procedures are as follows.
[Step 2 : Rewrite the firmware to the RDC-7 ]
- 1) Connect the RDC-7 to the AC adapter AC-3.
- 2) Insert the SmartMedia card into the Camera.
- 3) Set the Mode dial of the camera to "SETUP".
-
4) While pressing the Shutter Release Button, turn the camera power on.(Pic.1)
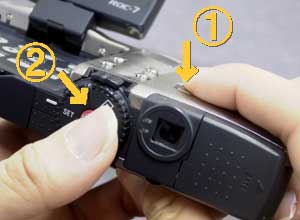
(pic.1) - The Camera is set at program rewriting mode and message is appeared on the LCD monitor.
-
5 ) Press the Shutter Release button to proceed and wait until program writing is completed. (GREEN LED lamp is blinking during the writing.) -
6) When program writing is completed, the camera will be reset automatically. (The Green LED is turned on and the LCD monitor will be return to SETUP menu.)
* If the green LED continues to flash after three minutes, leave for about five minutes and turn the power off. - 7) Turn the camera power off.
-NOTE-
*During the program writing, do not remove the AC adapter.
[Step 3: Rewrite the fixed data to the RDC-7 ]
- 1) Connect the RDC-7 to the AC adapter AC-3.
- 2) Insert the SmartMedia card into the Camera.
- 3) Set the Mode dial of the camera to "SETUP".
-
4) While pressing both of the UP and DOWN(
 ) button, turn the camera power on.
 -
The Camera is set at Initial data writing mode.
(pic.2) - 5) When "WAITING"message is appeared on the LCD monitor, you can stop pressing the buttons.
-
6) Press the MENU button to proceed and wait until "5555" is appeared on the LCD panel.
If "5555" is appeared, rewriting is completed. - 7) Disconnect the AC adapter and the camra power off. *Since achieving the fixed data writing, no operation from the button can be accepted, you need to turn the camra power off by disconnecting the AC adapter.
- 8) Remove the SmartMedia card from the camera.
[Confirmation]
- 1) Turn the camera power on and check if the camera operates properly.