GR DIGITAL Firmware Upgrade Procedure for Windows
The following instructions will guide you through the process of updating your camera's firmware.
- Confirm the version of the camera's current firmware
- Preparations
- Update procedure
- An alternative update method (Requires a memory card reader/writer)
1. Confirm the version of the camera's current firmware
|
Please check the version of the camera's current firmware before beginning this update.
|
|||
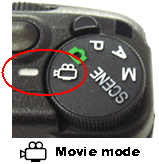
| 1. | Turn off the camera and turn the mode dial to Movie Mode. | ||

|
|||
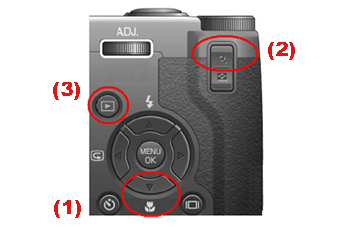
| 2. | While pressing both (1) the down arrow button and (2) the enlarged view button, holding down (3) the playback button until the information on the firmware version is displayed. | ||

|
|||
| 3. | A table like the one below will be displayed on the monitor. The CPU2 field shows the current version of your camera's firmware. The following example indicates the firmware version 1.00. | ||
|
|||
| Note: This screen will be displayed for about 20 seconds. | |||
2. Preparations
In order to complete this firmware update, you will need:
- 1. The GR DIGITAL camera (set the [ORIGINAL] mode in the USB connection, not the [MASS STR] mode.)
- 2. The AC-4c AC adapter or fully charged batteries
- 3. An SD memory card to store the files on (this update cannot be performed using the camera's internal memory)
- 4. A USB cable to connect between the GR DIGITAL and a computer.
- 5. A computer that has a USB port. And the latest version of the Caplio software for the GR DIGITAL installed in the computer.
- 6. Remove the other USB devices before this update.
After these preparations are complete, you are ready to update your camera's firmware.
3. Update procedure (Windows Vista/XP/2000/98SE/98)
In order to complete this firmware update, you will need:
- 1. Download the firmware file from this page to your computer. Double click the downloaded file to decompress it. A folder will be created and then find the [FirmUpdate.exe] file in the folder.
- 2. Check if the camera is in the [ORIGINAL] mode and if the battery is fully charged, insert an SD card in the camera.
- 3. Exit RICOH Gate La, then connect the camera to the computer via the USB cable.
- 4. Double click on the [FirmUpdate.exe]file, the firmware update window will appear in the computer. Read the instructions and then click the Update button in the window. All instructions will be in the window, follow the on-screen instructions to complete the update.
4. An alternative update method (Requires a memory card reader/writer)
If you are familiar with a computer and have a memory card reader/writer, you can update with the following way. This method does not require connecting a camera to a computer, you do not need to install the Ricoh Gate La in your computer.
- 1. Download the firmware file from here and decompress it. Find the following file in the folder extracted; [qrflect3], [qrflect7].
- 2. Format an SD card by the camera.
- 3. Copy the files, [qrflect3], and [qrflect7] to the root directory in the SD card using a memory card reader/writer.
- 4. Turn off the camera and switch the mode selector to the [Movie mode], and put the SD card into the camera.
- 5. Pressing both the [Flash/Upper arrow] button and the [Enlarged view] button, holding down the [Playback] button, until the information appears in the LCD of the camera.
- 6. Follow the instruction in the LCD to complete the update.
If you fail updating the firmware even if you have tried all things in this page, please contact to the original store where you purchased the camera, or contact a Ricoh service center.


