
WG-6
Below is a list of frequently asked questions and corresponding answers for the WG-6 digital cameras.
General function and specification
 What accessories are provided with this camera?
The following accessories are providing with this camera.
•Rechargeable Lithium-ion Battery DB-110
•USB Power Adapter AC-U1
•Power Plug
•USB Cable I-USB173
•Hand Strap
•Macro Sand O-MS3
•Operating Manual
•Quick Guide for Waterproof Function
* No camera case nor SD (SDHC) Memory Cards are included with the camera.-
What are the optional accessories for this camera?
The optional accessories are as follows:
•Camera Case O-CC135
•Protector Jacket O-CC173
•Waterproof Remote Control O-RC1
•AC Adapter Kit K-AC166
•Battery Charger BJ-11
•Wide Conversion Lens DW-5
•Camera Case SC-900
•Rechargeable Battery DB-110-
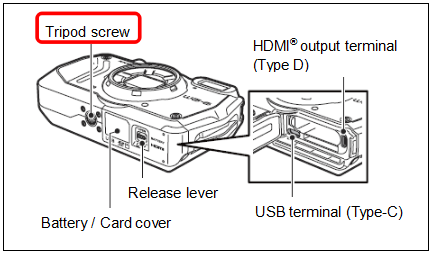
Can the camera be mounted on a tripod?
Yes, it can be mounted using the threaded tripod mount in the camera base.
-
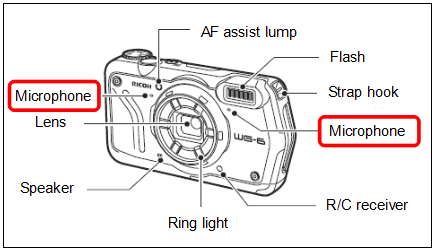
Where is the audio microphone?
Can an external microphone be connected to the camera?
The microphones are on both side of the lens at the front of camera.
External microphones cannot be connected to the camera.
-
Can the common filter be used for WG-6?
Yes. It can be used 37mm common filter.
It is useful to prevent scratch on the lens and condensation.-
Is the camera case for WG-6 available?
The Camera Case O-CC135 and the Soft Case SC-900 are available as option.
The Soft Case SC-900 can be stored with the Wide Conversion Lens (DW-5) attached.-
What is the specification of LCD monitor?
The specifications for the Monitor are as follows
Specification 3.0” Wide LCD, approx.1040K dots with AR coating (Cover only) Adjustment Brightness and Outdoor monitor: ±2 steps -
What is the recording format?
The recording format is as follows.
Still Image JPEG Baseline standard (Exif Ver.2.3) Movie MPEG-4 AVC/H.264
Water proof, dust proof and shockproof function
-
How is the performance of waterproof / dustproof / shockproof?
This camera is provided with a waterproof / dustproof design complying with JIS/IEC waterproof grade 8 and JIS/IEC dustproof grade 6 (equivalent to IP68).
The camera satisfies the RICOH drop test (2.1m height onto a 5cm thick plywood surface) complying with MIL-Standard 810F Method 516.5-Shock testing.
The camera satisfies the RICOH test for the waterproof, dustproof, and shockproof performance, but this does not guarantee it will remain free of trouble or damages.
• Waterproof performance is not guaranteed if the camera is exposed to impact such as being dropped or hit.-
Are there any precautions that should be observed before using the camera in the water?
Before using the camera in the water, please pay attention the following points.
• Make sure that there are no cracks or scratches on the rubber seal of the battery/card and terminal covers.
• Make sure there are no foreign objects (dust, sand, hair, lint or liquid) on the rubber seals or the surface they contact before closing the battery/ card and terminal covers. Wipe off any foreign objects with a clean lint-free cloth.
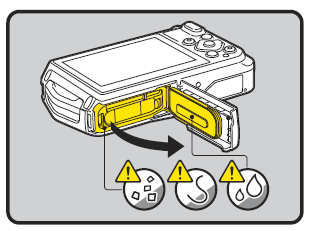
• Close the battery/card and terminal covers properly until they click. Otherwise water may get in and damage the camera.
• Avoid opening the battery/card and terminal covers when near the waterside or with wet hand.
• Wait until the camera is completely dry before changing the battery or the SD Memory Card.
• The camera will sink if dropped in water, so be sure to attach the strap and slip the strap over your wrist when using the camera in or near water.
• To enhance the waterproof performance of the camera, the front of the lens is protected by glass. As any dirt or water on the glass will affect the quality of pictures taken, the glass should always be kept clean.-
Are there any precautions that should be observed when using the camera in the water?
When using the camera in the water, please pay attention the following points
• Do not use the camera deeper than 20 meters underwater. Do not use the camera underwater for more than 120 minutes consecutively.
• Do not open the battery/card and terminal covers underwater.
• Do not use in hot water or in a hot spring.
• Do not apply excessive force to the camera, for example diving into water with it. Doing so may compromise the waterproof performance of the camera or cause the covers to open.
• Leaving the camera on the sand at the beach may cause the camera to exceed its operating temperature or cause the speaker or microphone to become blocked with sand.
• Avoid subjecting the camera to substantial vibrations, shocks, or pressure as this may cause a loss in waterproof performance. If the camera is subjected to substantial vibrations, shocks or pressure, take your camera to your nearest RICOH Service Center and have it checked.
• Avoid getting sunscreen or sun oil on the camera as it may cause discoloration of the surface. If any oil gets on the camera, wash it off immediately with warm water.
• Sudden and extreme changes in temperature may cause condensation to form in and on the camera. Keep the camera in a bag or case to reduce the difference in temperature.-
Are there any precautions that should be observed after using the camera in the water?
After using the camera in the water, please pay attention the following points
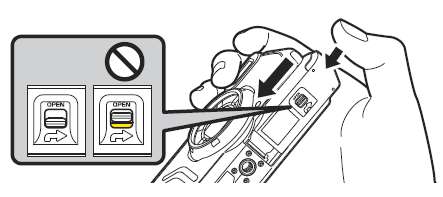
• Do not open the battery/card cover or terminal cover if the camera is wet. Wipe off any water with a clean lint-free cloth.
• The inside surface of the covers may get wet when they are opened. Wipe off the any water that is on the cover.
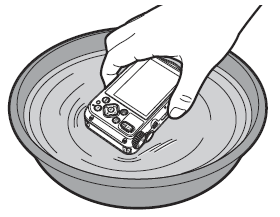
• Wiping off the camera while there is sand or dust on it may scratch the surface of the camera. Make sure that the battery/card cover, and terminal cover are firmly closed before washing the camera in tap water. After washing the camera, dry it with a soft cloth.
• Wipe off any dirt or sand on the waterproof packing or the packing contact surface. The camera's waterproof performance may be compromised by loose packing or cracks or dents in the packing or packing contact surface. If there is any such damage, contact your nearest RICOH Service Center.
• If the camera is very dirty or after it has been used in the sea, make sure that it is turned off and the battery/card and terminal covers are firmly closed before rinsing it under running tap water or leaving it in a bowl of clean water for a short time (2 or 3 minutes)
• Avoid cleaning with agents such as soapy water, mild detergents, or alcohol as this may compromise the waterproof performance of the camera.
• To maintain the waterproof performance of the camera, you are recommended to change the waterproof packing once a year. Contact your nearest RICOH Service Center regarding changing the packing. (A charge will be made)
• The camera's accessories are not waterproof.-
Is there waterproof case that can be used in deeper under water?
No, there is no plan to introduce such housing.
Memory Card
-
What memory cards can I use?
The operation has been confirmed with the following memory cards.
- Panasonic / Toshiba / SanDisk
SD Memory Cards with capacities up to 2GB
SDHC Memory Cards with capacities up to 32GB
SDXC Memory Cards with capacities up to 128GB
- Toshiba / SanDisk
SDXC Memory Cards with capacities up to 256GB
- SanDisk
SDXC Memory Cards with capacities up to 512GB
*If saving movie images, it is recommended to use a Class 6 or faster Memory Card.
*The WG-6 has 27MB built in memory.
-As of May 2019
*Tested" denotes only that the operation of the product has been checked by RICOH IMAGING and in no way constitutes a guarantee to customers that the product is suited to their requirements.-
Does the camera come with an SD (SDHC) Memory Card?
No. Memory Cards should be purchased as required.
You can store approx. 6 pictures in built-in memory at the default setting as record size: [L] [4:3] and quality level at ★★.-
When using SD (SDHC) Memory Cards, what should I do first?
Card that are unused or that have been used on other devices, such as another camera or a computer, must first be formatted on the WG-6.
*Please note that formatting will delete all data recorded on the card.
*When communicating using the FlashAir card, set [FlashAir Communication] to [On]
in the [Set Up] menu 5 [FlashAir Connection]
*If the write-protect switch of the FlashAir card is locked, the setting cannot be made.
*Do not format the FlashAir card with this camera.
*Please perform the initial setting when you use FlashAir card following the instruction manual of the FlashAir card.-
Can the Micro SD (SDHC) card be used?
No guarantee of proper operation with SD card adapter, please use SD (SDHC) card.-
Are there any precautions needed when using SD (SDHC) Memory Cards?
Please pay attention the following points.
• Do not remove a SD (SDHC) Memory Card or turn the camera off while you are recording data or playing back images or audio, or while the camera is connected to a computer via a USB cable.
• Card that are unused or that have been used on other devices, such as another camera or a computer, must first be formatted on the WG-6.
• When opening and closing the battery/card cover, be sure to remove water and dirt such as sand adhering to the camera, and avoid locations where dirt can enter the camera interior
• Avoid using or storing the card where it may be exposed to static electricity or electrical interference.
• If a card is left unused for a long period, it may no longer be possible to read the data.
• It is recommended that important data should be backed up regularly.
• We are not recovering or repair the data if the data have been corrupted or deleted at our Service sections.
Battery and Power Sources
-
What kind of battery does the camera use?
The rechargeable lithium-ion battery DB-110.-
How long can the rechargeable lithium-ion battery DB-110 be used for?
The result of actual measurements is as below.
Number of still images shot Approx. 340*1 Playback time (Slideshow) Approx. 260 minutes*2 Movie recording time Approx. 60 minutes*2 Recharging time (Max.) Approx. 180 minutes*3
*1 The number of still images shot is measured in conditions that comply with CIPA standards and it may vary from condition of use. (Example of CIPA standards: LCD monitor On, Flash 50% usage and Temperature 23℃)
*2 The playback time and movie recording time are based on the result of in-house testing. It is result of a measurement and not guarantee for using time and number of still images.
*3 Please recharge the battery at the condition of temperature between 0℃ and 40℃.-
When the battery is removed, how long is the date set in the camera retained?
Once a fully charged new battery has been loaded and left in the camera for at least 2 hours, data in the camera remains backed up for approximately 5 days when the battery is removed.
The internal clock also continues to run while the data is backed up.
*It is result of a measurement and not guarantee for back up time.-
Is there an AC adapter for the camera?
There is the optional AC adapter kit [K-AC166]
When using for long time, it is recommended to use the AC adapter kit k-AC166.
When using the AC adapter, remove the battery before use.-
Can I use the USB power adapter AC-U1 overseas?
Since the AC-U1 corresponded between AC 100V and 240V(50/60Hz), if you provide the power outlet or adapter for it, you can use it at almost all countries without problem.
Caution:
Please do not use a transformer, etc., as it may cause malfunction.
Capture and Playback
-
Can the ISO sensitivity be set in manually?
Yes. You can choose [125], [200], [400], [800], [1600], [3200] and [6400] from the setting menu.
At the Shooting menu 1, select [ISO Setting] and press
  key.
key.

* When [D-Range Setting] is set [Highlight Correction], you can choose minimum from ISO [250].-
What is Dynamic Range (D-Range)?
Expands the dynamic range so that to be able to express from bright area to dark areas.
At theShooting menu 3, select [D-Range Setting] and press key.
The default setting for both [Highlight] and [Lowlight] corrections are [Auto]. If you do not want to do correction, please set it to [Off].
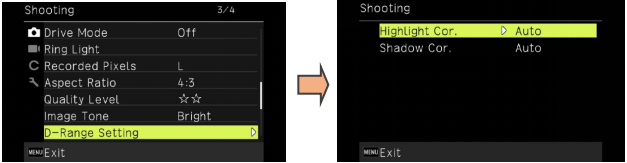
Highlight Correction Adjust the bright areas when the image is too bright. Shadow Correction Adjust the dark areas when the image is too dark.
Caution:
• In case of the subject is too bright or too dark, the correction effect may not be occurred.
• The default setting is [Auto]. If you do not want to correction, set this to [Off].-
What is the [IQ Enhancer]?
By using the image processing applying super resolution technology, you can shoot images with a higher resolution.
At theShooting menu 4, select [IQ Enhancer] and press key.

*The default setting is [On].
*When you set [Drive Mode] for [Burst Shoot], it will be turned [Off].
*When you set [Capture Mode] for [Handheld Night Snap], it will also be turned [Off].-
Can it be recorded the date in the image?
Yes. You can record the date and time set on the camera at the bottom right of the image.
Shooting Menu 4 [Date Imprint]
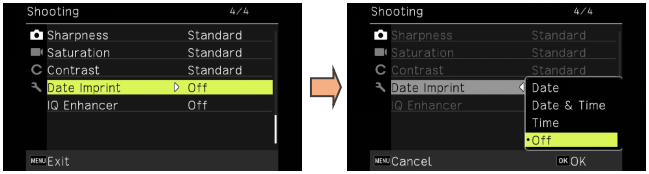
Caution:
• The recorded date and time cannot be deleted.
• The date and time can not be recorded in below case.
Movie Mode
[M-continuous shooting] and [S-continuous shooting] at [Drive Mode].
• When you set [UTC Data Imprint] for [On] at the C Customize Menu 4, the [Date Imprint] of theShooting Menu 4 is fixed to [Off].
-
Is there a function to reduce camera shake?
Yes, there are functions to reduce camera shake as following.
Shooting Menu 2 [Pix. Track SR] The default setting is [Off].
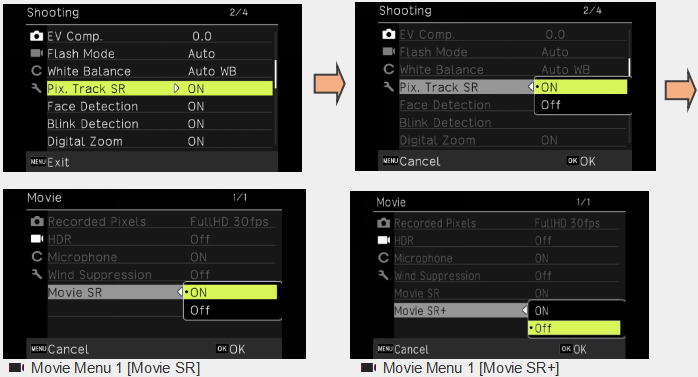
Memo:
• When the [Self-Timer] is set at the [Drive Mode], the [SR] is fixed to [Off].
• When the [[FullHD 30fps] is set at [Recorded Pixels] of Movie Menu 1, it is possible to obtain a movie with less distortion by setting [Movie SR+] for [ON]. In this case [Movie SR] is fixed to [Off].
Caution:
• In below cases, [Movie SR] and [Movie SR+] are fixed to [Off].
SCN Mode: Interval Movie] and High Speed Movie]
-
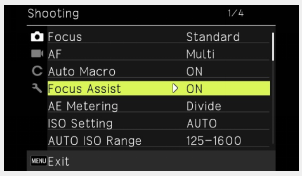
Is the AF assist light available?
Yes, the red color LED will be lit when the surroundings are dark.
Set the [Focus Assist] ofShooting Menu 1 to [ON].
-
Is the noise reduction function available?
No, there is not.-
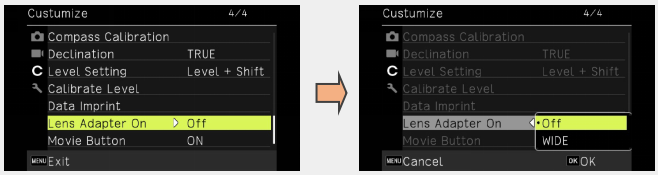
Can I capture an image with wider than 28mm (35mm format conversion)?
Yes. with the optional Wide Conversion Lens (DW-5), you can capture an image as 0.8x magnification of original lens which is equivalent to 22mm (35mm format conversion).
When you use Wide Conversion Lens, set [Lens Adapter On] to [WIDE] at C Customize Menu 4.
-
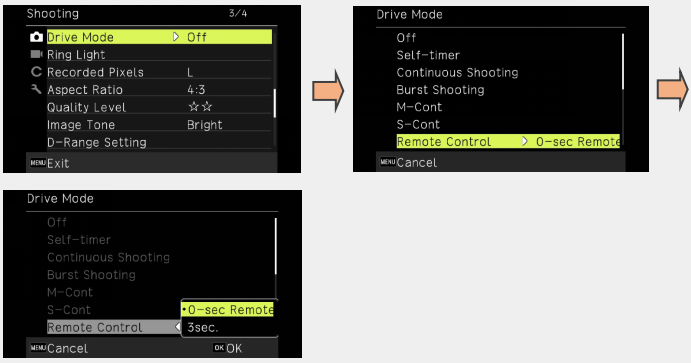
Can I capture an image with Remote Control?
Yes, there is the optional Waterproof Remote Control (O-RC1).
Set [Drive Mode] to [Remote Control] atShooting Menu 3 or  key.
key.
*Since this is a water-resistance specification, it can not use in the water or similar pressure location.
*You can choose either [0-sec. Remote Control] or [3-sec. Remote Control].
*The maximum operating distance of the Remote-Control unit is about 4m from the front of the camera and about 2m from the rear of the camera.
*In the Movie mode, press the shutter button to start recording and press again to end of recording.-
What is the [Digital Microscope Mode]?
You can take pictures of objects as close as 1cm, also the lights around the lens are always lighted when the Mode Dial set at [ Digital Microscope Mode].
* The number of recorded pixels and aspect ratio are fixed at [XS] and [4:3].
The quality level is set for [★★]
* The distance to the subject can be fixed at 1cm when the attached Macro Stand (O-MS3) is mounted on the camera.-
Can the camera focus be adjusted during movie recording?
No, you cannot.-
Can the optical zoom be used during movie recording?
No, you cannot.-
What is the function of the SCN mode?
Turn the Mode Dial to [SCN] and press button, the [Scene Mode] is displayed on the monitor.
 HDR
HDRCombine three images into a single image delivering a wider dynamic range image.  Handheld Night Snap
Minimizes the camera shake for shooting at night or other low light settings.  Night Scene
Suitable for shooting night scenes.  Underwater
Suitable for underwater photography.  Underwater Movie
Suitable for movie shooting underwater.  Landscape
Suitable for shooting landscapes.
Make the trees green and sky blue more vivid. Flower
Suitable for shooting flowers.
Express the contour of the flower softly. Portrait
Suitable for shooting people.
Finish skin color healthily. Digital SR
Use higher sensitivity to reduce blur.  Interval Shooting
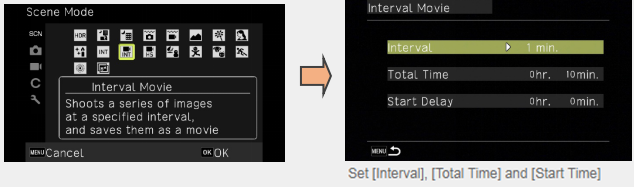
Automatically shoot at set intervals.  Interval Movie
Automatically shoot still images at set intervals and record as videos.  High Speed Movie
Shoot slow motion video.  Surf & Snow
Suitable for shooting in bright places such as sandy beaches and snowy mountains.  Kids
KidsSuitable for shooting moving children.
Finish skin color healthily. Pet
PetSuitable for shooting moving pets  Sport
SportSuitable for shooting fast-moving subjects such as sports.
Keep on focusing continuously. Fireworks
Suitable for shooting fireworks.
Please be careful about camera shake and fix it on a tripod etc. DOF Composite
You can shoot with all in focus photographs.
Memo
•The [Scene Mode] menu is displayed only when the Mode Dial is in [SCN] position.
•For [Interval Shooting] and [Interval Movie], automatic shooting is performed at regular intervals.
Set [Interval], [Number of shots] ([Interval movie] is [Total Time]) and [Start Delay].
Caution
•The selected scene limits the available functions.
• [Interval Shooting] and [Interval Movie] cannot be selected while recording GPS logs.
Green Mode
• By pressing the Green button, you will be in [Green Mode] and you can shoot using the standard settings regardless of shooting mode or the setting of the other menu. Press the Green button again to return to the original shooting mode.
• If you turn off the power while in the [Green Mode], it will be in the [Green Mode] the next time you turn on the power.
Ring Light
• During shooting, the six LEDs around the lens will light.
The way to turn on the Ring Light can be set by [Ring Light] ofShooting menu or by pressing and holding the  Flash button.
Select [All], [Right], [Left], [High], [Low] and [Off] Brightness [1] to [9] Lighting Time [Always On], [Shutter 10s], [Shutter 20s], [Shutter 30s] and [Shutter 60s] -
Can Interval Shooting be used with the WG-6?
Yes. Turn the Mode Dial to [SCN] and pressbutton, the [Scene Mode] is displayed on the
monitor. Select [  Interval Shooting] or [ Interval Movie] by
  key.
key.
Shooting may be interrupted due to lack of battery capacity. When shooting for a long time, we recommend using the optional AC adapter kit K-AC166.
Interval Shooting

Interval Movie
Caution:
• While recording the GPS log, [Interval Shooting] and [Interval Movie] are not selected.-
Can I connect to an AV device to view images?
Yes. You can connect it to a TV equipped with an HDMI®terminal, and view live view images when shooting or play back images.
Prepare a commercially available HDMI®cable type D (micro HDMI) according to the connected device.
1. Turn off the AV device and camera.
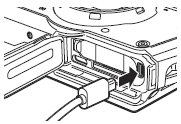
2. Open [Battery / Card cover] of camera and connect HDMI®cable with an HDMI®terminal.
3. Connect the other end of the HDMI®cable to the AV device input terminal.
4. Turn on the AV device and camera.
Caution:
• When opening and closing the [Battery / Card cover], be sure to remove water, sand and other dirt from the camera and avoid places that are easy to get dirty.
• The LCD monitor is not displayed when connected to an AV device.
• Video audio is output from the AV device.
• Use an HDMI®cable with a length of 3m or less.
(Recommended product: Panasonic RP-CHEU15-K) *The RICOH HDMI cable HC-1 cannot be used
Memo:
• When connected to an AV device in playback mode, it will be displayed as single image display mode
• When outputting with HDMI® cable, the maximum size supported by the AV device and the camera is automatically selected. In case you cannot view in good condition, try to change the setting in Setup menu 5 [HDMI Out]
-
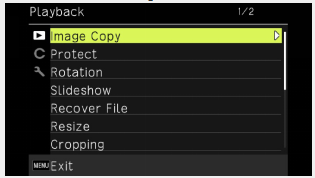
What kind of Playback setting is available?
There are below setting function are available.
Image Copy [Internal M]>>>[Card], [Card]>>>[Internal M] Protect 1 File, Sel., Multiple, Select All and Cancel All Slideshow Interval: 30sec., 20sec., 10sec. 5sec. and 3sec..
Screen Effect: Wipe, Checker, Fade, Random and off
Sound Effect: On and OffRotation 0°, 90° (counterclockwise), 180° and 90° (clockwise) Recover File - Resize Recorded Pixels: L, M, S, XS, 2M, 1M and VGA
Quality Level: ☆☆ and ☆Cropping Filter Small Face Filter: 5%, 7% and 10%
Ink Rubbing Filter: 1 to 5
Digital Filter: B&W/Sepia, Toy Camera, Retro, Color, Extract Color, Color Emphasis, High Contrast, Starburst, Soft, Fish-eye, Miniature and Brightness
HDR FilterMovie Edit Save as Still Image, Divide Movies※1 and Adding title picture Red-eye Edit - Start-up Screen Start-up screen with operation guide, RICOH, Photographs and Off Auto Image Rotation On and Off
*1 With the [Divided Movies] mode, the original movie does not remain.-
Can data in the camera's built-in memory be copied onto an SD (SDHC) Memory Card?
Yes.
*It will copy all the images in the built-in memory to the SD Memory Card. Before copying the image, make sure that the SD Memory Card has enough free space.
*This operation cannot be selected if the SD Memory Card is not inserted.
Copy procedure
Press the power switch. (Capture mode)
Press the Playback button. (Playback mode)
Press theMenu button to display the [Playback] menu.
Press thekey at the [Image Copy] of the Playback menu 1.
Select [Internal M]>>>[Card] and press [OK] button.
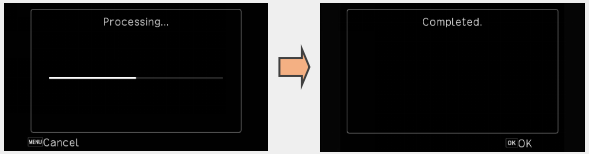
Copy is executed when you press the [OK] button.
GPS Function
-
What can you do with the GPS function?
You can record the location information in images using the GPS function.
Set in [GPS] of the C Customize menu 3 or press and hold(GPS) key to turn the GPS function on and off.
The standard GPS information displayed on the monitor can be set in [GPS Disp Mode] of the C Customize menu.
The GPS information is acquired every one second in the Shooting mode.
LAT/LON Display the latitude and longitude. UTM Display the Universal Transverse Mercator (UTM) coordinates. MGRS Display the Military Grid Reference System (MGRS) coordinates used as military information.
Set [GPS Lock] to [On] in the C Customize menu to unable the function to protect the acquired GPS information. The GPS information is protected whenkey is presses on the shooting screen. The information is unprotected when key is pressed again.
Caution:
• Local geographic conditions such as places where radio waves are blocked or reflected may prevent or delay the acquisition of GPS information.
• The position of GPS satellites are continuously changing and this may prevent or delay the acquisition of GPS information.
• The presence of devices transmitting frequencies close to those of GPS satellites or devices generating a strong magnetic field may interfere with the acquisition of GPS information or deteriorate the GPS information precision.
• Note that the camera may take a while to acquire the GPS information if it has not been used for an extended period or has been moved a great distance from where the GPS information was last acquired.
• The presence of devices generating a strong magnetic field or devices blocking magnetic fields may interfere with the acquisition of correct direction information.
• The GPS function may not work near a broadcast tower, etc. and in a place where strong static electricity is generated.
• The use of GPS, the collection of location information, etc. may be regulated depending on the country and region. When bringing the camera to a foreign country, check with your embassy or travel agency beforehand if there are restrictions on bringing in the camera with the GPS function, logging GPS information, etc.-
Can I record/save travel routes?
Yes, you can record/save the camera route using the GPS information.
1. Select [GPS Log] of the C Customize menu 3 and presskey.
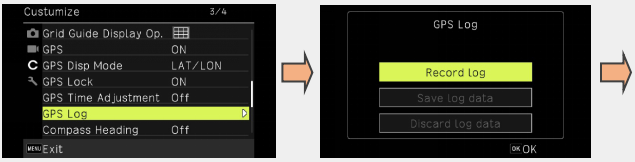
2. Press [OK] button at [Record log].
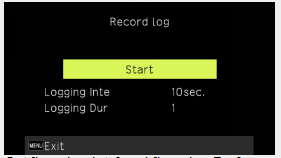
3. Set [Logging Inte] and [Logging Dur]
Logging Interval Select from [1sec.] to [60sec.]. Logging Duration Select from [1] hour to [18] hours.
4. Select [Start] and press [OK] button.
GPS logging starts.
Select [Stop] to stop the GPS logging.
When the set logging time elapses, the GPS logging stops.
Memo:
• To save the log file on the memory card, select [Save log data] on the screen of [GPS log] and select [NMEA] or [KML].
• The log file is saved in the [GPSLOG] folder in the memory card with the file name composed of the serial number 001 to 999 and the month and day. (Example: 001_0505)
• You can check the log file by using a software supporting the file on a computer.
• When deleting the log file, select [Discard log data] on the screen of [GPS log] as above.
The log file cannot be deleted with [Format [Card]] in the Setup menu.
Caution:
• If the memory card is not available for recording, the log file cannot be saved.
• [GPS log] is not available during the shooting in [Interval Shooting] or [Interval Movie] of the SCN mode. This interval shooting cannot be performed during the GPS logging.-
Where are the log files recorded?
Logs recorded in the camera are recorded as log files (KML format) in the [GPSLOG] folder on the SD memory card.
*Only one log data can be recorded in the camera. Perform [Save log data] on the SD memory card or [Discard log data] before collecting new logs.-
What kinds of GPS information are recorded in the log file?
GPS information to be recorded is longitude, latitude, altitude, date and time.
*The GPS information recorded in the log file cannot be confirmed by the camera.
Transfer the log file to computer and use KML compatible software such as Google EarthTM.
*Log files cannot be saved to internal memory.-
What is the GPS positioning accuracy?
It is about 10m in the state where GPS reception environment is good, such as the open outdoors of the sky.-
Can I view a map of the shooting location with my camera?
No, you cannot.-
Is the electronic compass indicated direction that corrected the magnetic north?
When GPS data is received, it indicates direction by GPS data.
When GPS data is not received, or GPS function is OFF, it indicates direction by magnetic north.
The acquired GPS information can be recorded in the image.
Compass Heading Set the displayed information. Compass Calibration Executes the adjustment of the compass. Hold the camera with one hand and move it slowly like drawing the figure 8. When the adjustment is completed, a beep sounds. Declination Select from [TRUE] and [MAG].
-
Can GPS information be imprinted in the image?
The acquired GPS information can be imprinted at the bottom right of the image.
Set in [Data Imprint] of the Customize menu.
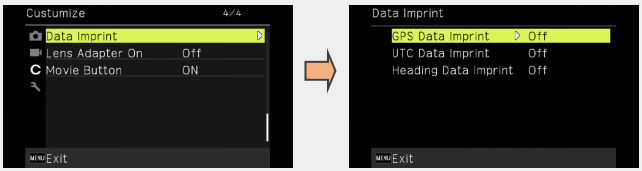
GPS Data Imprint Set the standard of GPS information to imprint. UTC Data Imprint Imprints the Universal Coordinated Time.
[Date Imprint] of the shooting menu is disabled.Heading Data Imprint Imprints the direction information.
Caution:
• The imprinted GPS information cannot be deleted.
• The GPS information cannot be imprinted in the following cases.
In the Movie mode
When [Drive Mode] is set to [Burst Shoot], [M-Cont], or [S-Cont].-
Why the calibration for compass is need?
In order to acquire aspect information more accurately, it is necessary to adjust the compass (calibration) to different magnetic field environments depending on the shooting location.-
When the calibration is required?
Before use compass function.-
How long the calibration data can be hold in the camera?
The calibration data can be hold until next calibration starts.
The calibration data is retained even when the power is turned off-
If calibration is not done, how accurate the compass data is.
It will changed depend on the environment of capture place.
Please perform the calibration before use.-
Are there any precautions needed when using GPS?
If GPS is turned on, the battery will drain even if the camera is turned off. If you are concerned about battery consumption, please turn off the GPS.
Computer/Software
-
Which OS are confirmed function with USB connection.
Following OS are confirmed function.
Windows® Windows® 10 (FCU / CU) (32bit / 64bit) / Windows® 8.1 (32bit / 64bit) / Windows®8 (32bit / 64bit) / Windows®7 (32bit / 64bit) Mac macOS 10.14 Mojave / macOS 10.13 High Sierra / macOS 10.12 Sierra / OS X 10.11 El Capitan / OS X 10.10 Yosemite
Troubleshooting
-
The "Card not formatted" message is displayed on the LCD panel.
The SD Memory Card you have inserted is unformatted or has been formatted on a computer or other device. Format the SD Memory Card in the camera before using it.
*When executing format, all data will be deleted include protected image/sound or GPS log.
Before executing format, you should back up the data in the SD Memory Card.
Format Procedure
1.Select [Format [Card]] by pressing four-way controller (up/down) from the [Setup] menu.
2.Press the four-way controller (Right) to display [Format] screen.
3. Press the four-way controller (Up) to select [Execute].
4. Press OK button to execute format.-
The "Card locked" message is displayed on the LCD panel.
The locked SD Memory Card is inserted in the camera.
The SD memory card is equipped with a write protect switch. If the switch is on the LOCK side, you cannot record, delete or format images. Only menu operations, mode switching and image playback can be performed.-
Can I reset the file numbers at 0001?
Yes, you can reset the file number
* Before beginning this procedure, you should back up the data in the camera's built-in memory or on the SD (SDHC) Memory Card.
1. Uncheck the [File No] of [Mode memory]
1-1 Select [Mode memory] of Shooting menu
1-2 Press key to display [Mode Memory] setting menu.
1-3 Press or  key to select [File No.].
1-4 Press or key to uncheck [File No.].
1-5 Press [MENU] button (Confirm).
1-6 Press [MENU] button (Return to Shooting mode).
2. Delete all images
2-1 Select [Delete All] at the Setup menu
2-2 Press key to select [Delete All] from [Cancel].
2-3 Press [OK]. If you use [Delete All], the file numbering will restart at 0001 from next shot.
* If any of the images are protected, the numbering may not revert to 0001. Remove the protection and use [Delete All] again, or use [Format].