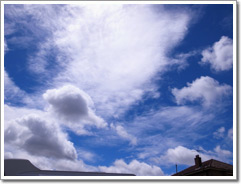
Taken with: GR DIGITAL III ●ISO100 ●1/760sec. ●F6.3 ●EV-0.3 ●WB:MANUAL
Entranced by the combination of pale clouds and soft morning light, I took this shot. Figuring that in this case the feeling of the scene would be lost if something else were added to the image, I shot just clouds and sky at a wide-angle setting.
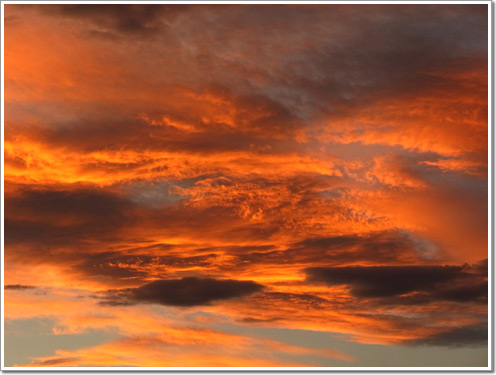
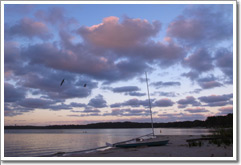
Taken with: CX3 ●ISO200 ●1/270sec. ●F4.8 ●EV-0.5 ●WB:MANUAL
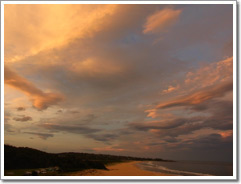
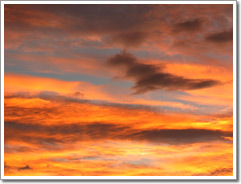
Faced with a dynamic sunset, I used a telephoto setting to shoot the portion that was especially powerful. Negative exposure compensation gave me a stronger photograph by strengthening the color saturation and three-dimensional feel of the image.
Use My Settings
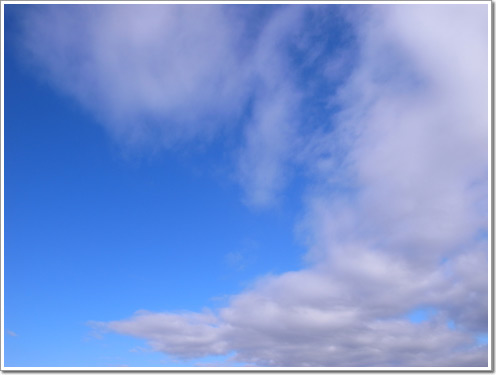
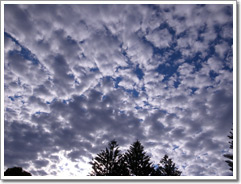
Taken with: CX3 ●ISO100 ●1/1620sec. ●F5.1 ●EV-0.5 ●WB:MANUAL
I found these twin clouds in the blue sky. When you find your own "Oh!" scene, be quick to press the shutter. Using My Settings you can be ready for such "Oh!" moments.
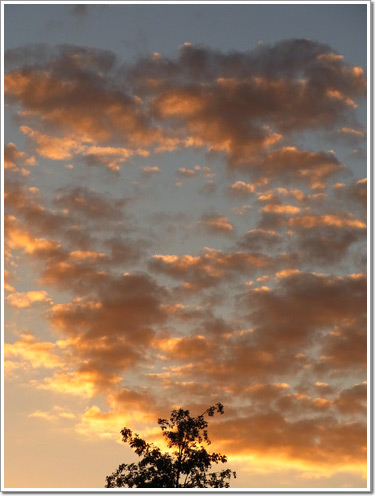
Taken with: CX3
●ISO200 ●1/1000sec. ●F5.1 ●EV0.0 ●WB:MANUAL
If you are shooting in the evening and are having trouble framing an interesting image, try adding something like the top of a tall tree to your composition. A shot like this can be taken even from a narrow closed-in spot.
What I do is to use My Settings 1 for daytime shots on clear days and My Settings 2 for sunsets. On my camera, My Settings 1 has white balance set as outdoors mode, image setting as vivid, focus as spot AF (central single-point), noise reduction as auto, ISO as 200 or auto, overexposure warning display as ON, camera shake correction as ON, electronic level as display only, and AE bracketing as ON. For sunsets My Settings 2 just has white balance set as cloudy mode. When I use the GR3, which has three My Settings, I set My Settings 3 to dynamic range expansion mode.
Sky photography may seem like a relaxed, easy-going thing, but, in fact, cloud shapes can change in an instant. One secret to raising the level of your photography one rank is to prepare in advance so you can immediately press the shutter the instant you feel that "Oh!"
Be careful about overexposure
Taken with: GR DIGITAL III ●ISO100 ●1/1520sec. ●F7.1 ●EV0.0 ●WB:MANUAL
Taken with: GR DIGITAL III ●ISO100 ●1/2000sec. ●F7.1 ●EV-0.5 ●WB:MANUAL
White clouds have a fluffy three-dimensional feel because they contain white with different levels of density. For sky photographs, it is important to pay close attention to this three-dimensionality. When an image is overexposed, the area subject to whiteout expands and the three-dimensional quality is lost. To prevent this, it is very convenient to use the overexposure warning display, and I suggest you check the image immediately after shooting.
On the other hand, white clouds are often subject to a certain amount of overexposure even when viewed with the naked eye, and the white areas of the image will become muddy if you use too strong a minus exposure compensation setting in order to eliminate all overexposure. So I think it is probably best to allow a moderate level of overexposure. I also recommend using AE bracketing as a convenient function for dealing with overexposure.
Make good use of AE bracketing
Taken with: CX3 ●ISO100 ●1/660sec. ●F7.0 ●EV0.0 ●WB:MANUAL
Taken with: CX3 ●ISO100 ●1/930sec. ●F7.0 ●EV-0.5 ●WB:MANUAL
Taken with: CX3 ●ISO100 ●1/470sec. ●F7.0 ●EV0.5 ●WB:MANUAL
Light conditions in the sky are complex so there are many cases where even the most accurate multi-pattern light metering will fail to accurately read the light and end up producing images that are too bright or too dark. So I have AE bracketing turned on all the time. This means that when I press the shutter-release button I instantaneously shoot three images. With the CX3, the camera defines +0.5 and -0.5 exposures, and with the GR DIGITAL III, which lets you select your own values, I use +0.3 and -0.3. This almost entirely eliminates exposure mistakes. AE bracketing is especially convenient in daylight photography where it can be difficult to see the picture display. Later on you can leisurely review the images and delete those which are not needed.
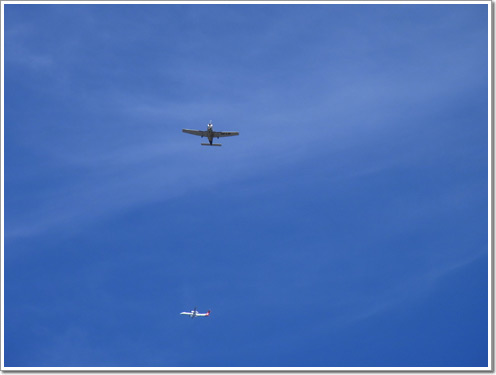
Put in some transitory elements
Taken with: CX3 ●ISO100 ●1/930sec. ●F5.6 ●EV-0.5 ●WB:MANUAL
Including an airplane in a relatively featureless sky gives a "moment in time" feel to the image. AE bracketing is a convenient tool for situations like this where there is no chance to re-take the shot.
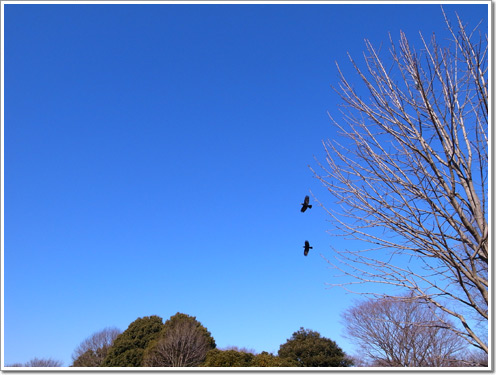
Taken with: GR DIGITAL III ●ISO200 ●1/1230sec. ●F5.6 ●EV0.0 ●WB:AUTO
It can be difficult to make an interesting photograph out of a cloudless blue sky, but here I was able to give movement and tension to the image by including flying crows.
By including elements that have movement, you place the sky photograph at a certain moment in time and this gives the image energy and life. This can be difficult if you are not used to responding quickly to a bird or airplane in flight, but please give it a try. If AF response is slow, one option is to switch to manual focusing. I make extensive use of the GR DIGITAL III full press snap function which, when the shutter-release button is pressed all the way down in one movement, immediately takes the shot at a preset focal distance without doing AF processing. Press the button the instant you feel the "Oh!" That is the basic technique for capturing your excitement.
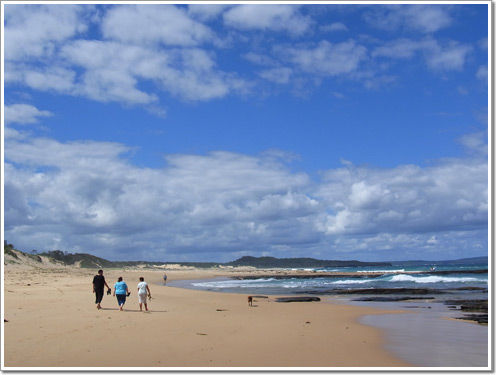
Including people and cars and other objects as small incidental details of the landscape can also help you to create images with a wider range of imaginative power
Taken with: CX3 ●ISO100 ●1/810sec. ●F8.4 ●EV-0.5 ●WB:AUTO
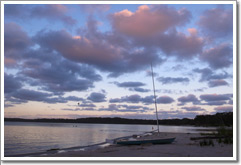
The beach is a great place for sky photography. Just the combination of sky and horizon often seems enough to make a good image. However, such images can seem repetitive after awhile, so you can add variety to your beach photographs by including small elements such as strolling people.
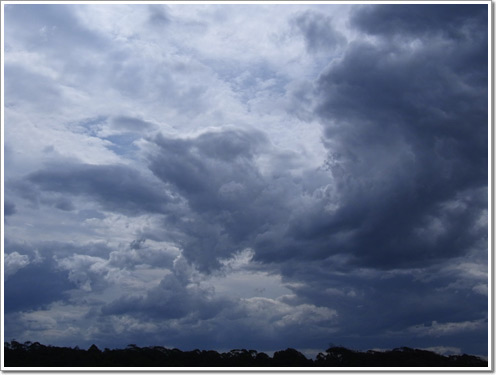
Sky photography is not just for clear days
Taken with: CX3 ●ISO100 ●1/1620sec. ●F8.7 ●EV-0.5 ●WB:MANUAL
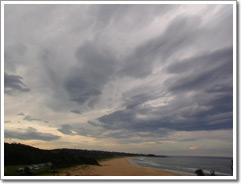
Just before a sudden shower, the wind is strong and the clouds flow swiftly across the sky, so the scene changes moment to moment. When you find some appealing clouds, take a series of shots without pausing to think too much.
Taken with: CX3 ●ISO200 ●1/410sec. ●F7.0 ●EV0.0 ●WB:MANUAL
Taken with: GR DIGITAL III ●ISO100 ●1/1620sec. ●F7.1 ●EV0.0 ●WB:MANUAL
Seeing white clouds in a blue sky or a brilliant sunset, you immediately want to take a picture, but there are other skies that have their own appeal. One example is the sky just before or after a storm. Before and after a storm or sudden shower, the wind is strong and the flow of the clouds accelerates. This increased speed means you can see a variety of cloud formations, and the condition of the light changes at an amazing pace. It is especially at times like these that you should find a wide open space and check the sky on all sides. Use a wide-angle setting to shoot the landscape and a telephoto setting to isolate a segment of the sky. You will be surprised at the wide variety of images you can photograph.
If the exit of the sudden shower is timed just right, you may be treated to a stunning sunset. This is a blissful time for the photographer as you rush to zoom in, pull back, and try various different modes.
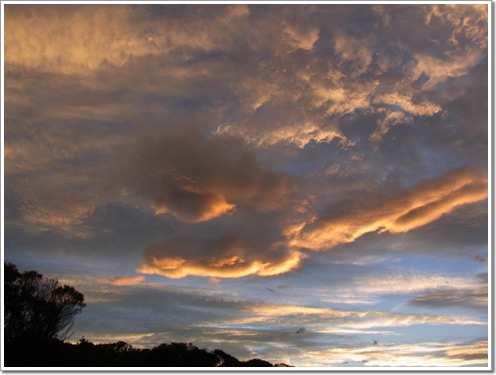
Taken with: CX3 ●ISO200 ●1/1150sec. ●F3.5 ●EV0.0 ●WB:AUTO
Just as the storm passed, the sunset began. North, south, east, west—every direction was like watching a cloud and light show. I used telephoto settings to isolate particularly interesting areas. To give a sense of scale, I added just a small part of the trees on the ground.
Taken with: CX3 ●ISO200 ●1/500sec. ●F3.5 ●EV0.0 ●WB:MANUAL
Taken with: CX3 ●ISO200 ●1/217sec. ●F4.7 ●EV0.0 ●WB:MANUAL
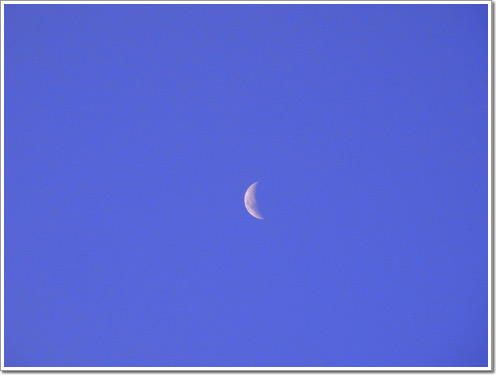
The moon is also an appealing subject. I particularly like the crescent moon, and often take pictures of it combined with clouds. In the instance shown here there were no clouds so I tried shooting with various white balance settings. The white balance fluorescent light mode perfectly captured the purple tinged color of the sky just after sunset.
Taken with: CX3 ●ISO200 ●1/290sec. ●F5.2 ●EV-0.5 ●WB:MANUAL
A tripod is a must when photographing the moon and stars. When you have a hard time focusing with AF, switching to manual focus can help.
Pan focus is a basic technique
Taken with: GR DIGITAL III ●ISO100 ●1/540sec. ●F8.0 ●EV-0.3 ●WB:MANUAL
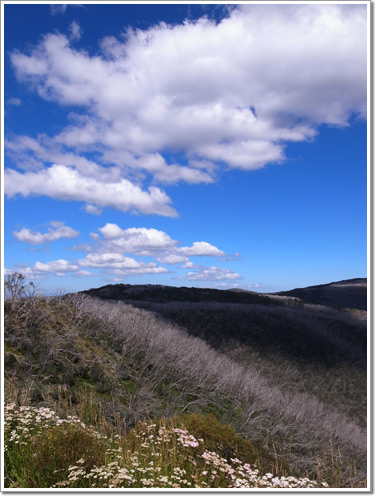
Cloud shadows falling on the mountains made for a memorable scene. I stopped down the aperture so that I could keep everything from the foreground flowers to the clouds in focus.
The GR DIGITAL III has aperture priority mode (A) so pan focus (also called "deep focus") photography is possible. With this technique, everything from nearby objects to distant clouds are in focus. When I used a 28 mm lens on a 35 mm film camera, I stopped down the aperture to f11 and set the focus position to about 3 meters, but on the GR DIGITAL III, which has a small image sensor, I set the aperture to f7.1 or f8 and the focus position to about 5 meters. This way I can sharply reproduce both the flowers close at hand and the mountain range and clouds behind. Setting these values in the full press snap function is a very convenient technique for sky photography.
For the electronic level, turn on display only
Taken with: GR DIGITAL III ●ISO200 ●1/217sec. ●F5.6 ●EV0.0 ●WB:MANUAL
Taken with: GR DIGITAL III ●ISO200 ●1/203sec. ●F5.6 ●EV0.0 ●WB:MANUAL
When you include the horizon in the image, it is a good idea to turn on the level. When shooting with the viewfinder, you can rely on your own "feel" to keep the camera fairly level, but when using the picture display there is a tendency to end up shooting from a non-level position. Except for those times when you intentionally deviate from the horizontal, it is a good idea to take care in leveling the camera.
Dynamic range double shot
Taken with: GR DIGITAL III ●ISO200 ●1/1150sec. ●F11.0 ●EV0.0 ●WB:MANUAL
I tried using dynamic range double shot in order to capture the powerful sky while also keeping the land at the same level of brightness I could see with my eyes. A tripod is necessary.
With dynamic range double shot, the camera shoots two images at different exposures and then combines them into a single image. It is a convenient function to use when there is a large difference in the brightness of the sky and the ground. You can "dynamically" reproduce highlights while at the same time retaining details on the ground.