The human eye can sense that "white things are white," even when the object has some slight coloring. Cameras, however, are different – without any white balance adjustment, a photo depicts the same exact colors as the original light source. For example, fluorescent lights appear green, while light bulbs look orange. The function that corrects these color issues is the digital camera's "white balance." Essentially, white balance adjusts images to make white subjects look white in the final product.
By making good use of white balance, you'll be able to manipulate the tone of your pictures at will. Ricoh digital cameras provide a variety of ways to control white balance, such as the "white balance" mode, the white balance bracketing function, and "white balance correction," which lets you make adjustments after the picture is taken.
Using White Balance
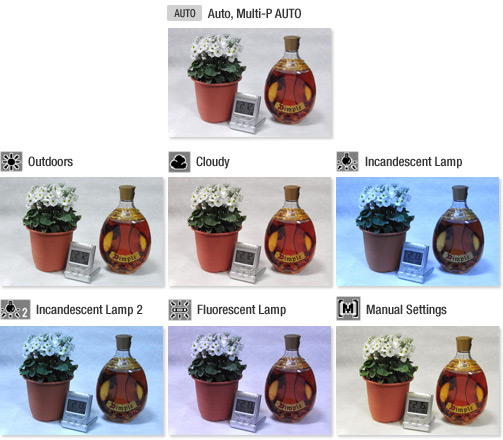
By default, Ricoh digital cameras are set to "Auto" or "Multi-P(Multi-Pattern) AUTO"*1, which work for most types of photography. However, since white balance is a function that makes white objects appear white, it also ends up making adjustments to scenes that you don't want to look whiter; for example, the red hues of a beautiful sunset or the blue shades of a rainy day. This can rob the picture of its atmospheric quality.
So, when you want to faithfully depict the light of the setting or create new light effects altogether, Ricoh digital cameras give you the choice of several different white balance settings.
*1 Varies according to model. Refer to the manual for more details.
*2 The GR DIGITAL III model features advanced settings that allow you to select from 16 levels, including incandescent lamp, outdoors, and cloudy.
Photo: Hideo Nunokawa ●R8 ●ISO400 ●F4.2 ● EV0.0
These photos were taken at the window of a sunlit room (with fluorescent light in one part of the room) using various white balance modes. Putting the pictures side by side for comparison makes it easier to see the characteristics of each mode.
In "Auto" mode, the textures of the various subjects had very natural coloring. The "Outdoors" setting gave the image a slightly bluer tint than Auto mode. "Cloudy" did the opposite, enhancing the magenta tones and making the coloring of the flowerpot and the bottle more vivid. In "Incandescent Lamp" mode, blues became more prominent. "Incandescent 2" brought out the blue hues, but less than the "Incandescent Lamp" setting. The "Fluorescent Lamp" setting was affected by the presence of fluorescent light in one part of the room. For the "Manual Settings" photo, I set up a white board near the subject to help configure white balance. The result had a slightly yellower tone than the "Auto" mode picture, which gave the image an added warmth.
<Advanced>Using White Balance Bracketing (WB-BKT)
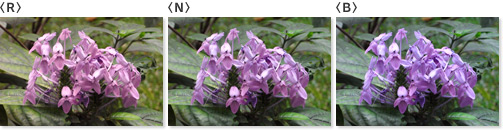
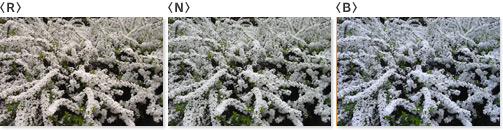
White balance bracketing (WB-BKT) is a function where the camera automatically stores three versions of the same picture with different white balance values: a reddish image, a bluish image, and an image using the current setting value. Subtle changes in color can have a tremendous impact on the look of the image, so the white balance bracketing function is quite a useful tool when you're having trouble deciding on the best white balance setting. When there are reddish and bluish tones in the same picture, finding the right white balance setting is a challenge. When that happens, shoot with WB-BKT to get the color you're looking for.
White balance generates subtle changes in color when you take pictures of white flowers and similar subjects - and it also depends largely on weather, shade, and other conditions. In order to get a better handle on white balance, it might be a good idea to try out bracketing to see how it affects your photos.
<Advanced>Using White Balance Correction
Ricoh digital cameras* also include a "white balance correction" function that makes color adjustments after a photo is taken. Every photographer has taken a picture and thought, "I wish the color was a little different." That's where the powerful "white balance correction" function comes in.
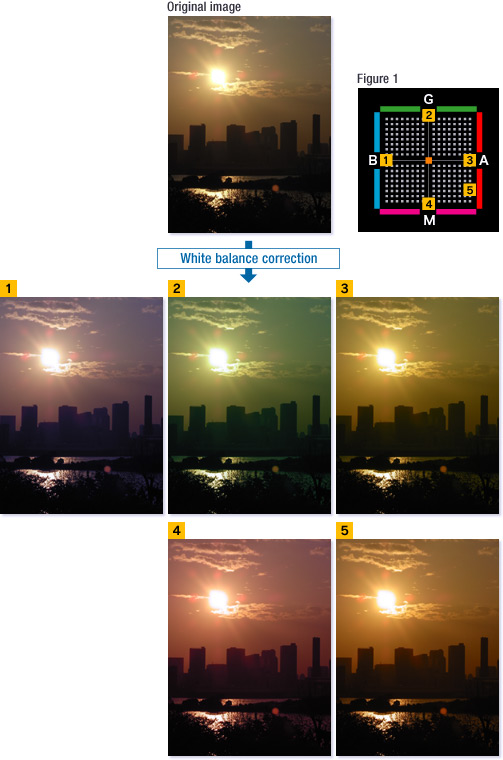
The function lets you look at a still image, use a screen like Figure 1 to adjust the green, magenta, blue, and amber balance, and save your settings. While making corrections, you can always refer to the original image on the camera monitor for comparison.
* Some models do not have white balance correction. Refer to your camera's manual for more information.
In Auto mode, this picture of a sunset (the original) didn't have enough of a reddish tone. When I used white balance correction to adjust the picture to the (5) position, the coloring was exactly how I wanted it to be. Take a look at the results of each of the different corrections, and you'll see just how much of an impact the function can have on coloring.
You can perform correction as many times as you want, but since the function compresses the image, doing too much correction on the same picture can cause a drop in image quality. When you use the function, make sure to make adjustments on the original picture. The original image is saved to your storage media along with the corrected image.
As you can see, making the most of white balance lets you control the coloring of your image at will.
Try it out for yourself and go after the tone you've always wanted.