
Digital Compact Camera: Optio E80
<General function and specification>
- What languages are supported?
- What accessories are provided with this camera?
- What are the optional accessories for this camera?
- Will a waterproof case be released?
- Can the camera be mounted on a tripod?
<Storage media>
- What are the storage media?
- Does the camera come with an SD (SDHC) Memory Card?
- Which SD (SDHC) Memory Cards are recommended for this camera?
- What are the figures for the number of recordable still images and the length of recordable video or audio for each of the SD (SDHC) Memory Card capacities?
- Are there any precautions needed when using SD (SDHC) Memory Cards?
- How do I switch from using the camera's built-in memory to using an SD (SDHC) Memory Card?
<Battery and Power Sources>
- What kind of battery does the camera use?
- How long can the alkaline battery be used for?
- Is there an AC adapter for the camera?
- When the battery is removed, how long is the date set in the camera retained? And does the internal clock keep running?
<Capture and Playback>
- How long is the startup time?
- How long is the shutter release time lag?
- How long is the interval between shots in continuous shooting?
- With the "Auto" ISO sensitivity setting, what is the range of variation in the ISO sensitivity?
- What exactly is the "Digital Panorama" shooting mode?
- What exactly is the "Frame Composite" drive mode?
- Can the camera focus be adjusted during movie recording?
- Can the zoom be used during movie recording?
- Can the LCD monitor brightness be adjusted?
- Can Remote control be used?
- What is the Auto Picture mode?
- Can sound be added to still images?
- What is the movie recording format? And what is the number of recorded pixels and the frame rate in recorded movies?
<Computers and Software>
- What are the system requirements?
- What is the application software? What languages are supported?
- Are there user manuals for the bundled application software?
- Can movies be played on a computer?
<Print Connection>
<Troubleshooting>
- I made a mistake in the Initial Settings. How do I reset the settings?
- The subject is not in focus.
- The flash does not fire.
- The flash fired but the photo is too dark.
- The "Memory card full" message is displayed on the LCD panel.
- The "Memory card error" message is displayed on the LCD panel.
- The "Card not formatted" message is displayed on the LCD panel.
- The "Card locked" message is displayed on the LCD panel.
- Can data in the camera's built-in memory be copied onto an SD (SDHC) Memory Card?
- The camera is connected to the computer, but is not recognized as a removable disk.
- Can I view still picture or movie on a TV?
- Suddenly, the camera stops operating.
- [DATE] is displayed on the LCD monitor. What is that?
- Can I playback on a television monitor at overseas?
<General function and specification>
- What languages are supported?
- 21 languages are supported.

•English •Japanese •Turkish •French •Danish •Greek •German •Swedish •Russian •Spanish •Finnish •Thai •Portuguese •Polish •Korean •Italian •Czech •Chinese (Traditional) •Dutch •Hungarian •Chinese (Simplified)
- What accessories are provided with this camera?
-
- Strap 0-ST86*
- USB cable I-USB98*
- AA alkali battery (x2)
- Software CD-ROM S-SW87
- Operating manual
* No camera case or SD (SDHC) Memory Cards are included with the camera.
* Accessories marked with an asterisk (*) can also be purchased separately.
- What are the optional accessories for this camera?
- The optional accessories are as follows:
- AV cable I-AVC7
- Camera case O-CC81
- Camera strap O-ST8
- Leather strap O-ST24
- Sports strap O-ST81
- AC adapter kit K-AC62
[Includes AC adapter D-AC62, AC code D-CO2 and DC coupler D-DC51]
- Can the camera be mounted on a tripod?
- Yes, it can be mounted using the threaded tripod mount in the camera base.
<Storage media>
- Does the camera come with an SD (SDHC) Memory Card?
- No. Memory Cards should be purchased as required.
- Which SD (SDHC) Memory Cards are recommended for this camera?
- We recommend the SD (SDHC) Memory Card brands shown in the table below.
As of July 2009Panasonic *SD Memory Card - Capacities: 512MB to 2GB
*SDHC Memory Card - Capacities: 4GB to 32GBToshiba *SD Memory Card - Capacities: 512MB to 2GB
*SDHC Memory Card - Capacities: 4GB to 32GBSanDisk *SD Memory Card - Capacities: 512MB to 2GB
*SDHC Memory Card - Capacities: 4GB to 32GB
* When recording a movie, using a Class 6 or faster SD (SDHC) Memory Card. It allows you to shoot the movie without having to stop mid-way.
*If saving still images, using a Class 6 or faster SD (SDHC) Memory Card. It gives no noticeable improvement in the continuous shooting speed but faster SD (SDHC) Memory card is recommended.
* "Recommended" denotes only that the operation of the product has been checked by PENTAX and in no way constitutes a guarantee to customers that the product is suited to their requirements.
- What are the figures for the number of recordable still images and the length of recordable video or audio for each of the SD (SDHC) Memory Card capacities?
- The figures vary depending on the shooting conditions and subject, but an approximate guide to the number of still images, the length of continuous movie recording time and the length of audio recording time in Voice Recording mode can be found here.
- Are there any precautions needed when using SD (SDHC) Memory Cards?
- Card that are unused or that have been used on other devices, such as another camera or a computer, must first be formatted on the OptioE80.
* Note that formatting a card erases all the data on the card, including protected images and sound files.
- Do not bend the SD (SDCH) Memory Card or subject it to violent impact. Keep it away from water and store away from high temperature.
- Do not remove an SD (SDHC) Memory Card or turn the camera off while you are recording data or playing back images or audio, or while the camera is connected to a computer via a USB cable.
Doing so will result in the corruption of stored data and/or damage to the SD (SDHC) Memory Card. - Avoid using or storing the card where it may be exposed to static electricity or electrical interference.
- SD (SDHC) Memory Cards have a limited life-span.
If a card is left unused for a long period, it may no longer be possible to read the data stored on the card. Important data should be backed up regularly.
- Card that are unused or that have been used on other devices, such as another camera or a computer, must first be formatted on the OptioE80.
- How do I switch from using the camera's built-in memory to using an SD (SDHC) Memory Card?
- There is no selector switch for this.
When an SD (SDHC) Memory Card is inserted into the camera, data is recorded onto the SD (SDHC) Memory Card.
If there is no SD (SDHC) Memory Card in the camera, data is recorded into the built-in memory.
No data is recorded in the built-in memory while there is an SD (SDHC) Memory Card in the camera.
<Battery and Power Sources>
- What kind of battery does the camera use?
- Use two AA alkaline batteries, AA lithium batteries and AA Ni-NH batteries.
- How long can the alkaline battery be used for?
-
Number of still images shot Approx. 210 Playback time (Slideshow): Approx. 400 minutes Movie recording time: Approx. 100 minutes The number of still images shot is measured in conditions that comply with CIPA standards. (Includes: With a 50% flash use rate and the LCD monitor ON at 23°C.)
*Note: CIPA standards are standards formulated by the Camera and Imaging Products Association.
The playback time, movie recording time and audio recording time are based on the result of in-house testing.
- When the battery is removed, how long is the date set in the camera retained? And does the internal clock keep running?
- Once a new battery has been loaded and left in the camera for at least 1 day, data in the camera remains backed up for approximately 1 day when the battery is removed. The internal clock also continues to run while the data is backed up.
<Capture and Playback>
- How long is the startup time?
- The startup time is approximately 2.6 seconds. This is the time between the camera being turned on and the camera being ready to record with P mode selected, the built-in flash set to Flash Off, no start-up screen and no start-up sound selected.
- How long is the shutter release time lag?
- The shutter release time lag is approximately 0.14 seconds.
This is the time between the shutter release button being pressed fully and the camera starting image capture with the flash set to Flash Off and the focus locked.
- How long is the interval between shots in continuous shooting?
- It varies depending on the write speed of the recording media, the number of recorded pixels, the quality level and the recording conditions, but an approximate guide to the continuous shooting interval in Continuous Shooting mode using the Initial Settings is 0.92 frames per second.
- With the "Auto" ISO sensitivity setting, what is the range of variation in the ISO sensitivity?
- When the ISO setting is [Auto], the sensitivity automatically adjusts between ISO 100 and 800.
* When [Digital SR] mode is selected, the sensitivity automatically adjusts up to ISO 6400.
* In the [Digital SR] mode, recorded pixels is fixed at 5M (2592 x 1944).
- What exactly is the "Digital Panorama" shooting mode?
- This mode stitches photographed images together in the camera to create a single panoramic photograph. When you take 3 images with slightly overlapping edges to facilitate the image stitching process in Digital Panorama mode, the camera automatically creates and saves a panorama image.
- What exactly is the "Frame Composite" drive mode?
-
The camera stores 20 default frames. (90 frames are included together with the default 20 frames in the supplied CD-ROM (S-SW87) There are the shooting mode and the playback mode on the [Frame composite] mode. When you take pictures with this camera, you can add a frame to your pictures by selecting one from the wide assortment available.
*Note: The recorded pixels setting is fixed at 3M (2048 x 1536).
- Can the LCD monitor brightness be adjusted?
- Yes. It can be adjusted through 3 levels up and down from the standard setting.
- What is the Auto Picture mode?
- When press the shutter release button halfway, the camera automatically selects the most appropriate mode from following shooting modes.
Normal, Night Scene, Night Scene Portrait, Landscape, Flower, Portrait, Sport and Candle light.
- s the movie recording format? And what is the number of recorded pixels and the frame rate in recorded movies?
- The recording format is AVI (Motion JPEG-compliant).
The number of recorded pixels can be selected [1280 x 720], [640 x 480] or [320 x 240].
[1280 x 720] - Frame rate is only available approx 15 fps.
[640 x 480] and [320 x 240] - Frame rate can be selected approx 15 fps or approx 24 fps.* fps: frames per second
* Movies can be recorded continuously onto an SD (SDHC) Memory Card or into built-in memory until the card or memory is full. (Note that the maximum size for one recording is 2 GB.)
<Computers and Software>
- What are the system requirements?
- [Windows]
USB connection requirements:
Requires a computer with a USB port as standard equipment running Windows Vista, XP or 2000 pre-installed at shipment, with the latest system software updates installed.
Application Software ACDSee for PENTAX 3.0 requirements:
OS: Windows 2000 / Windows XP / Windows Vista™
CPU: Pentium III or higher
Memory: 256 MB minimum (1GB or more recommended)
Hard Disk space: 100MB minimum (1GB or more recommended)
CD-ROM drive
Internet Explore 5.0 or later
DirectX 9.0 or later
Windows Media Player 9.0 later
[Macintosh]
USB connection requirements:
Requires a computer with a USB port as standard equipment and Mac OS X 10.1.2 to 10.5 preinstalled, with the latest system software updates installed.
Application Software ACDSee 2 for Mac requirements:
OS: Latest version of Mac OS X 10.1.2 to 10.5
CPU: Power Macintosh 233 MHz or higher
Memory: 8 MB minimum (1GB or more recommended)
Hard Disk space: 6MB minimum (1GB or more recommended)
CD-ROM drive
Quick Time 4.0 or later* Operation is not guaranteed for all computers with the recommended requirements. Even on computers that meet the above requirements, the software may not run correctly depending on the computer settings and the other installed software applications.
- What is the application software? What languages are supported?
- [Windows]
Application Software: ACDSee for PENTAX 3.0
Languages: English, French, German, Spanish, Italian, Russian, Chinese (Traditional), Chinese (Simplified), Korean, Japanese
[Macintosh]
Application Software: ACDSee for PENTAX (ACDSee 2 for Mac)
Languages: English, French, German, Spanish, Italian, Japanese
- Are there user manuals for the bundled application software?
- No. For detailed information on the functions, refer to the "Help" menu in the ACDSee for PENTAX 3.0 or ACDSee 2 for Mac menu bar.
- Can movies be played on a computer?
- Yes, they can.
[Windows VistaTM/Windows XP/Windows 2000]
Movies can be played using "ACDSee for PENTAX 3.0"
[Macintosh Mac OS X 10.3, 10.4](QuickTime 4 or later required)
Movie can be played using "ACDSee 2 for Mac".
Movie can also be played using just QuickTime.
<Print Connection>
<Troubleshooting>
- I made a mistake in the Initial Settings. How do I reset the settings?
- The Initial Setting screen is only displayed once.
If any of the settings are incorrect, they must be reset individually.
* If an option other than Japanese, English or Korean is selected in the initial settings, the video output is set to [PAL].
--Setting the language- Press the power switch. (Capture mode)
- Press the MENU button.
- Press the four-way controller (right) once to open the Setting screen.
- Press the four-way controller (down) 4 times to select [Language].
- Press the four-way controller (right) once to open the Language screen.
- Use the four-way controller to select the language.
- Press the OK button.
*Note: To change the date and time, follow the steps in [Adjusting the date]
- Press MENU button. (Back to the capture mode)
-- Setting the date (Date Style, Date and Time settings)- Press the power switch. (Capture mode)
- Press the MENU button.
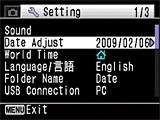
- Press the four-way controller (right) once to open the Setting screen.
- Press the four-way controller (down) 2 times to select [Date Adjust].
- Press the four-way controller (right) once to display the [Date Adjust] screen.
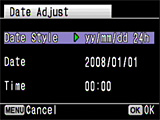
- [Date Style] setting
Press the four-way controller (right) once to move the selection frame.
Use the four-way controller (up/down) to select [yy/mm/dd], [dd/mm/yy] or [mm/dd/yy].
Next, press the four-way controller (right) once to move the selection frame.
Use the four-way controller (up/down) to select [12h] (12-hour display) or [24h] (24-hour display).
After making your selection, press the four-way controller (right). - [Date] setting ([yy/mm/dd] selected as the date style)
Press the four-way controller (down) once to move the selection frame to [Date].
Press the four-way controller (right) once and then use the four-way controller (up/down) to select the [Year] setting.
Press the four-way controller (right) once and then use the four-way controller (up/down) to select the [Month] setting.
Press the four-way controller (right) once and then use the four-way controller (up/down) to select the [Day] setting.
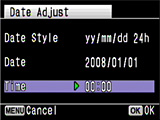
After completing the settings, press the four-way controller (right). - Press the four-way controller (down) once to move the selection frame to [Time].
Press the four-way controller (right) once and then use the four-way controller (up/down) to select the [Hour] setting.
Press the four-way controller (right) once and then use the four-way controller (up/down) to select the [Minute] setting.
After completing the settings, press the OK button. - Press the OK button. (The Setting screen reappears.)
Press the MENU button (The camera returns to Capture mode.)


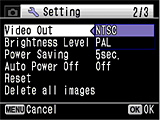
-- Setting the video output (changing from PAL to NTSC) --- Turn the camera on. (Capture mode)
- Press the MENU button.
- Press the four-way controller (right) once to open the [Setting] screen.
- Press the four-way controller (up) 7 times to select [Video Out].
- Press the four-way controller (right) once and then use the four-way controller (up/down) to change the setting from [PAL] to [NTSC].
- Press the OK button. [Confirming the setting]
- Press the MENU button. (The camera returns to Capture mode.)
- The subject is not in focus.
- Check the following:
- Are you trying to photograph a subject that is difficult to focus on with autofocus?
Certain subjects are not suitable for autofocus, such as subjects with little or no contrast (blue sky, white walls, etc.), dark subjects, finely patterned subjects, fast-moving subjects, and scenes shot through windows or mesh. First focus on an object that is at the same distance as your subject and lock the focus (by pressing the shutter release button down halfway). Then recompose the shot as you want to take it and release the shutter. - The subject is not in the focusing area.
Frame the shot so that your subject is inside the [ ] (focusing area) marks on the LCD monitor. If your subject is not inside the focusing area, briefly move the camera so that the desired subject is inside the focusing area and lock the focus (by pressing the shutter release button down halfway). Then recompose the shot as you want to take it and release the shutter. - The subject is too close.
The effective shooting rang is as follows:
Wide-angle: 0.5m to infinity Telephoto: 0.5m to infinity
- Are you trying to photograph a subject that is difficult to focus on with autofocus?
- The flash does not fire.
- Check the following:
- Is the flash mode set to [Flash Off]?
- Is the drive mode set to [Continuous Shooting] ?
- Is the focus mode set to [Infinity]?
- The flash fired but the photo is too dark.
- Check the following:
- The subject is too far away in a dark location.
If the subject is too far away, the picture becomes dark because the light of the flash does not reach the subject.
Use the following as a guide to flash photography:
Wide-angle: Approx. 0.1 to 6.0
m Telephoto: Approx. 0.35 to 3.21 m (with Auto selected as the ISO setting)
- The subject is too far away in a dark location.
- The "Memory card full" message is displayed on the LCD panel.
- The SD (SDHC) Memory Card is full and no more images can be saved. Insert a new SD (SDHC)
Memory Card or delete some unwanted images. Changing the number of recorded pixels may enable you to save images.
- The "Memory card error" message is displayed on the LCD panel.
- Shooting and playback are impossible due to a problem with the SD (SDHC) Memory Card. It may be possible to view your images on a computer.
- The "Card not formatted" message is displayed on the LCD panel.
- The SD (SDHC) Memory Card you have inserted is unformatted or has been formatted on a computer or other device. Format the SD (SDHC) Memory Card in the camera before using it.
-----Formatting procedure ------- Press the power switch. (Capture mode)
- Press the MENU button.
- Press the four-way controller (right) once to display the [Setting] menu.
- Press the four-way controller (up) once to select [Format].
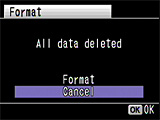
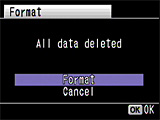
- Press the four-way controller (right) once to display the [Format] screen.
- Press the four-way controller (up) once to select [Cancel] -> [Format].
- Press the OK button to format the card.
- When formatting ends, the camera returns to Capture mode.
* Note that formatting a card erases all the data on the card, including protected images and sound files.
* This function can only be selected when an SD (SDHC) Memory Card has been inserted in the camera.
Setting menuFormat selection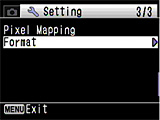
- The "Card locked" message is displayed on the LCD panel.
- locked SD (SDHC) Memory Card is inserted in the camera. You can only use the menus, change the camera modes or play back images.
- Can data in the camera's built-in memory be copied onto an SD (SDHC) Memory Card?
- Yes.
-- Copy procedure --- Press the power switch. (Capture mode)
- Press the Play button. (Playback mode)
- Press the four-way controller (down). (Playback mode palette)
- Press the four-way controller (right) 5 times to select [Image/Sound Copy].
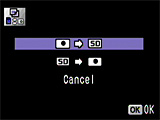
- Press the OK button to display the screen for selecting the copy destination.
- Press the four-way controller (up) 2 times to select [Camera SD].
- Press the OK button to copy the data.
- Press the Play button or press the shutter release button down halfway to return to Capture mode.
Playback Mode PaletteCopy destination selection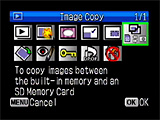
- The camera is connected to the computer, but is not recognized as a removable disk.
- Check that [MSC] is set as the camera's USB connection mode.
- If [PTP] is set as the camera's USB connection mode, the camera is not recognized correctly as a USB mass storage device and the images cannot be viewed.
- Check that the camera and computer ends of the USB cable are both inserted fully into the connection sockets.
- If the computer has multiple USB ports, try using another port.
- If the camera is connected via a USB hub, connect it directly to the computer.
- Can I view still picture or movie on a TV?
- Yes. By using the optional AV cable (I-AVC7), you can play back images on a TV that has a Video-In (and Audio-In for sound) port.
*Check the video output format. (In Japan, the format is NTSC.)
*The camera's LCD monitor turns off while the camera is connected to a TV.
- Suddenly, the camera stops operating.
- Very occasionally, static electricity may cause camera malfunction. In this case, remove the battery and install it again. If the camera is then working properly, normal condition is restored and you can continue using the camera.
- [DATE] is displayed on the LCD monitor. What is that?
- This indicates that [Date Imprint] is selected in the recording mode settings.
This setting is used to directly imprint the date onto photographed images.* The date imprinted with the Date Imprint function cannot be deleted.
* The date is imprinted on the picture with the date style set in the [Date Adjust] screen.
- Can I playback on a television monitor at overseas?
- Yes, Depending on the country or region, images and movie files may fail to be played back if the video output format is set difference from one in use there. If this happens, change the video output format setting. (NTSC PAL)
*You cannot connect the output of this camera to a SECAM format television.