Since film cameras use daylight-type film, color conversion filters needed to be used according to the changes in color temperature to reproduce colors and so, filtering was essential. With the digital camera, however, filter use decreased drastically since the color temperature could be adjusted simply by adjusting the white balance. Nevertheless, the polarizing filter (PL filter) which does not affect the coloring can be used as an everyday-use filter and is reliable for adding hidden extra flavor when taking photographs with digital cameras.
Taken with: CX3 ●ISO100 ●1/320sec. ●F3.5 ●EV-0.3 ●WB:A ●P Auto ●Polarizing filter
The polarizing filter is called a “PL filter Eand enables reproducing the color contrasts in a blue sky without losing the coloring of the subject. Can you see how the blueness of the sky on the upper right corner of the photograph is darker than that of the left side?
Taken with: CX3 ●ISO80 ●1/1230sec. ●F3.5 ●EV-0.3 ●WB:A ●P Auto
One of the features of the polarizing filter is that it can cut out reflections that appear in a water surface or glass window. Of course, it can also cut out light reflected off the ground or asphalt, so you can get a wet look in a photograph even if it is taken on a day with fine weather.
Taken with: CX3 ●ISO80 ●1/760sec. ●F4.5 ●EV-0.3 ●WB:A ●P Auto ●Polarizing filter
Using such effects, I increased the blueness of the sky and cut out the light reflecting off the surface of the ocean. Even though the two photographs are of the same place, the impressions you get from each are very different.
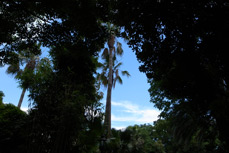
Taken with: GR DIGITAL III ●ISO100 ●1/620sec. ●F4.5 ●EV-0.3 ●WB:Outdoors ●A Auto
The sky and tree leaves reflected in the small pool create a feeling of coolness. The reflected leaves add their own flavor to the photograph so they might not need to be cut out.
Taken with: GR DIGITAL III ●ISO100 ●1/153sec. ●F1.9 ●EV-0.3 ●WB:Outdoors ●A Auto ●Polarizing filter
When I took the shot using a polarizing filter, although the reflection could still faintly be seen around the upper portion of the pool, the resulting photograph had a clean finish as a whole.
Taken with: GR DIGITAL III ●ISO100 ●1/200sec. ●F2.8 ●EV-0.3 ●WB:Outdoors ●A Auto
The reflection can clearly be made out on this odd-shaped window. It seems very real because if you stare at certain parts of the photograph long enough, you will see things that will tell you exactly when and where the photograph was taken.
Taken with: GR DIGITAL III ●ISO100 ●1/160sec. ●F2.5 ●EV-0.3 ●WB:Outdoors ●A Auto ●Polarizing filter
The reflection of the sky becomes underexposed when the shot is taken using a polarizing filter and the photograph came out with a heavy feel to it.
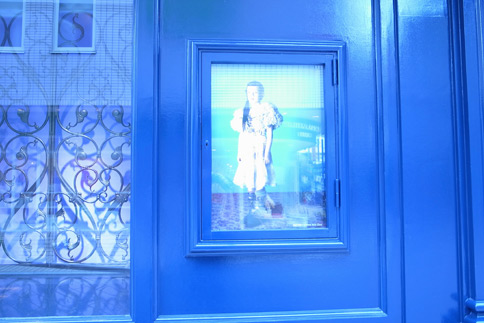
During the film camera era, color temperature was something that I always worried about when I took photographs. Since reversal film (which has a narrow latitude range) was used, changes in color temperature immediately affected the photograph. Also, when the photographic emulsion was still unstable, I carefully memorized the compensation value (1/3 magenta compensation) for the film provided by the processing laboratory and used a gelatin filter to ensure sufficient compensation when shooting. However, with the use of digital cameras, I was surprised to find out that the white balance (and not the color temperature) could be compensated by the camera internally. From such experiences, I normally use the 5300K (Outdoor) setting as I did with film cameras for all shooting except when I am shooting under mixed light source conditions. This time, instead of using the white balance for normal use, I used it effectively in place of a filter.
Taken with: GR DIGITAL III ●ISO100 ●1/80sec. ●F1.9 ●EV0.7 ●WB:Incandescent lamp ●A Auto
A portrait of a woman with a cold expression was set in a blue door. I could have taken the photo with the white balance set to “Outdoors E but I tried to emphasize the blueness by changing the setting to ”Incandescent lamp E
Taken with: GR DIGITAL III ●ISO100 ●1/500sec. ●F5.0 ●EV-0.3 ●WB:Auto ●A Auto
Taken with: GR DIGITAL III ●ISO100 ●1/500sec. ●F5.0 ●EV-0.3 ●WB:Outdoors ●A Auto
Taken with: GR DIGITAL III ●ISO100 ●1/500sec. ●F5.0 ●EV-0.3 ●WB:Cloudy ●A Auto
Taken with: GR DIGITAL III ●ISO100 ●1/500sec. ●F5.0 ●EV-0.3 ●WB:Incandescent lamp ●A Auto
Taken with: GR DIGITAL III ●ISO100 ●1/500sec. ●F5.0 ●EV-0.3 ●WB:Fluorescent light ●A Auto
Taken with: GXR+RICOH LENS P10 28-300mm ●ISO3200 ●1/500sec. ●F5.0 ●EV-0.3 ●WB:Auto ●A Auto
This photograph was taken with the white balance set to “Auto E The color temperature is beautifully compensated, but there is something lacking in the photograph which looks bland.
Taken with: GXR+RICOH LENS P10 28-300mm ●ISO3200 ●1/1500sec. ●F7.0 ●EV-0.3 ●WB:Outdoors ●A Auto
So, I took another shot with the white balance set to the Outdoor setting for sunlight. The resulting photograph had a warm finish to it reproducing the reddish coloring from the incandescent light.
●Taking night snapshots with the High-sensitivity setting.
Up until a few years ago, I was reluctant to increase the sensitivity since it often meant that photographs would be more prone to noise. However, the evolution of recent digital cameras is truly remarkable and the resolution of high-sensitivity photographs has improved so much that it is now difficult to tell the difference between photographs taken with low-sensitivity and those taken with a high-sensitivity as high as ISO3200. And so, I grabbed my GXR camera with a 50mm micro unit attached and headed out to the city to take some night snapshots.
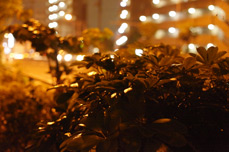
Taken with: GXR+RICOH LENS P10 28-300mm ●ISO3200 ●1/100sec. ●F2.5 ●EV-0.3 ●WB:Outdoors ●A Auto
The colors of the illuminations you see at night are truly beautiful. However, the true beauty of the scene cannot be drawn out just by obscurely taking a photograph of it.
Taken with: GXR+RICOH LENS P10 28-300mm ●ISO3200 ●1/125sec. ●F2.8 ●EV-0.3 ●WB:Outdoors ●A Auto
Using my GXR with a 50mm micro unit attached, I was able to draw out the beautiful image of the illuminations by manually setting the focus on the foreground so that the light sources were blurred and reduced to round dots.
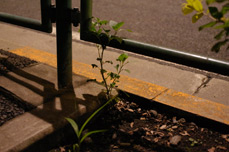
Taken with: GXR+RICOH LENS P10 28-300mm ●ISO3200 ●1/125sec. ●F2.5 ●EV-0.3 ●WB:Outdoors ●A Auto
I was simply amazed at the power of the GR 50mm micro unit which enabled realistically reproducing the natural resolution of this plant that was quietly growing in the side of the road with minimal lighting under a guardrail.
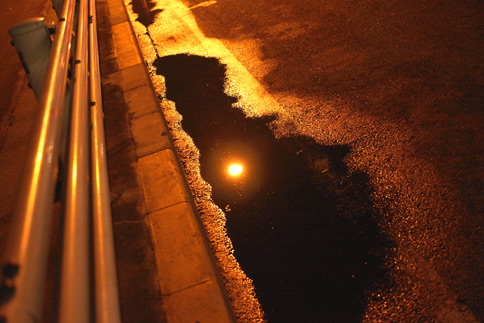
Taken with: GXR+RICOH LENS P10 28-300mm ●ISO3200 ●1/60sec. ●F2.5 ●EV-0.3 ●WB:Outdoors ●A Auto
When I was looking through the VF-2 while slowly turning the focus ring, the crystal clear reflection of the street light in a puddle of water jumped out at me. The moment when I confirm that I have successfully captured the image, that moment is the best part of taking manual focus photos.
Taken with: GXR+RICOH LENS P10 28-300mm ●ISO3200 ●1/10sec. ●F2.5 ●EV-0.3 ●WB:Outdoors ●A Auto
Looking into the four corners of the viewfinder while keeping the power lines to the right, I slowly released the shutter. I was satisfied with the high resolution that almost made me forget that the sensitivity was set at 3200.
Taken with: GXR+RICOH LENS P10 28-300mm ●ISO3200 ●1/13sec. ●F2.5 ●EV-0.3 ●WB:Outdoors ●A Auto
Night snapshots may become just another everyday shot if it’s possible to reproduce the sharp contrasts without anyone realizing that the photo was taken with ISO3200.
Taken with: GXR+RICOH LENS P10 28-300mm ●ISO3200 ●1/25sec. ●F2.5 ●EV-0.3 ●WB:Outdoors ●A Auto
I saw the lights from the condominium through the bushes near the sidewalk, so I set the focus on the bushes and included the background in the frame. The result was a photograph in which the lively bushes were reproduced with a background studded with beautiful blurred lights.
Taken with: GXR+RICOH LENS P10 28-300mm ●ISO3200 ●1/125sec. ●F2.5 ●EV-0.3 ●WB:Outdoors ●A Auto
I had taken similar shots in front of this antique shop numerous times, but this was the first time I took one using my GXR set at ISO 3200 with a 50mm micro unit attached. Night snapshots should only be taken with this combination. That’s what I thought.
●Taking daytime snapshots with increased sensitivity and excessive exposure compensation.
Taking a high-key image in which the details have been washed out takes a bit of courage. However, if you take the plunge and take up the challenge, you will find it to be as addictive as taking night snapshots with increased sensitivity. I was able to take artistic photos to a completely new level by manually operating settings for high-sensitivity, high-key, and white balance.
Taken with: GR DIGITAL III ●ISO1600 ●1/870sec. ●F3.2 ●EV-0.3 ●WB:Outdoors ●A Auto
If you set the compensation to +2, which causes even the facial contours to be overexposed, and set the white balance to Incandescent lamp with ISO1600, you will be able to get anything-but-ordinary shots no matter what the subject.
Taken with: GR DIGITAL III ●ISO1600 ●1/60sec. ●F9.0 ●EV-0.3 ●WB:Outdoors ●A Auto
Even though the finish of this photo was not extremely innovative, I thought it conveyed a nice aura after taking the photo. This pale, washed out feeling seemed to awaken a long lost memory.
Taken with: GR DIGITAL III ●ISO1600 ●1/740sec. ●F8.0 ●EV-0.3 ●WB:Outdoors ●A Auto
Scenes from everyday life, which are never repeated, are captured by the camera and remember by us. Such casual yet realistic memories dwell in such high-key images.
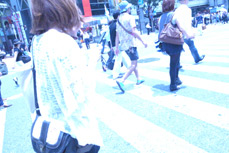
Taken with: GR DIGITAL III ●ISO1600 ●1/217sec. ●F2.5 ●EV-0.3 ●WB:Outdoors ●A Auto
This was the first time I took a photograph with a digital camera set to high-sensitivity, with +2 exposure compensation and manual white balance. The result surprisingly seemed to capture the essence of the photograph. So, don’t be afraid to try out new settings!
Taken with: GR DIGITAL III ●ISO1600 ●1/440sec. ●F4.2 ●EV-0.3 ●WB:Outdoors ●A Auto ●Image Setting:Black & White
High-sensitivity and excessive exposure compensation are still effective even if the image setting is set to “Black & White E Since I have been engrossed in taking black and white photos with digital cameras from a while back, I find this setting extremely interesting.
●Fill-in flash works well for photographs of plants.
Using fill-in flash may seem a little absurd considering the trend these days of capturing the subject in the natural surrounding light and using the flash as little as possible. Many of you may think of fill-in flash as an auxiliary light such as one used when taking a photograph of people against the sun on a clear day. What would a flash sync photograph taken in broad daylight look like? Using plants and other things as the subject, I would like to take a look and figure out what the fill-in flash is useful for.
Taken with: CX3 ●ISO80 ●1/1620sec. ●F7.0 ●EV-2.0 ●WB:Outdoors ●P Auto ●Flash On compensation -1
On a sweltering hot day, a flower caught my eye as I was walking down a shopping promenade in Setagaya. Since I had my already-tested-data saved on my CX3 (to MY settings), I immediately switched the settings and took a photograph with fill-in flash. The shot came out exactly as I wanted, with the perfect coloration and exposure.
Taken with: CX3 ●ISO80 ●1/2000sec. ●F7.0 ●EV-2.0 ●WB:Outdoors ●P Auto ●Flash On compensation -1
The contours in this photo are exaggerated with the fill-in flash and the plants seem to soar into the blue sky as if taken on a movie set. There are no hazy sections with the effects of the flash and everything looks sharp.
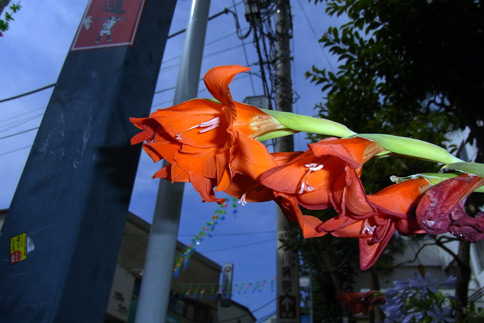
Taken with: CX3 ●ISO80 ●1/1740sec. ●F7.0 ●EV-2.0 ●WB:Outdoors ●P Auto ●Flash On compensation -1
If you had no interest, you would probably just walk by without even noticing the towering plant, full of life, growing in the corner of a parking lot in a residential area. Not me. I felt drawn to this plant and had to go in closer to take this shot.
Taken with: CX3 ●ISO80 ●1/1870sec. ●F7.0 ●EV-2.0 ●WB:Outdoors ●P Auto ●Flash On compensation -1 ●Flash discharge compensation -1
I saved these settings to MY settings on my CX3. I came up with them specifically for taking fill-in flash photos of plants. For me, these settings are the best for taking fill-in flash photographs. Why not try taking a few photos with these settings to find out what kind of results they’ll bring you?
Taken with: CX3 ●ISO80 ●1/500sec. ●F7.0 ●EV-2.0 ●WB:Outdoors ●P Auto ●Flash On compensation: -1
The use of fill-in flash on plants is very alluring. It would not be an exaggeration to say that it is a magical light that can take us to a completely different world, in an instant.
Taken with: CX3 ●ISO100 ●1/660sec. ●F7.0 ●EV-0.3 ●WB:Outdoors ●P Auto
Around nightfall on a cloudy day, I took a photograph of a road sign that I happened to see. The resulting photograph had no contrast and looked flat.
Taken with: CX3 ●ISO80 ●1/760sec. ●F7.0 ●EV-1.0 ●WB:Outdoors ●P Auto ●Flash On compensation -1
I then took another shot with exposure compensation -1 weaker than my custom fill-in flash settings. This left the background with the same brightness and made only the road sign stand out.
Taken with: CX3 ●ISO80 ●1/1620sec. ●F7.0 ●EV-2.0 ●WB:Outdoors ●P Auto ●Flash On compensation -1
Finally, I combined MY settings I have saved on my camera and took another shot. This narrowed the aperture down 1 for the background and created a quasi-night scene effect.
Taken with: CX3 ●ISO80 ●1/440sec. ●F7.0 ●EV-0.3 ●WB:Outdoors ●P Auto
I took a photo of a motorcycle parked on the street. The resulting photo was quite ordinary and I couldn’t get myself to like it much.
Taken with: CX3 ●ISO80 ●1/1000sec. ●F7.0 ●EV-2.0 ●WB:Outdoors ●P Auto ●Flash On compensation -1
When I took another photo using fill-in flash, however, the catch light landed on the head light and the photo came out looking quite natural. I think this is a perfect example of the subject’s nature and flash sync working superbly together, setting off sparks.


![Photo-technique [Individual Subject section] 07 Simply changing the camera angle can spice things up. Try taking photographs from your own viewpoint instead of leaving it up to the camera](/english/r_dc/photostyle/take/object/007/img/beg_bod_ttl.gif)


 Taken with: CX3 ●ISO100 ●1/320sec. ●F3.5 ●EV-0.3 ●WB:A ●P Auto ●Polarizing filter