
PENTAX K-3 Mark III
Below is a list of frequently asked questions and corresponding answers for the PENTAX K-3 Mark III digital camera.
Basic Specifications and Functions
 What accessories are provided with this camera?
The following accessories are providing with this camera. (P & J for only Japanese market)
-Hot Shoe Cover FK
-Sync. Socket 2P Cap
-Eyecup FU
-ME Viewfinder Cap
-Strap O-ST162
-Triangular rings and Protective covers
-Battery grip terminal cover
-Rechargeable Lithium-ion Battery D-LI90P
-Body Mount Cap KII
*The included body mount cap Kll is not available as an optional accessory.
-USB power adapter AC-U1
-Power plug
-USB cable I-USBCS-166
-Operating manual.-
Are there any other necessary items that are not included in the kit?
The kit does not come with an SD Memory Card, so please prepare an SD Memory Card with the necessary capacity and capabilities for camera applications.
Use a commercially available mini HDMI cable (type D) to play back recorded images or movies on a TV screen or other AV device.-
What are the optional accessories for this camera?
-Hot Shoe Cover FK
-Sync. Socket 2P Cap
-Eyecup FU
-ME Viewfinder Cap
-Strap O-ST162
-Triangular rings and Protective covers
-Battery grip terminal cover
-Rechargeable Lithium-ion Battery D-LI90P
-Body Mount Cap K
*The included body mount cap Kll is not available as an optional accessory.
-AC adaptor kit K-AC166J (includes the AC Adapter D-AC166 and an AC plug cord)
-Battery charge kit K-BC90PJ (includes the buttery chrger D-BC90P and an AC plug cord)
-Battery charge adaptor kit K-BC177J (includes the buttery chrger D-BC177, AC adaptor D-BC166 and plug cord)
-Battery grip D-BG8
-Strap O-ST1401
-Hand strap O-ST128
-Cable switch CS-205
-Remote control F
-Remote control O-RC1
-Auto Flash AF540FGZ II / AF201FG-
What display languages are available for text and messages on the LCD monitor?
There are 21 display languages available, Japanese, English, French, German, Spanish, Portuguese, Italian, Dutch, Danish, Swedish, Finnish, Polish, Czech, Hungarian, Turkish, Greek, Russian, Thai, Korean, Simplified Chinese and Chinese Traditional.-
How many bits for the A/D converter?
14 bits.-
How long is the startup time?
Approx. 0.6 second.-
Can the cable switch be used with this camera?
Yes, can use CS-205.
However, please note that the camera will no longer be water-resistant while the cover of the switch connector being open while the switch is used, requiring extra caution to be taken for use outdoors or indoors that around water.-
Can Refconverter A/M be used with this camera?
Yes, it can. Which model number?.-
Can a battery grip be used with this camera?
The optional Battery Grip D-BG8 (sold separately) can be used with K-3Mark III. If a Lithium-ion Battery D-LI90(P) is inserted into both the camera and the battery grip, the number of recordable images will be increased.-
Can polarizing filters are used with this camera?
Circular type polarizing filters (C-PL/Circular PL) can be used. Normal, non-circular polarizing filters may adversely affect the exposure and AF and thus cannot be used.-
Is there a proprietary case available for this camera?
No, there is not.
Camera Shooting Function
-
Please tell me about the specifications of the drive mode.
The main specifications of drive mode are as follows.
Caution:Drive Mode Single frame, Continuous (H, M, L), Bracketing (2, 3 or 5 frames), Mirror Lock-up, Multi-exposure, Interval shooting, Interval Composite, Timer/Remote Control Self-timer (12s, 2s), Remote Control (immediately, 3 sec.) Continuous
ShootingMax. Approx. 12 fps, JPEG (L: ★★★ at Continuous H): up to approx. 37 frames, RAW: up to approx. 32 frames, RAW+: up to approx. 30 frames.
Max. Approx. 7.0 fps, JPEG (L: ★★★ at Continuous M): up to approx.
60 frames, RAW: up to approx. 37 frames,
RAW+: up to approx. 33 frames.
Max. Approx. 2.5 fps, JPEG (L: ★★★ at Continuous L): up to approx.
90 frames, RAW: up to approx. 39 frames,
RAW+: up to approx. 37 frames.
* At ISO100
* When use erectronic shutter and High sensitivity shooting the continuous shooting speed will be slower.
When the smc PENTAX-DA★60-250mmF4ED[IF] SDM or smc PENTAX-DA★50-135mmF2.8ED[IF] SDM is attached camera body then take a picture by AF.C mode, the continuous shooting speed will slow down even with frame speed priority when the battery is low.-
What kind have the bracketing shooting mode?
Bracketing shooting mode has following functions.
*1 Cannot be selected when a lens with an “A” position is used with the aperture ring set to a position other than “A”.Bracketing You can change the number of shots, bracket width, and exposure compensation value in one release. Depth of Field Bracketing Without changing the exposure, the aperture value is changed step by step to shoot 3 shots in a row. Can be selected only in AV / TAV mode *1 Motion Bracketing Without changing the exposure, the shutter speed is changed step by step to shoot 3 shots in a row. Can be selected only in AV / TAV mode *1
Memo: The bracket value can be set in increments of [1/3 EV Steps] or [1/2 EV Steps] according to the setting of [EV Steps] in the C5 menu.-
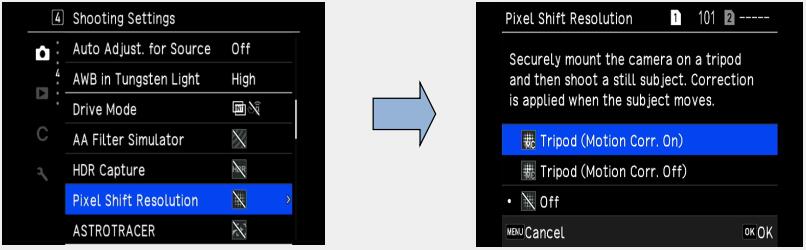
What is the Pixel shft Resolution ?
The in-body SR (shake reduction) mechanism is used to move the image sensor unit in minute increments, a single pixel pitch at a time, to capture four shots. Pixel Shift Resolution merges those shots into a single image to generate an ultra high-definition image. This method differs from the traditional Bayer method, which acquires only a single element of color information for single pixel, by acquiring all RGB color information for individual pixel. This difference makes it excellent for detail and color reproduction, creating super high-definition images. This also prevents false colors from occurring theoretically, and also has a high-sensitivity noise reduction effect when compared to normal shooting.
Photographed RAW images can be processed on the camera and also developed using the included utility software as Pixel Shift Resolution.
*Be sure to use a tripod for thorough stabilization when shooting.
*When shooting, use Drive Mode options: Self-timer, Remote Control, or Mirror Lock-up Shooting.
*Effects may not be gained if the subject moves or the camera shakes.-
What is the setting modes and functions of Pixel Shift Resolution II System?
There are following four capture settings available.
When shooting is performed, captured four images and then they are merged into a single image.Tripod (Motion Corr.On) Reduces mosaic-pattern noise when a moving object is detected. Tripod (Motion Corr.Off) Does not detect moving objects. Off Does not use Pixel Shift Resolution.
・Set the function at the Capture 4 menu [Pixel Shift Resolution].
Memo:
・The use of Pixel Shift Resolution function in combination with [Mirror Lock-up Shooting], [Self-timer] or [Remote control] of [Drive Mode] in the4 menu is recommended.
・While the Pixel Shift Resolution function is the used, [Shake Reduction] is fixed to [Off] in the7 menu.
Caution:
*This function cannot be used in the following situations.
・In B or X mode.
・In Movie mode.
・When shooting with [Pixel Shift Resolution], use a tripod and mount the camera on it securely.
*This function cannot be used in combination with some other functions. (Below figure)
○: Available ×: Not availablePixel Shift Resolution Flash × Drive Mode Continuous Shooting × Bracketing × Mirror Lock-up Shooting ○ Multi-exposure × Interval Shooting × Interval Composite × Interval Movie Record × Star Stream × HDR Capture × AA Filter Simulator × ASTRO TRACER × -
What is the AA filter Simulator function?
By using the camera’s SR II mechanism to apply microscopic vibrations to the image sensor, the AA (anti-aliasing) filter simulator effectively minimizes moiré and false color along the image’s edges, which are common problems when shooting subjects with minute patterns.
Set the function at the4 [Anti-Aliasing Filter Simulator]
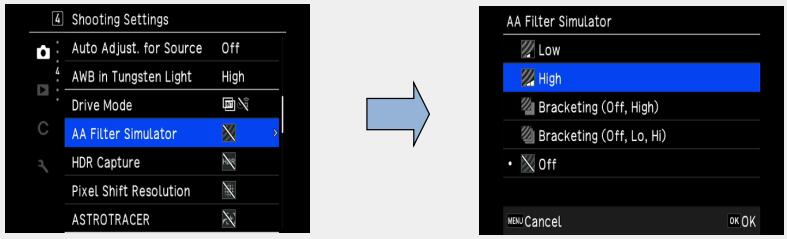
Low Takes images while balancing the resolution and moire reduction. High Prioritizes the moire reduction. Bracketing (Off, High) Takes consecutive two images in order of [Off] and [High]. Bracketing (Off, Lo, High) Takes consecutive two images in order of [Off], [Low] and [High].
Caution
*This function cannot be use in some capture modes or in combination with some other functions.
*[Bracketing] cannot be selected in the following situations.
-In M mode.
-When the drive mode is set to other than [Single Frame Shooting].
-When [HDR Capture] is set.
-When taking pictures with [Pixel Shift Resolution system].
*When the shutter speed is faster than 1/1000 seconds, the full effect of this function cannot be achieved.-
What is the Composition Adjustment function?
By using the Shake Reduction mechanism, the composition of the image can be adjusted. It is useful function when using a tripod while shooting with Live View and you like to adjust the composition at the same time.
Setting procedures
1.Select [ON] at the [Composition Adjust.] of the7 menu.
2.Press [MENU] button.
3.Set [LV].
[Adjust the composition of the image] will be displayed.
4.Adjust the composition.
The composition adjustment value will be displayed at the top/right corner of the LCD.
-Composition movement (Up/Down/Right/Left, up to 24 steps)
-The level of the composition (Up to 8 steps. Not available when the amount of composition adjustment steps are 17 or more)
5.Press [OK] button.
Return to Live View capture mode.
Caution:
*You cannot use this function when the ASTRO TRACER function is used.
Memo:
・The adjustment composition is saved even if Live View is ended or the camera is turned off. To reset the saved adjustment value when the camera is turned off, set [Composition Adjustment] to [Off] in [Memory] of the C5 menu.
・If [Composition Adjustment] is registered in [Fx Button] in the C2 menu, you can start the composition adjustment by pressing the button.-
Can a remote control be used with this camera?
Yes, it can. The optical remote control waterproof O-RC1 and Remote Control F are available for use with this camera.
1. Select [Timer/Remote Control] on the [Drive Mode] screen and press right.
2. Use to select a setting.
3. Press halfway.
4. Point the remote control unit towards the remote control receiver of the camera, and press the shutter release button on the remote control unit.
Memo:
・ mode, make setting in [Remote Control] of the 4 menu.
・When shooting with remote control unit is enabled, the lamp of the camera remote control receiver blinks. You can also make setting so that the lamp does not blink.
・The eye sensor is disabled while [Remote Control] is selected.
・During shooting with the remote control unit, [Shake Reduction] of the7 and 7 menu is automatically turned off. If you do not want to turn off the [Shake Reduction] function, make setting in [Auto Shake Reduction Off] of the 7 and 7 menus.
・The maximum operating distance of the remote control unit is about 4 m from the front of the camera, and about 2 m from the back of the camera.
・To adjust focus while shooting with the remote control unit, set [AF with Remote Control] to [On] in the C6 menu.
・When using the Remote control Water proof O-RC1, the autofocus system can be operated with the button on the remote control unit. The Fn button cannot be used.
・The [Timer/Remote Control] setting is saved even after the power is turned off. If [Timer/Remote Control] is set to [Off] in [Memory] of the C5 menu, the setting returns to [Off] when the power is turned off.

Performs shooting with the remote control unit.
(The shutter is released immediately.)
Performs shooting with the remote control unit.
(The shutter is released after about 3 seconds.)-
Can multi-exposure shooting be used with this camera?
Yes, it can. You can select from [Average], [Additive] or [Bright]
Caution: [Continuous Shooting] is not available in B mode.Composite Mode [Average]: Creates a composite image with the average exposure.
[Additive]: Creates a composite image with the cumulatively added exposure.
[Bright]: Compares the captured image with the previous image pixel by pixel and creates a composite image by replacing only the brightest pixel between the images.Save Interim Images Sets whether to save images in the middle of processing. Continuous Shooting Sets whether to perform continuous shooting. -
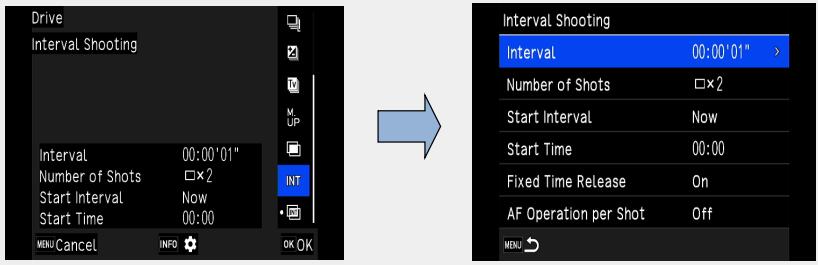
What kinds of capture mode in the Interval shooting?
Please show as follows.
Capture mode:

Interval Shooting Takes pictures at set intervals and saves them. 
Interval Composite Takes pictures at set intervals and merges them into a single image.
*Shooting procedures:
1. Select [Interval Shooting] on the Drive Mode screen and press .
.
2. Set the shooting conditions.
Shooting condition:Interval Select from 1 seconds to 24 hours. Number of shots Select from [∞] and 2 to 9999 times Start Interval Sets the timing to take the first image. Start Time Set the shooting start time when [Start Interval] is set to [Set Time]. Fixed Time Release Sets whether to take images at the interval set in [Interval] regardless of the shutter speed. AF Operation Per Shot Sets whether to lock the focus position used when the first image is taken or perform autofocus each time the images is taken.
3.Press button.
The screen of Step 1 reappears.
4.Press button.
The camera returns to standby mode.
5.Press button.
When [Start Interval] is set to [Now], the first image is taken. When [Start Interval] set to [Set Time], shooting starts at the set time.
Press to cancel shooting.
After the specified number of images are taken, the camera returns to the standby mode.
Memo:
*For each interval shooting, a new folder is created and the images are saved there.
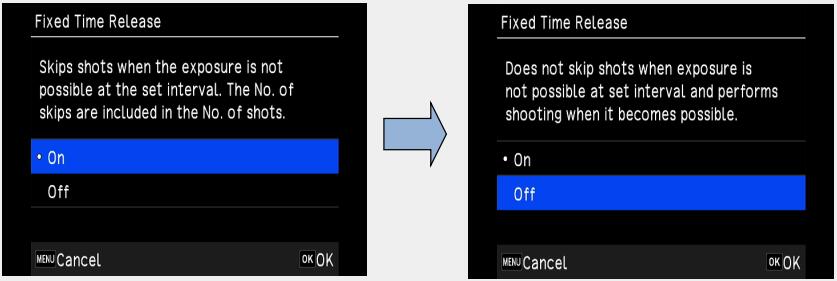
*The second and later exposures start at the interval set in [Interval]. When the shutter speed is longer than the interval set in [Interval], the shooting result varies depending on the [Fixed Time Release] setting.
Fixed Time Release When the Shutter Speed Is Longer than the Interval Set in [Interval] On Some shutter releases are skipped.
Example) When [Interval] is set to 2 seconds, and the shutter speed is set to 3seconds: The first exposure has not yet finished at the time the second exposure is supposed to be started (2 seconds after shooting has started), and so the second image is not taken. (Shooting ends before the images specified in [Number of Shots] are taken.)Off No shutter releases are skipped.
Example) When [Interval] is set to 2 seconds, and the shutter speed is set to 3seconds: The second exposure does not start even 2 seconds after shooting has started and starts after the first exposure finishes. (Shooting ends after the images specified in [Number of Shots] are taken.)
・When [Fixed Time Release] is set to [On], [Minimum] is not available for [Interval]. If [Interval] is set to [Minimum], the setting changes to [1 sec.].
・The time set by [Minimum] in [Interval] varies depending on the combination with the menu functions.
-
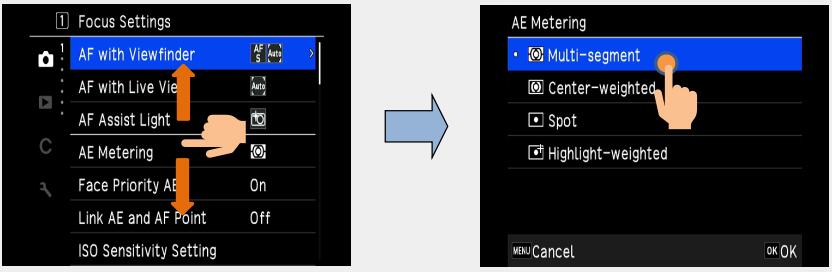
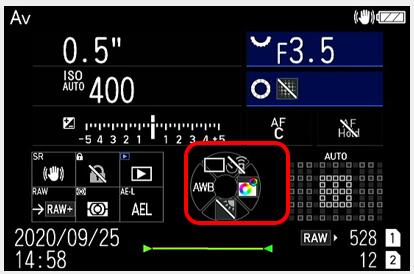
What kinds of Operation can be performed by touch panel?
You can use the touch panel to select functions, set the AF point for shooting, and perform other operations.
・When not using the touch panel function, set [Monitor Touch Operation] to [Off] in the C3 menu.
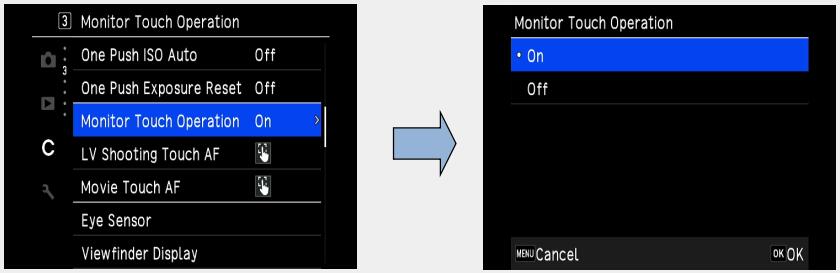
You can directly touch the monitor and scroll the menu up or down to select directly.
-
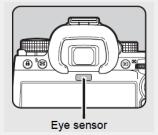
What is an Eye sencor?
The eye sensor detects whether the user is looking through the viewfinder in the standby mode while shooting with the viewfinder. When the sensor detects the user’s eye, the monitor backlight turns off and the metering starts. The eye sensor may operate when an object is brought close to it or it is exposed to direst sunlight. It is also used for the automatic brightness adjustment of the monitor.
 Note:
Note:
If the sensor part is wet or has sebum or other substances on it, the following symptoms may occur, even if they are not noticeable.
・The image monitor does not display, and the i mage monitor is difficult to turn off when looking through the viewfinder.
・The monitor adjustment "Brightness: AUTO" does not work properly.
・The metering linkage of the eye sensor during viewfinder shooting does not work properly.
You can set the camera operation when the eye sensor detects the user’s eye in [Eye sensor] of the C4 Menu.
Link Monitor Display. Turn off the monitor backlight when the eye sensor detects the user’s eye. AE with Eye Sensor. Starts metering when the eye sensor detects the User’s eye. Detection Sensitivity Sets the eye sensor detection sensitivity.
Performance for environment
-
What is the exterior of the camera made of ?
A magnesium alloy is used for Front cover, Back cover and Bottom cover.-
Is the K-3 Mark III designed to be water-resistant/dust-proof?
Yes. There are sealing components used in the dials, buttons, joints of the camera, making it both dust-proof and water-resistant, and anticipating use in cold locations, PENTAX has subjected the K-3 Mark III to exacting environmental tests at temperatures as low as –10°C.
*For best protection against water or dust, use the camera with the Hot Shoe Cover FK, the Sync Socket 2P Cap and the Battery Grip Contact Cover attached.-
If the water resists lens set with K-3 Mark III, can it be used in the rain?
When an AW- or WR-series lens* is mounted, the K-3 Mark III and its lens forms a remarkable digital imaging system totally resistant to demanding environmental factors. However, it is not recommended to use these units in the rain for long time. When you are going to shoot in the rain continuously, it is recommended to use with rain cover etc.
*AW:All Weather, WR:Water Resistant.
*Seals have been placed around the joints and the operating parts, however when exposed to moisture, there is a possibility for water to pool. So, if it gets wet wipe up as quickly as possible. About the lens, it is also recommend especially when zooming etc. to wipe up any moisture immediately.-
Is the K-3 Mark III designed to be cold-resistant?
Anticipating use in cold locations, PENTAX has subjected the K-1 Mark II to exacting environmental tests at temperatures as low as –10°C, and gathered a vast array of data on operational precision, response and stability of mechanisms and circuits, as well as fluctuations in battery voltage* As the result, the K-1 Mark II assures solid, trouble-free operation even at freezing temperatures.
*Battery performance declines as the temperature goes down. When shooting in cold environments, the user is advised to carry spare batteries and keep them warm by storing them in an inside pocket
Display and Auto focus performance
-
What are the features of the LCD monitor?
The specification of the LCD monitor is as follows.
Type Wide viewing angle TFT color LCD, Air-gapless glass. Flexible-tilt Size 3.2 inch (aspect ratio 3:2) Dots Approx. 1620K dots. Adjustment Brightness, Saturation and Colors adjustment. Outdoor monitor ±2 steps adjustable. Night vision display On / Off -
What are the field of view and magnification of the viewfinder?
The specifications of the viewfinder are as follows.
Type Pentaprism Finder. Coverage (FOV) Approx. 100% Magnification Approx. 1.05x (50mmF1.4 at infinity) Eye-Relief Length Approx. 20.5mm (From the view finder frame.)
Approx. 22.3mm (From the center of eyepiece lens.)Diopter adjustment Approx. -4 to +1.0m-1 Focusing screen Fixed Natural- Bright- Matte III focusing screen View finder indication. AF point, Grid indication, Electronic Level, AF frame, Spot Metering frame Crop, Smart function icons, and Operation Control Lock icon. -
Is the focusing screen changeable?
No. It is a fixed type focusing screen.-
Specification for Auto Focus System using the viewfinder
The specification is as below.
Type TTL Phase-matching autofocus Focus Sensor SAFOX 13, 101 points (25 cross type focus points in the center) Brightness range EV-4 - 18 (ISO100, at normal temperature)
・-4 EV is only available for AF points that support F2.8 light flux when an F2.8-light-flux compatible lensis attached.AF mode Single AF (AF.S), Continuous AF (AF.C) AF point selection Auto Area, Zone select, Select, Expanded Area AF (S, M, L), select (S), Spot. AF Assist Light Dedicated LED AF assist light
Kind of Focus Sensor point
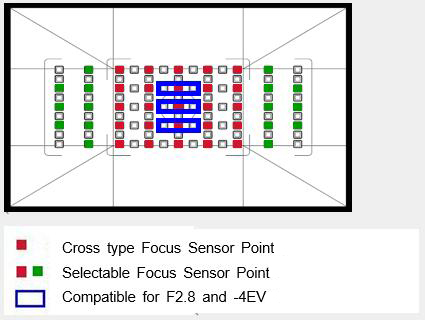
There are 101 AF points, and the focusing area uses a focus module that is 1.2 times larger than the KP.
Corresponding to the brightness range of -4EV, the focusing performance in dark places has been improved.-
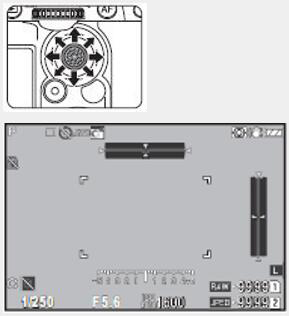
Can K-3 Mark III select the AF points?
Yes. You can select the AF points. The AF points can be selected from 41 points out of 101 points.
1. Press , and then turn
  .
.

Auto Area Automatically selects the optimum focusing points out all AF points. 
Zone Select Automatically selects the optimum focusing points out of the selected 21 AF points. 
Select Sets the AF points to the user selected five points. 
Expanded Area AF (S) Sets the AF points to the user selected five points.
When the subject happens to move out of the selected AF points after being focused, 16 peripheral points are used as back-up points for autofocus.
This setting is available only with [Continuous AF]
Expanded Area AF (M) Sets the AF points to the user selected five points.
When the subject happens to move out of the selected AF points after being focused, 60 peripheral points are used as back-up points for autofocus.
This setting is available only with [Continuous AF]
Expanded Area AF (F) Sets the AF points to the user selected five points.
When the subject happens to move out of the selected AF points after being focused, 96 peripheral points are used as back-up points for autofocus.
This setting is available only with [Continuous AF]
Select (S) Performs autofocus with fewer AF points than those for [Select]. 
Spot Sets the AF point to the center point.
2. Use to select the desired AF points.
The device used for the AF point selector lever detects movement in eight directions bycombining a switch that detects in which direction the lever is tipped and a switch that detects that the lever has been operated.
If you release the switch immediately after you feel the click, the two switches may not be fully turn on, so you may need to operate the switch a little harder to ensure that the two switches operate properly.
Also, these two types of switches are designed to be difficult to respond when operated from the side.
Please place your thumb along the top surface of the control panel and operate the lever in a tilting motion.
Push the lever in to reset the AF points.
Memo:
・The selected AF points can be checked also in the viewfinder.
Caution:
・The selected AF points differ depending on the lens attached.
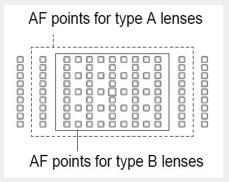
Restrictions on the Selection of AF Points
When the following lenses, some AF points on the left and right sides cannot be used while shooting with the viewfinder.
See RICOH IMAGING website for the latest information.

-
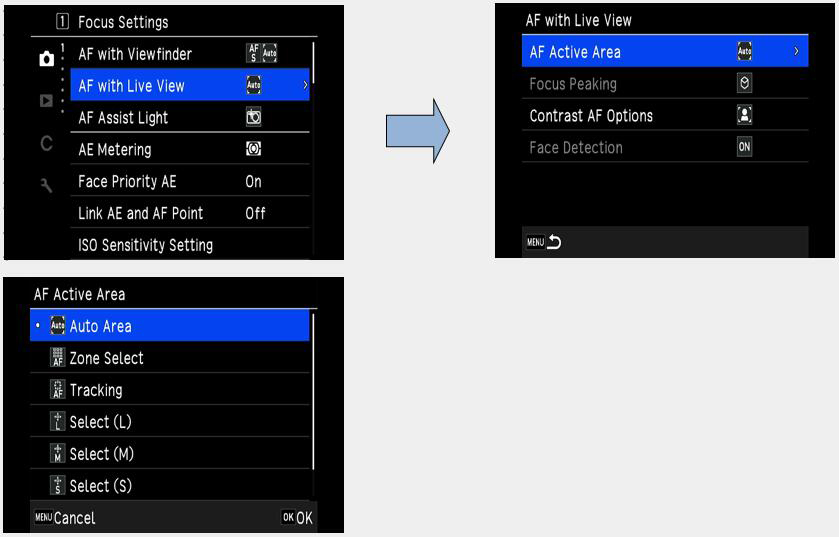
What is the Autofocus specification when shooting in Live View mode?
Live View mode specification as follow.
Setting;
1. Press, and then turn .
Auto Area Automatically selects the optimum focusing points out of all AF points. Zone Select Performs autofocus in the selected 3x3 areas. Tracking *1 Tracks the subject in focus. 
Select (L) Performs autofocus with more areas than those for [Select (M)]. 
Select (M) Performs autofocus with the selected areas. Select (S) Performs autofocus with fewer areas than those for [Select (M)]. Spot Sets the AF active area to the center area.
*1 Not select in B mode.
2. Use to select the desired AF points.
Push the lever in to reset the AF active areas.
-
How to set the AF Fine Adjustment?
You can set AF Fine Adjustment following the procedure below.
■Setting procedures of AF Fine Adjustment
1. Preparation
Camera, Lens, Object (Chart)*
*As below sample, prepare the flat chart which has a clear contrast of black and white and place it to parallel with the camera.

Caution: Following object and method of capturing are not suitable for AF Fine Adjustment.
・Objects which have depth.
・Spherical objects where the focus point can easily change.
2. Setting of the camera
3. AF fine adjustment procedures.Items Contents 1 Distance As a guide, set the chart from camera about 30 to 40 times of focal length. (Ex.) f=50mm x40 =2m(2000mm) 2 Zoom Position
*in case of Zoom lensRecommended telephoto end which has narrower depth of field and easy to find focus point. 3 Focus point Set the center of SEL with AF.S mode or user’s favorite focus point. 4 Light source Outdoor with sunlight or same as actual capture condition.
Observe not to reflect any direct light on the target chart.5 Condition of the object Set the target chart to parallel with the camera. 6 Diaphragm Recommended fully opened aperture which has narrower depth of field and easy to find focus point.
Follow the numbers (1) to (6) below.
(1) Focus with the [Phase Matching AF].
(2) Shoot as it is or set Live View display.
(3) Check the focus on the captured image or Live View mode.
If you have the focus you like, you are done.
If not, go to step (4).
(4) Judge if it is the Front Focus or Back Focus.
There are the following confirmation methods.
1) Focus the subject with Phase-Matching-AF and set the AF-MF switch to MF.
2) Switch the Live View display to ON
3) Make a judgment by slowly moving the focus ring in a certain direction while looking at the enlarged display of the target subject (focusing point) on the LV screen.
・Move to infinity and when it comes into focus, it tends to be in front focus. ・On the contrary, if you move to the near side from infinity and comes into focus, this tends to be in back focus.
[Remarks] Focus can be considered the best, if it is out of focus regardless of whether it is moved to infinity or the near side.
(5) From the result of step (4), set AF fine adjustment by the following steps 1) to 5).
1) At the C7 Function customization menu, select [AF Fine Adjustment] and press the right of the 4-way key twice to display the setting menu.
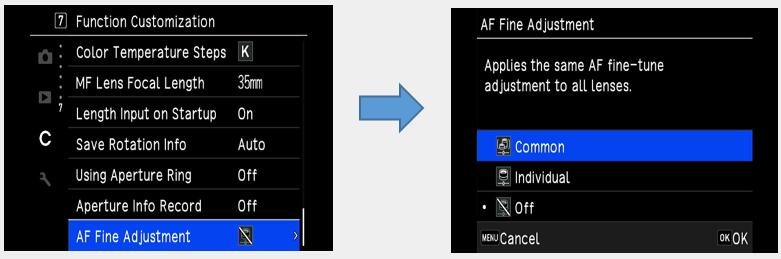
2) Select either ‘Common’ or ‘Individual’ settings and press the ‘OK’ button.
The illustration below shows when ‘Common’ is selected.
Common Apply the same adjustment value for all lenses Individual Register the adjustment value only for the lens which is attached body (Up to 20 models can be registered)
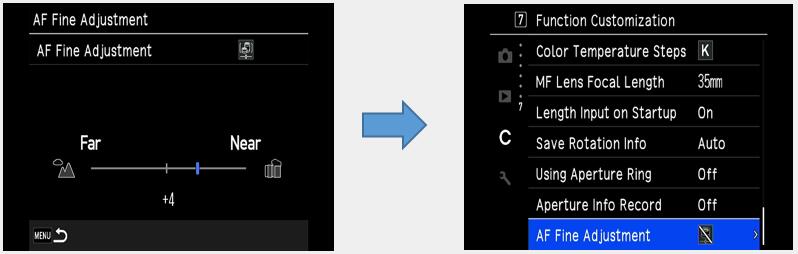
3) Press the bottom of the 4-way key to set the adjustment value to ‘settable’.
4) From the result of step (4) above, increase or decrease the adjustment value as follows.
In the photo above, the adjustment value is ‘+4’.
・In the case of a back focus tendency…Move the index to the + side.
・In the case of a front focus tendency…Move the index to the - side.
5) After entering the adjustment value, press the MENU button to return to the shooting screen.
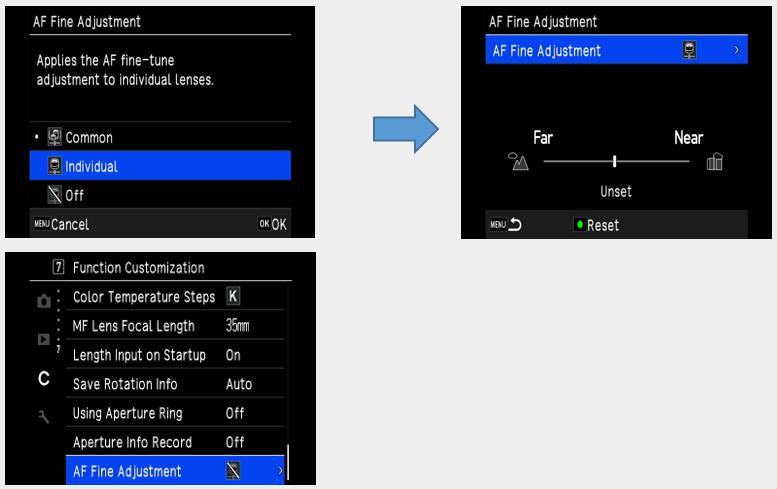
‘Individual’ setting can be selected only when a compatible lens is attached to the body, And the adjustment value will be enabled for the attached lens model.
(6) Return to step (1) and check the adjustment result.
By repeating step (1) to (6) above, you can adjust the focus position to your favorite lenses.
■ When the result of adjustment is as follows,
・When the focus direction (+ or -) of the adjustment value tends to be the same for multiple lenses you have.
・Even if you make fine AF adjustments, the focus may be lost depending on the subject.
In these situations, it is possible that the AF accuracy is a problem with the customer’s camera
Please bring or send in the camera / lens together to the Ricoh Imaging Service Centre,
we will provide an inspection service and make adjustments if necessary.
*In case of any costs will be involved, we will contact you before the adjustment.-
Does the K-3IIl have an AF assist light?
Yes, it does. The AF assist light is activated when AF. S mode is selected.
You can switch on/off with the1 Focus Setting Menu [AF Assist Light].
-
What kind of function is Catch-in Focus.
The shutter is released automatically when the subject comes into focus
Use a manual focus lens or a lens with the AF/MF switch set to MF.
1. Attach a manual focus lens to the camera.
2. Set the focus mode to AF.
3. Set [Catch-in Focus] to [On] in [AF with Viewfinder] of the1 menu.
4. Place the camera on a fixed support such as tripods.
5. Adjust the focus to the position where the subject may pass and press fully.
When the subject comes into focus at the specified position, the shutter is released automati cally.-
Please tell me how to use Smart Function conveniently.
By using the combination of S.Fn button and S.Fn dial, you can change the function to be used while looking through the viewfinder.
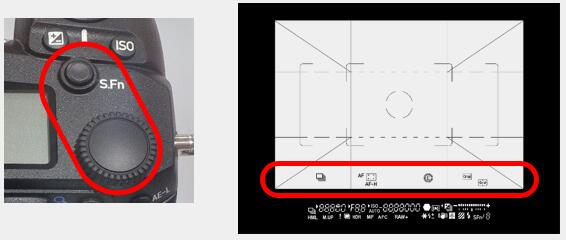
・The settings for each function can be registered in the C2 menu [Smart Function] for function 1 to 5 to be used by the user
・You can change the settings while looking at the function icon displayed in the viewfinder.
1. Press the S.Fn button.
2. Turn the to select the function you want to change.
3. Turn the S.Fn dial to change the setting.
Reducing Blurring of Image
-
What is the K-3 marklll Shake Reduction method?
It is equipped with the sensor shift type Shake Reduction mechanism, SRll, which can correct camera shake with all lenses.
For 5-axis correction corresponded to angular blur that tends to occur in macro photography, and rotational
blur that cannot be handled by the in-lens Shake Reduction mechanism.
A correction effects about 5.5 steps can obtained in terms of shutter speed.-
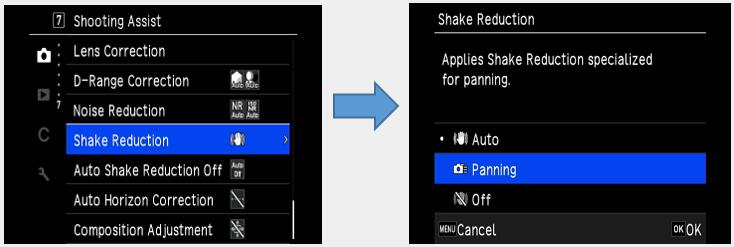
Does the Shake Reduction SRll also support panning?
Yes, When panning is detected, the camera determines the direction of shaking and control the SRll mechanism to correct only other blurring, and support both normal shooting and panning without switching operations. In addition, a new ‘Panning’ exclusive mode is also installed to prevent erroneous correction in planning shots of minute movements.
-
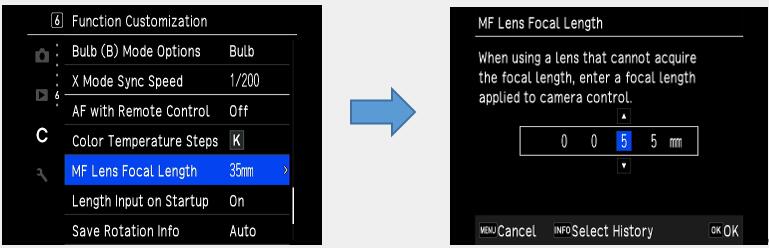
Are there any lenses that cannot use the Shake Reduction SRll mechanism?
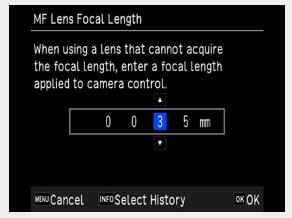
You can use the SR mechanism of K-3 marklll with all the lenses that can be attached. If the lens cannot obtain focal length information, enter the focal length from 8mm to 2000mm.
・The F/FAJ/FA lens, which can automatically communicate lens information when mounted with camera, supports 5-axis, and the other lenses support 3-axis Shake Reduction of pitch, yaw and rotation
・Depending on the lens, the information on the lens is limited, so the effect of 5-axis SR may differ.
-
Does the Shake Reduction mechanism work even when using a lens made by another company?
We do not guarantee camera operation (including exposure and focus accuracy) when a lens made by another company is attached. If it is a K mount, it can be attached, but when using it at your own risk.
We cannot compensate for any accidents or malfunctions caused by using lenses made by other companies. Finally, although the SR mechanism itself is performed, the SR effect can not be guaranteed.-
Is it better to always turn on the Shake Reduction (SR)?
It is always recommended to turn it on for handheld shooting.
・Turn it off when using with the camera fixed on a tripod.
・When the shooting modes ‘B (bulb)’ and ‘M.UP (mirror lockup)’ are selected, SR is automatically turned off.
・When using the self-timer or Remote Controller, [Do not turn off automatically] can be selected from the7 Shooting Assist menu [Auto Shake Reduction Off].
-
Is it possible to check the effect of the Shake Reduction (SR) before shooting?
You cannot check the SR effect in the viewfinder image, but if you use Live View, you can check the effect before shooting on the image monitor.-
I heard that there is no low-pass filter. Are there any measures against dust on the image sensor?
There is no low-pass filter, but there is an IR cut filter, etc. As a measure against dust, it is equipped with ‘DRll (Dust Removal ll), an image sensor cleaning function that removes dust by ultrasonic vibration using a piezoelectric element.
Image Processing Related
-
What is the Image Recording method?
You can select the highly versatile JPEG format that allows you to freely adjust the image quality after shooting. Simultaneous recording of RAW(PEF/DNG) and JPEG is also possible at the time of shooting-
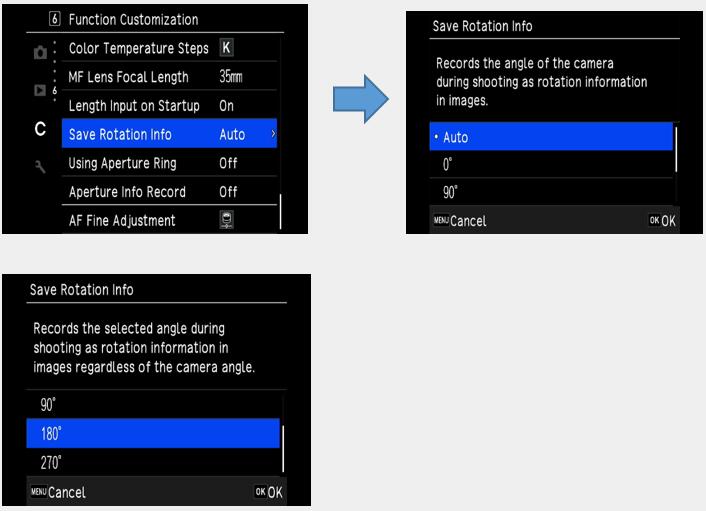
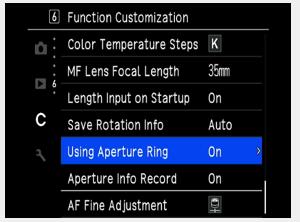
Is it possible to add rotation information for vertical and horizontal shooting to the image?
Yes, you can.
At the C 6 Function Customization menu, [Save Rotation Info] can be set.
-
Please tell me the type of Custom Image.
There are 13 types of setting as follows.
Auto Select / Bright / Natural / Portrait / Landscape / Vibrant / Radiant / Muted / Flat / Bleach Bypass / Reversal Film / Monotone and Cross Processing.-
What are the features of Custom Image [Flat].
[Flat] suppressed contrast, but the keys and sharpness remain the same as original, creating a calm picture for the purpose of retouching after shooting.-
If I shoot with the Custom Image [Auto Select], can I check which mode was shot later.
Since the information at the time of shooting is recorded in EXIF information, you can check it by switching the playback screen to [Detailed information display].
You can also check the shooting information [Image Finish] of the attached software Digital Camera Utility 5.-
Please tell me about the Digital Filter.
You can enjoy your own expression by adding special effects to the captured image. There are two Methods, one is to perform Digital Filter processing at the time of shooting, and the other is to select a Digital Filter for the image during playback.
*If the digital filter is selected at the shooting, it will take time to save the image.Shooting Playback Still Digital Filter Contents / Effects Still Movie - - ○ Base Parameter adj. Adjusts the parameters to create the desired image. ○ ○ ○ Extract Color Extracts one or two specific colors and makes the rest of the image black and white. ○ ○ ○ Replace Color Makes the image with the selected color replace with another color. ○ - ○ Toy Camera Creates an image that looks as though it was shot with a toy camera. ○ ○ ○ Retro Creates an image with the look of an old photo. ○ ○ ○ High Contrast Enhances the contrast in the image. ○ - ○ Shading Creates an image with darkened areas around the periphery. ○ ○ ○ Invert Color Creates an image with the colors inverted. ○ ○ ○ Unicolor Bold Extracts a select color and makes the rest of the image black and white. ○ - ○ Tone Expansion Creates an image of unique contrast. ○ ○ ○ Bold Monochrome Creates a monochrome image with enhanced contrast. ○ - ○ Grainy Monochrome - - ○ Miniature Blurs part of the image to create a miniature scene. - - ○ Soft Creates an image with a soft focus throughout the image. - - ○ Fisheye Creates an image that looks as though it was shot with a fish-eye lens. - - ○ Slim Changes the horizontal and vertical ratio of images. - - ○ Monotone Make it a black and white image. - - ○ Frame composite
*It is not possible to change an image that uses digital filter at the shooting to an original image.
*The digital filter can be used only for JPEG/RAW images shot with K-3 marklll during playback.
*The processed image will be saved as a JPEG file.-
What is the [Clarity] adjustment function?
This is an effective image processing technology when you want to express the luster of metal and the transparency of the sky and splashes. By adjusting the smoothness of the subject surface, you can change the texture and clarity from -4 to +4.
Set in the6 menu, [Clarity].
-
What kind of function is [Skin Tone] correction?
While keeping the hair, costumes and background at high resolution, only the area of the person’s skin is extracted and reproduced with a soft texture and healthy color.
*Regardless of AF setting or exposure setting, the [Skin Tone] correction processing is enabled when a face detected in the captured image.
*It can also be selected RAW development in the camera body.
You can select TYPE1/TYPE2/Off in the6 menu, [Skin Tone] correction.
・TYPE 1: Adjusts skin hue and brightness based on the detected face
・TYPE 2: Adjusts skin hue, brightness and tone based on the detected face-
What kind of shooting is [HDR Capture]?
In a scene with a large difference in brightness, three images with different exposures (standard/under/over exposure) are taken and automatically composite them, so that you can take an image having wide dynamic range.
Suitable for still life photography such as landscapes.-
What is the difference in the effect of selecting the HDR Capture mode?
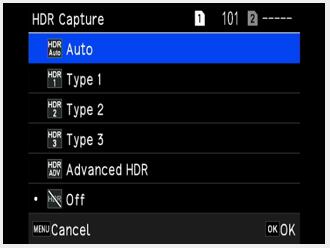
You can select from Auto / Type1 / Type2 / Type3 / Advanced HDR / Off in the4 shooting setting menu, [HDR Capture]. The higher the number, the wider the dynamic range, and you can take more exaggerated pictures that exceed the dynamic range that can be persuaded by
the human eye. If you selected ‘Auto’, the adjustment range is automatically set according to the difference in brightness of the entire shooting screen.
The [Advanced HDR] is a mode that adds clarity enhancement technology to the HDR effect to create a more dramatic expression.
 Memo:
Memo:
・It cannot be used in combination with Clarity, Skin Tone, Digital Filter, Real Resolution, Astro-Tracer and AA Filter Simulator.
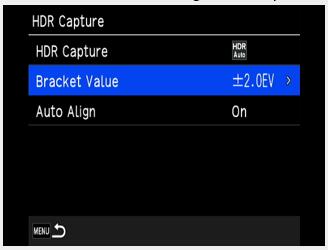
・You can select the width of the range of exposure from ±1EV / ±2EV / ±3EV in [Bracket Value]
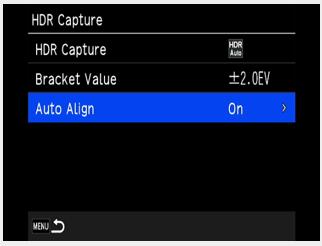
・[Auto Align] automatically adjusts slight deviations in the image during handheld shooting.
・When [Auto Align] is set to [Off], [Shake Reduction] is fixed to [Off] at the4 shooting menu.
・When the drive mode is set to Interval Shooting or Interval Movie, [Auto Align] is fixed to [Off].
・The flash does not fire during HDR Capture.
・Since HDR Capture combines images, it takes longer to record the image on the card than Normal shooting. During image processing, [Data being processes] is displayed on the display panel, and you cannot take the next shot until the processing is completed.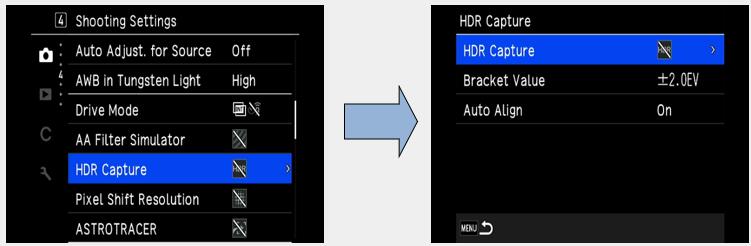
1.Select a type from Auto / Type1 / Type2 / Type3 / Advanced HDR and press [OK].
2.Select the width to change the exposure from ±1EV, ±2EV and ±3EV in [Bracket Value].
3.Select On or Off of [Auto Align].
4.Press MENU twice to return to the shooting standby state.
Memo:
・You can also change the HDR type with Smart Function.
Caution:
・HDR Capture is not possible in B, X and Movie mode.
・It cannot be combined with some functions.
・When the drive mode is set to Interval Shooting or Interval Movie, [Auto Align] is fixed to [Off].
・When [Auto Align] is set to [Off], [Shake Reduction] is fixed to [Off] at the7 shooting assistance menu.
Playback / Editing Related
-
Is it possible to play images by connecting to an AV device?
You can prepare a commercially available HDMI cable (mini plug type D) and connect it to a TV equipped with an HDMI terminal to display a Live View image at the time of shooting or to display an images in playback mode.
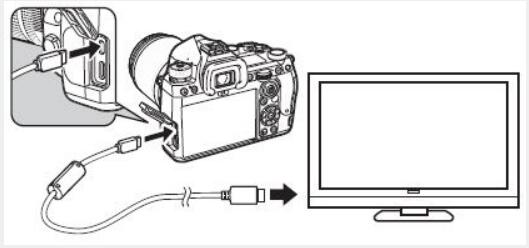
Caution:
・The image monitor of the camera is not displayed while connected to an AV device. Also, the volume cannot be adjusted with the camera, please adjust with the AV device.
Memo:
・Check the instruction manual of the AV device you are using, and select the video input terminal to connect the camera.
・For long-term use, we recommend using the separately sold AC adapter kit K-AC167x-
Can I resize or crop the image with the camera?
JPEG files captured with K-3 Marklll, can be resized or cropped.
・RAW files captured with K-3 Marklll cannot be resized, but can be cropped.
・2M JPEG images that have already resized with K-3 Marklll and JPEG images captured in XS size cannot be resized or cropped.-
What kind of items are there in the playback related function?
Playback functions are specified in the Playback Mode palette in addition to the Playback 1 menu.
The playback mode palette is displayed by pressing ▼ when displaying one image in playback Mode.
*1 Cannot be executed when displaying TIFF images and movies.Item Function Delete 
Delete the image Protect 
You can protect images from being accidentally deleted Rotating*1 
The rotation information of an image can be changed. Copying 
You can copy images between cards in the SD1 slot and the SD2. Digital Filters*1 
You can process the image with Digital Filters. Cropping*1 
You can crop out only the desired area of the selected image. RAW Development 
You can convert RAW images into JPEG or TIFF format and then save them as new files. Resize 
You can change the number of recorded pixels of the selected image and save it as a new file. Levels Adjustment 
You can adjust the brightness and contrast of the highlight, mid-tone and shadow areas in images. White Balance 
You can adjust the white balance. Color Moire*1*2 
You can reduce color moire in images. Extract Movie 
Saves the range specified with the start and end points as a new file. Divide Movie 
Divides a movie into two files at the specified division point and saves as new files. Save Manual WB 
You can copy the white balance setting of a captured image and save them in [Save as Manual WB]. Save Cross Processing 
You can save the Cross Processing setting used in the image.
*2 Cannot be executed when displaying RAW images and TIFF images.
Memo:
・The Playback Mode palette function is performed on the image in the memory card slot being Played.
When displaying one image, switch the playback slot from SD1 to SD2 before displaying the playback mode palette.-
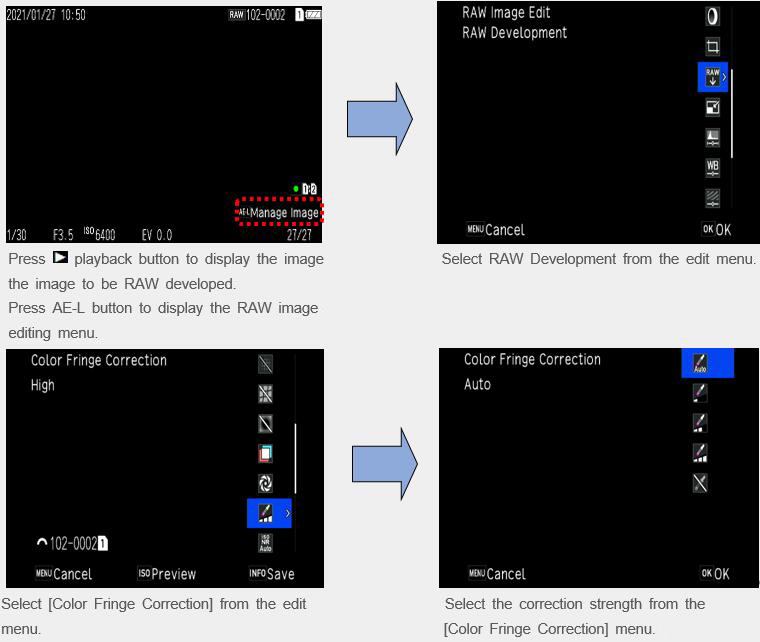
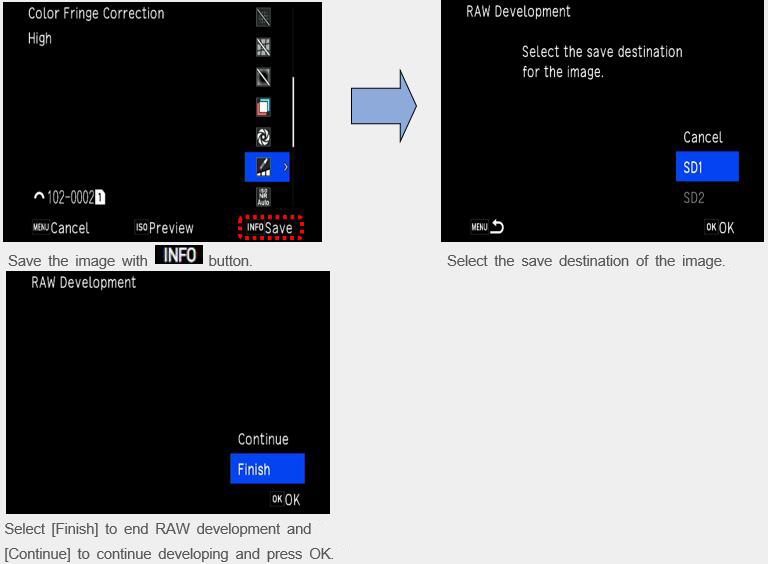
Is Color Fringe Correction possible?
It can be set from the RAW development of the playback mode palette menu.
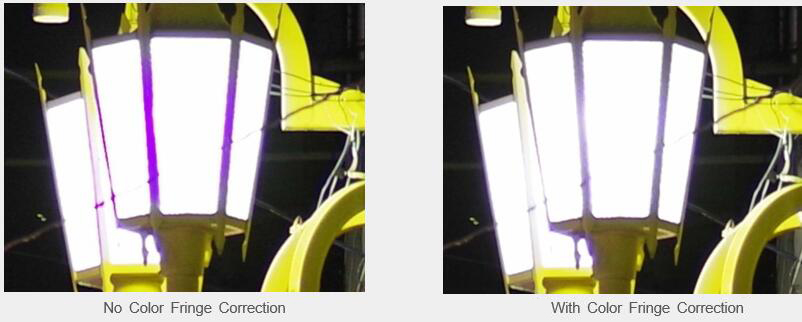
・The Color Fringe Correction can be set in the setting menu only during RAW development.
It cannot be set with Lens Correction at the time of shooting.
・There are four correction intensities for [Color Fringe Correction] (AUTO, Strong, Medium and Weak), and AUTO is set to be appropriate, but the correction method varies depend on the subject situation. Please try other correction strengths if you like.
Memo:
・This can be set only when a lens that supports [Lens Correction] is attached.
Also, if an accessory such as the Rear Converter etc. is attached between the camera and The Lens, the setting will be invalid.
・When the [Recording Format] of5 Recording Setting menu is RAW / RAW+, the correction information is recorded in the parameters of the RAW file and can be turned on or off during RAW development.
・If you set [Lens Correction] other than the default setting, it will take time to save the image.
The initial settings are [Lat-Chromatic-Ab Adj] ON, [Diffraction Correction] ON, [Distortion Correction] OFF and [Peripheral Illumin. Corr.] OFF.-
What kind of function is [Highlight Alert]?
The bright part of the captured image that has lost the gradation and turned white is displayed by blinking red on the image monitor during quick view or playback.
・It can be set [Highlight Alert] at C 4 [Customize Display] menu, [Quick View].-
Does the K-3lII support PictBridge?
No, it does not.
GPS Function
-
Is there a built-in GPS unit?
This camera does not have a built-in GPS unit.
・When the optional GPS unit O-GPS1 is attached to the camera, GPS information is saves in the shooting information of an image and furthermore, the [ASTROTRACER] function can be used.
・You can check the GPS positioning status on the status screen and Live View screen.
・When an image is taken while the GPS is on, the GPS information is saved internally in the image file. The GPS information is not saved in the movie file.
・You can check the GPS information in [Detailed Information Display] in the playback mode.
Caution:
・[Electronic Compass], [Simple Navigation] and [GPS Time Sync] cannot be used with this camera.
・If you do not want to disclose your location information when posting to SNS, please turn off GPS and shoot.
Memo:
・Refer to the manual of the GPS unit for details on how to attach the unit and information on the unit’s functions.
・Perform calibration in the 4 Communication Setting menu [GPS Setting] before shooting to obtain the GPS information of the GPS unit correctly.
・When GPS information is available, the Coordinated Universal Time(UTC) is recorded in the Image as the shooting date and time.-
How long can the ASTROTRACER track when the GPS unit O-GPS1 is installed?
The tracking time (approximate) of the ASTROTRACER is as follows.
Data for original K-3
Click here for detailed specifications of O-GPS1Declination Focal Length 200mm 100mm 50mm 90 degrees 300sec. 300sec. 300sec. 45 degrees 100sec. 200sec. 300sec. 0 degrees 80sec. 160sec. 300sec.
Flash Related
-
Does it have a built-in flash?
There is no built-in flash.-
Can I use an external flash?
If you use the optional external flash AF540FGZ / AF540FGZII / AF360FGZ / AF360FGZII / AF200FG / AF201FG and AF160FC, you can shoot with various flash shootings such as P-TTL Auto flash shooting.
✓: Available #: Restricted X: Not available
*1 Only the AUTO mode is available for the capture mode.Camera Function Compatible Flash AF540FGZ
AF540FGZII
AF360FGZ
AF360FGZIIAF200FG
AF201FG
AF160FCRed-eye reduction flash ✓ ✓ Auto Flash Discharge*1 #*2 #*2 Automatic switch to the flash sync speed ✓ ✓ Automatic setting of the aperture value in P or Tv mode #*2 #*2 P-TTL auto flash*2 #*2 #*2 Slow-speed Sync flash ✓ ✓ Flash Exposure Compensation ✓ ✓ AF assist light of the external flash ✓*3 X Trailing Curtain Sync flash*4 ✓ ✓*5 Contrast Control Sync flash #*6 #*7 Slave flash #*6 X High-speed Sync flash ✓ X Wireless flash #*6 X
*2 Available only when using a D FA / DA / DA L / FA / FA J / F or A lens.
(When using a lens with an aperture ring, set to the A position.)
*3 AF assist light is not available with the AF540FGZ or AF360FGZ.
*4 Shutter speed of 1/100 seconds or slower.
*5 Not available with the AF200FG or AF160FC.
*6 Multiple AF540FGZ, AF540FGZll, AF360FGZ or AF360FGZll units are required.
*7 Available only when combined with the AF540FGZ, AF540FGZll, AF360FGZ or AF360FGZll.
Caution:
・Flashes with the reversed polarity (the center contact on the hot shoe is minus) cannot be used due to the risk of damaging the camera and flash.
・Do not combine with accessories that have a different number of contacts, such as Hot Shoe Grip, as a malfunction may occur.
・Combining with flashes from other manufacturers may cause equipment breakdown.
Memo:
・With the AF540FGZ, AF540FGZll, AF360FGZ or AF360FGZll, you can use the high-speed sync flash to discharge a flash and take an image at a shutter speed faster than 1/200 seconds.
Set the exposure mode to Tv, TAv or M.
・By using two or more external flashes (AF540FGZ, AF540FGZll, AF360FGZ or AF360FGZll), you can use the wireless mode to shoot in the P-TTL flash mode without connecting the flash unit with a cord. In this case, set the camera channel on the external flashes
・You can set the flash sync speed in [X Mode Sync Speed] of the C 5 menu.
・You can connect an external flash to the camera with a sync cord by using the X-sync socket. Remove the sync socket 2P cap to connect a sync cord to the X-sync socket.
-
Can the sync socket be used for professional flashes?
Yes, it can. However, some professional flashes use extremely high voltages. The use of such flashes may cause the camera to breakdown. Before using the flash, check its specifications in advance.-
Can wireless flash photography be used?
You can use the [wireless mode] that perform a P-TTL shooting without connecting the flash each other by the code in combination of an external flash (AF540FGZ II, AF360FGZ II, AF540FGZ, or AF360FGZ).
Setting of channels is done in the external flash side.
Movie Capture Related
-
What are the specifications of the Movie Capture function?
The main specification of the Movie are as follows.
Recording Format MPEG-4 AVC/H.264 (MOV) Recorded Pixels / Frame rate 4K(3840×2160、30p/24p)
FHD(1920×1080、60p/30p/24p)Sound Built-in stereo microphone, external microphone (stereo recording compatible) Recording Sound Level adjustable, Wind Noise Reduction Recording Time Up to 4GB or 25 minutes. Automatically stops recording if the internal temperature of the camera becomes high. White Balance Auto White Balance, Daylight, Shade, Cloudy, Fluorescent (D: Daylight Color, N: Daylight White, W: Cool White, L: Warm White), Tungsten,CTE, Manual White Balance (up to 3 settings), Color Temperature (up to 3 settings), Copying the white balance settings of a captured image. Custom Image Auto Select, Bright, Natural, Portrait, Landscape, Vibrant, Radiant, Muted, Flat, Bleach Bypass, Reversal Film, Monotone, Cross Processing Cross Processing Random, Preset 1 to 3, Favorite 1 to 3 Digital Filter Extract Color, Replace Color, Retro, High Contrast, Invert Color, Unicolor Bold, Bold Monochrome
Caution:
・When recording a movie with sound, camera operation sounds are also recorded.
・When recording a movie with an Image Processing function such as [digital Filter] of the 6 menu applied; the movie file may be saved with some frames omitted.
・If the internal temperature of the camera becomes high during recording, recording may stop.
・When a retractable lens is attached, recording stops if the lens is retracted during recording and an error message is displayed.
Memo:
・When the mode dial is set to other than P, Tv, Av, TAv or M, the camera operates in P mode.
・You can set the autofocus operation during movie shooting in [Movie Mode AF] of [AF with Live View] in the 1 menu.
・To disable the autofocus operation with pressed halfway in mode, set [Movie] to [Off] In [AF/AE Lock Setting] of the C 2 menu.
・You can record a movie continuously up to 4 GB or 25 minutes.
When the memory card is full, recording stops
[Movie Recording Using the Touch Panel]
When recording a movie, you can start and stop recording and change the following setting using the touch panel.
・ISO sensitivity, shutter speed, aperture value and exposure compensation value.
・AF point
・Screen display on/off
To perform autofocus while recording a movie, make setting in [Movie Touch AF] of the C 3 menu.
AF Point Sets the AF point to the touched point. (Default setting) AF Point + Continuous AF Sets the AF point to the touched point and continues autofocus when a compatible lens is attached to the camera. AF Point + Single AF at Start Sets the AF point to the touched point and performs autofocus once. Off Does not use the touch panel for recording movie. -
Does autofocus work even during movie recording?
The autofocus is activated with the rear AF button even during movie shooting.
*However, the AF operation sound will be recorded.
・You can select either AFC[Continuous] or AFS[Stop after AF operation] of the autofocus operation during movie shooting in [Movie Mode AF] of [AF with Live View] in the 1 menu.
AFC can be set when using a lens that has an in-lens pulse motor.-
Can the external microphone to be used with the K-3 Mark III?
Yes, it can.
When a commercially available stereo microphone is connected to the microphone terminal, audio can be recorded with stereo.
You can reduce the possibility of recording camera operation sounds by connecting commercially available stereo microphone to the terminal on the camera.
The following specifications are recommended for external microphone. (The monaural microphone is not supported)
When a commercially available headphone is connected to the headphone terminal, you can shoot/play back while listening to the headphone.Plug Stereo mini plug (Φ3.5mm) Format Stereo electrets condenser Power Plug-in Power Method (operating voltage of 2.0V or lower.) Impedance 2.2kΩ
Note:
-Do not connect a microphone or device other than the recommended standard to the microphone terminal or headphone terminal.
-Do not use an external microphone with a cable length of 3 m or longer. The camera may malfunction.
-If you connect an external microphone and enable the wireless LAN function to shoot movies, noise may appear in the sound.
Memory Cards
-
What SD memory card can be used?
The following memory cards can be used on this camera.
・SD memory card
・SDHC memory card
・SDXC memory card
These are referred to as "Memory Cards" in this manual.
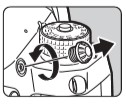
1.Confirm that the camera is turned off.
2.Slide the memory card cover in the direction of 1, and then rotate it to open as shown by 2.
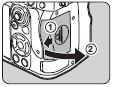
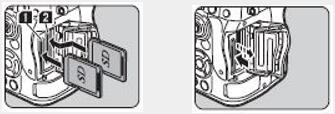
3.Insert a card all the way into each memory card slot with the memory card label facing toward the side with the monitor.
Push the memory card in once and release to remove.
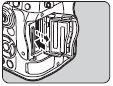
4.Rotate the memory card cover as shown by 3 and slide it in the direction of 4.
*Compatibility with the K-3 Mark III has been tested with below SD memory cards.
・UHS-II (32GB ~ 256GB)
SanDisk, Panasonic, TOSHIBA (KIOXIA) and SONY
・Others (1GB ~ 1TB)
SanDisk, Panasonic, and TOSHIBA (KIOXIA)
As of June 2021
*The information above is given for the convenience of customers and does not guarantee complete compatibility with the K-3 Mark III.
Caution:
-Do not remove the memory card while the card access lamp is lit.
-If the memory card cover is opened while the power is on, the camera turns off.
Do not open the cover while the camera is in use.
-Use this camera to format (initialize) a memory card that is unused or has been previously used on other devices.
-Use a high-speed memory card when recording movies. If the writing speed cannot keep up the recording speed, writing may stop during recording.-
Does the K-3 Mark III support UHS speed class?
Yes. The K-3 Mark III supports SDHC and SDXC Memory Cards with UHS-I (SDR104) standard and UHS-II (FD156).
Only SD1 slot support UHS-II memory card, If an UHS-II memory card is inserted in the SD2 slot, it operates at a speed equivalent to UHS-I-
Can the Wi-Fi function SD memory card be used with this camera?
No.-
Can a miniSD Card or microSD card be used through a memory card adapter?
Proper operation of a memory card used through an adapter cannot be guaranteed. Use a regular SD Memory Card (SD/SDHC/SDXC).-
Does the performance of the SD Memory Card used affect the shooting interval or other functions of the camera?
When using SD Memory Cards with slow transfer rates, the start-up time, the number of images for continuous shooting, and the continuous movie recording time may be affected.-
How many shots can be taken by each capacity of the SD memory card?
The approximate of number of storable images is as follows.
*The number of storable images may vary depending on the subject, shooting conditions, selected capture mode and memory card, etc.
[Approximate number of recordable still pictures] *When using an 8GB memory cardRecorded pixels JPEG RAW(PEF) ★★★ ★★ ★ L (26M) 495 1120 2190 141 M (15M) 837 1872 3607 - S (9M) 1401 3105 5820 - XS (2M) 4717 9812 16353 -
[Approximate movie recordable time] When using an 8GB memory card
hh:mm:ssRecorded pixels 4K (3840x2160) Full HD (1920x1080) 30p 50i 60p 30p 24p 8GB 00:08’39” 00:10’46” 00:12’17” 00:24’09” 00:29’56”
*Recordable movie is up to 4GB or 25 minutes at one time.-
Are there any precautions that need followed when using SD Memory Cards?
Please note the below points.
- Cards that have not yet been used or that have been used on other devices, such as on another camera or a computer, must first be formatted on the K-3 Mark III before use.
- Do not remove an SD Memory Card or turn the camera off while recording data or playing back images or audio, or while the camera is connected to a computer via a USB cable.
- Do not bend an SD Memory Card or subject it to violent impacts. Do not leave cards in locations where they will be exposed to water, moisture, or high temperatures.
- Avoid using or storing cards in places where they may be exposed to static electricity or electrical interference.
- Data saved to SD Memory Cards that have been left unused for long periods of time or that have been damaged may become unreadable and lost. Important data should be backed up regularly.
Battery and power sources
-
What type of batteries can be used with the K-3 Mark III?
Use the dedicated Rechargeable Lithium-ion Battery D-LI90(P) to power the camera.
In addition to the Rechargeable Lithium-ion Battery D-LI90(P) can be used with the Battery Grip D-BG8 (optional).-
How do you charge the battery.
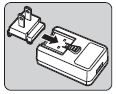
Follow the procedure below to charge the battery. 1.Insert the power plug to the USB power adapter until it clicks.
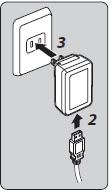
2.Connect the USB cable to the USB power adapter.
3.Plug the USB power adapter into the power outlet.
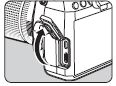
4. Make sure that the main switch of the camera is set to [OFF], and open the terminal cover.
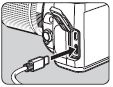
5. Connect the USB cable to the USB terminal.
The self-timer lamp on the back of the camera turns off when the battery is fully charged.

Caution:
-If the camera is turned on while charging, the charging stops.
-If the self-timer lamp continues to blink rapidly, make sure that the main switch is set to [OFF], remove the USB cable and battery from the camera, and start over from the beginning. If this does not improve the situation, contact your nearest service center.
-If the battery begins to run down more quickly even after being charged, the battery may have reached the end of its service life. Replace the battery with a new one.
Memo:
-The Maximum charging time is approximately 4.5 hours (It depends on temperature and remaining battery power). Charge the battery in a location where the temperature is between 10°C and 40°C (50°F and 104°F).
-You can also charge the battery by connecting the camera to a computer using the USB cable and turning the camara off.
-You can also charge the battery using the optional Battery Charger D-BC177.
-When the optional Battery Grip D-BG8 is used, you can charge the battery in the battery grip. The battery set in [Battery Grip Setting] of the 5 menu of the camera is charged first. The self-timer lamp blinks twice continuously while charging the battery in the camera, and three times continuously while charging the battery in the battery grip.
-You can also charge the battery by connecting a commercial portable charger to the camera with a USB cable.
-You can supply power to another device using the battery of the camera via a USB cable. Select [Execute] in [USB Power Supply to Ext.] of the 5 menu, and turn the camera off. This function cannot be used if the battery level is insufficient.
Power saving mode
The battery consumption can be reduced by controlling the display time of status screen.
Make settings in [Power Saving Mode] of the 5 menu.
Low Turns the monitor off when the time set in [Meter Operating Time] of the C5 menu elapses. High Performs metering for 2 seconds after Instant Review during shooting, and turn the monitor off. (Default setting) OFF Keeps the monitor on even after the metering time elapses. -
How many photos can I take when batteries are used? How long can I playback images?
The approximate number of still pictures that can be shot and available playback time with the K-3 Mark III using the dedicated Rechargeable Lithium-ion Battery D-LI90P are given in the table below.
*Tested in compliance with CIPA standard using a new rechargeable lithium-ion battery under a temperature of 23°C (73.4°F). Actual results may vary depending on the shooting conditions/circumstances.Use battery Use temperature Number of recordable images Playback time D-LI90P 23℃ Approx.: 670 images Approx.: 340 minutes
Memo:
- The battery level may not be displayed properly if the camera is used at low temperatures or when performing Continuous Shooting for a long time.
-Battery performance temporarily decreases as the temperature decrease. When using the camera in cold climate, have extra batteries at hand and keep them warm in your pocket. Battery performance will return to normal at room temperature.
-Have an extra battery ready when traveling overseas, taking picture in cold conditions or when taking a lot of pictures.
-When the optional Battery Grip D-BG8 is used, the following settings can be made in [Battery Grip Setting] of the 5 menu.
Priority order- Auto/Body/Grip-
Is there an optional AC adapter available?
Yes, the AC Adapter Kit K-AC166J is available, sold separately.
We recommend the use of the optional AC adapter kit K-AC166J when using the monitor for a long time or when connecting the camera to a computer or AV device.
1.Make sure that the camera is turned off, and open the terminal cover.
2.Connect the USB Type-C cable of the AC adapter to the USB terminal of the camera.
3.Connect the AC adapter to the AC cord and plug it into an outlet.
Caution:
-Make sure that the camera is turned off before connecting or disconnecting the AC adapter.
-Make sure that the connections are secure between the terminals. The memory card Or data may be corrupted if the connection to the power supply is lost while the card is being accessed.
- When connecting the AC adapter and turn off the power of camera, it can be charged the battery in the camera or the battery grip D-BG8 is attached. (The battery cannot be charged if the camera is turned on.)-
Can I use the AC adapter overseas?
The AC Adapter Kit K-AC166J (sold separately) works in the range from 100V AC to 240V AC (50/60 Hz), which should allow the adapter to be used in almost any overseas country, although a plug converter may need to be used depending on the type of electrical outlet in use in a specific country.
*Do not attempt to use a commercially available transformer or similar device with the adapter as doing so may cause the adapter to become damaged.
*Plug adapter can be found at travel goods store and similar shop.-
Does the K-3 Mark III support USB Power Delivery?
It is designed in accordance with the USB Power Delivery standard, but does not support USB PD certification.-
Can I charge with a mobile battery?
Depending on the type of mobile battery, the charging time may be longer, but it is possible to charge the battery.-
Can I use a camera while supplying power by mobile battery?
It is confirmed that some mobile batteries operate, but operation is not guaranteed.
Lens that can be used
-
Please tell me about the function when various lenses used.
All exposure modes are available when a D FA, DA, DA L, FA or FA J lens is used, or when a lens with an A position used with the aperture ring set to the A position.
When other lenses than above are used, or a lens with an A position is used in a position other than A, the following restrictions apply.
√: Available #: Restricted X: Not available
*1. Lenses with a maximum aperture of F2.8 or faster. Only available aperture ring at the A position.Function Lens
[Mount type]D FA
DA
DA LFA*6
FA JF*6 A M
P[KAF]
[KAF2]
[KAF3]
[KAF4][KAF]
[KAF2][KAF] [KA] [K] Autofocus (Lens only)
Autofocus (with AF Adapter 1.7x)*1√
-√
-√
--
#-
#Manual Focus
(with Focus Indicator) *2
(With matte field)√ √ √ √ √ Quick-Shift Focus System #*4 X X X X Focus point selection mode [Auto] √ √ √ X*9 X*9 AE Metering [Multi-segment] √ √ √ √ X P / Sv / Tv / Av / TAv mode √ √ √ √ #*10 M mode √ √ √ √ # P-TTL auto flash*3 √ √ √ √ X Power Zoom - √*7 - - - Automatic obtainment of lens focal length information √ √ √ X X Lens Correction #*5 X*8 X X X
*2. Lenses with a maximum aperture of F5.6 or faster.
*3. Available when using AF540FGZ, AF540FGZll, AF360FGZ, AF360FGZll, AF200FG or AF160FC.
*4. Only available with compatible lenses.
*5. Distortion Correction and Peripheral Illumination Correction disabled when a DA FISH-EYE 10-17mm lens is used.
*6 To use an FA SOFT 28mm lens, FA SOFT 85mm F2.8 lens, or F SOFT 85mm F2.8 lens, set [Using Aperture Ring] to [Enable] in the [Custom Setting] menu. Pictures can be taken with the aperture set, but only within a manual aperture range.
*7 The auto zoom and preset zoom are disabled.
*8. The Lens Correction is available with the following FA lenses. (only [Distortion Correction] and [Lat-Chromatic-Ab adj] can be used when the aperture ring is set to a position other than A.)
FA* 24mm F2 AL[IF], FA 28mm F2.8AL, FA 31mm F1.8 Limited, FA 35mm F2 AL, FA 43mm F1.9 Limited, FA 50mm F1.4, FA 77mm F1.8 Limited, FA* 85mm F1.4 [IF], FA* 200mm F2.8 ED[IF], FA* MACRO 200mm F4 ED, FA* 300mm F2.8 ED[IF], FA* 300mm F4.5 ED[IF], FA* 400mm F5.6 ED[IF], FA* 600mm F4 ED[IF], FA* 28-70mm F2.8 ED[IF], FA* 80-200mm F2.8 ED[IF] and FA*250-600mm F5.6 ED[IF]
*9 Fixed to [Spot].
*10. Av with the aperture set to wide open. (The aperture ring has no effect on the actual aperture value.)
Caution:
-When the aperture ring is set to a position other than A, or a lens without an A position or accessories such as an auto extension tube or auto bellows are used, the camera does not operate unless [Using Aperture Ring] is set to [Enable] in the C6 menu.
-When a retractable lens is attached and is not extended, you cannot take pictures or use some functions. If the lens is retracted during shooting, the camera stops working.
Lens Names and Mount Names
-DA lenses with a motor and FA zoom lenses with a power zoom are categorized for the KFA2 mount. (Of these lenses, the lenses without an AF coupler are categorized for the KAF3 mount)Mount Lens Name Lens Type MF S S For 35mm full-frame size K K/M A A AF KAF D FA For 35mm full-frame size DA For APS-C size, Without the aperture ring FA For 35mm full-frame size, Power zoom not compatible FAJ For 35mm full-frame size, Without the aperture ring F For 35mm full-frame size KAF2 DA For APS-C size, SDM compatible, Without the aperture ring FA For 35mm full-frame size, Power zoom compatible KAF3
KAF4D FA For 35mm full-frame size Dedicated for SDM, Without the aperture ring DA For APS-C size, Dedicated for SDM, Without the aperture ring
-The KAF3 mount equipped with an electromagnetic diaphragm mechanism instead of an aperture control lever is referred to as the KAF4 mount.
-AF single focal length lenses, DA and DAL lenses without a motor, and DFA, FAJ, and F lenses use the KAF mount.-
Is it possible to take a picture with set the aperture ring to a position other than the A position?
Yes, the shutter can be released even if the aperture ring of the DFA, FA, F or A lens
Is not set to the A position or a lens without as A position is attached.
Set [Using Aperture Ring] to [On] in the C6 menu.
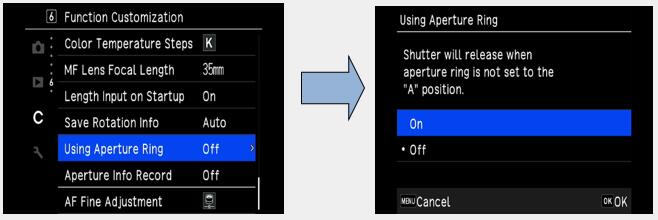
With the automatic exposure control, the camera operate as follows.

Memo: -[F---] apertures for the aperture indicator on the status screen, etc. When [Aperture Info Record] is set to [On] in the C6 menu, the aperture value set with , and
, and  is
displayed, and only “F” blinks.
-Set [Aperture Info Record] to [On] in the C6 menu to record the aperture value set for recording with , and in captured images.
is
displayed, and only “F” blinks.
-Set [Aperture Info Record] to [On] in the C6 menu to record the aperture value set for recording with , and in captured images.

Caution:
-When shooting using the automatic exposure control, note the following points.
-Images can be taken with the set aperture value but an exposure deviation may occur.
-When shooting with the optical viewfinder, you cannot check the shutter speed and ISO sensitivity before shooting because the metering is performed immediately before the shutter is released. When shooting with Live View, you can check the shutter speed and ISO sensitivity before shooting because the aperture is always narrowed down.
-When a lens with automatic diaphragm is attached, the aperture is narrowed down immediately before the shutter is released, causing a time lag in the shutter release.-
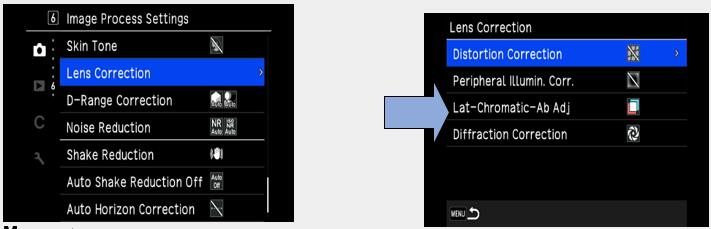
What kind of function is “Lens Correction” and what different types are available?
The following features can be set in [Lens Correction] of the Capture 6 menu.
The following four corrections can be set by [Lens Correction] in theDistortion correction Reduces distortions occurring due to lens properties. Peripheral Illumin. Corr. Reduces peripheral light fall- off occurring due to lens properties. Lat-Chromatic-Ab Adj Reduces lateral chromatic aberrations occurring due to lens properties. Diffraction Correction Corrects blur caused by diffraction when using a small aperture. 6 Image Process Setting.
Memo:
-Corrections can only be made when a compatible lens is attached. The features are disabled when using accessories such as a rear converter that is attached between the camera and the lens.
-When [File Format] is set to [RAW] or {RAW+}, correction information is saved as a RAW file parameter and you can select whether to apply the correction to the images when developing them.
For the RAW Development function, [Color Fringe Correction] can also be set.
- If set [Lens Correction] other than the default setting is selected, the image storage will take longer.
Default setting:
Lat-Chromatic-Ab Adj – ON
Diffraction Correction – ON
Distortion correction – OFF
Peripheral Illumin. Corr. – OFF-
Can the S (screw) mount lenses be used with the K-3 Mark III?
Yes, you can use them combination with the Mount Adapter K.
*Under the default setting, the camera does not operate and display [F- -] in the LCD panel. Perform the following settings before use.
1.Set the [Using Aperture Ring] to [ON] in the C6 Function Customization.

2.[ON] in the C6 Function Customization.
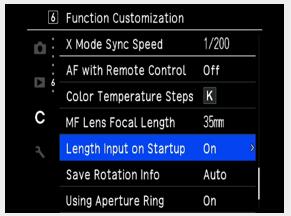
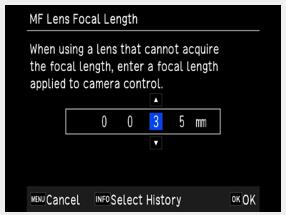
3.When pressing four-way key right, [MF Lens Focal Length] screen is displayed. Enter the focal length of the attached lens and select [OK].
-
Can the 645 format lenses be used with the K-3 Mark III?
Yes, you can use below lenses combination with the 645 Lens Adapter K.
*FA 645 lenses and HD D FA645 35mm F3.5 AL [IF].
*DA645 and D FA 645 lenses which do not have the aperture ring cannot be used with the K-3 Mark III.
* Under the default setting, the camera does not operate and display [F- -] in the LCD panel. Perform the following settings before use.
1.Set the [Using Aperture Ring] to [ON] in the C6 Function Customization.
2.Set the [Length Input on Startup] to [ON] in the C6 Function Customization.
3.When pressing four-way key right, [MF Lens Focal Length] screen is displayed. Enter the focal length of the attached lens and select [OK].
-
Can the 67 format lenses be used with the K-3 Mark III?
Yes, you can use them combination with the 67 Lens Adapter K.
Under the default setting, the camera does not operate and display [F- -] in the LCD panel. Perform the following settings before use.
1.Set the [Using Aperture Ring] to [ON] in the C6 Function Customization.
2.Set the [Length Input on Startup] to [ON] in the C6 Function Customization.
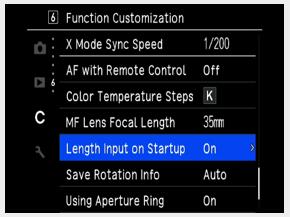
3.When pressing four-way key right, [MF Lens Focal Length] screen is displayed. Enter the focal length of the attached lens and select [OK]
Memo:
-When the aperture is set to a position other than the A position, the correct exposure can be obtained by the following method.
1.Set mode dial to M.
2.Set the lens aperture ring to the desired aperture value.
3.Press green button.
Shutter speed is set to the appropriate value.
4.Adjust ISO sensitivity if proper exposure cannot be achieved.-
Can I use other manufacturers’ replacement lenses with the K-3 Mark III?
Camera operation (including exposure and the accuracy of focus) cannot be guaranteed when lenses from other manufacturers are used. Lenses from other manufacturers can be used if they are K-mount lenses. However, responsibility for such use shall fall squarely on the user.
We shall accept no responsibility or liability for problems arising from the use of such lenses. We will assume no responsibility or liability for accidents, damages, and malfunctions resulting from the use of lenses made by other manufacturers. Furthermore, while the Shake Reduction mechanism will still function with such lenses, the effectiveness of the results cannot be guaranteed.
Computer Connection and Software
-
What is the external interface environment?
Please refer to the list below.
Connection Port USB terminal (USB TYPE-C), Cable release terminal (Φ2.5mm) X-sync socket, HDMI output terminal (type D), Microphone terminal, headphone terminal USB Connection USB 3.2 GEN1, Data transfer: MTP/ CD-ROM, Battery recharge, Power supply to the camera (when the dedicate AC adapter is used. -
What software is included with the camera?
Digital Camera Utility 5 (Ver. 5.9.x) is stored in the built-in memory of the camera.
Install to the computer according to the procedure in the operating manual page 98.-
What are the system requirements for using included software and USB connection?
The following system environment is required for connection to this equipment and use of the attached software.
・Windows®
OS Windows® (FCU / CU) (32bit / 64bit) / Windows® 8.1 (32bit / 64bit) / Windows® 8 (32bit / 64bit) CPU Intel® Core i5 or higher Memory 8GB or more HDD Around 100 MB or more at time of installation and startup, Around 15 MB/file for JPEG image files or around 50 MB/file for RAW image files for saving image files Display monitor 1280×1024 pixels, 24bit color or above
・Macintosh
OS macOS 11.x Big Sur / macOS v10.15 Catalina / macOS v10.14 Mojave / macOS v10.13 High Sierra / macOS v10.12 Sierra CPU Intel® Core i5 or higher Memory 8GB or more HDD Around 100 MB or more at time of installation and startup, around 15 MB/file for JPEG image files or around 50 MB/file for RAW image files for saving image files Display monitor 1280×1024 pixels, 24bit color or above
*When playback movies that is shooting with this camera on a computer, please use movie playback software compatible with MOV file/AVI file.-
Is there a user’s manual available for the included application software?
No, there is not.
Please refer to [Digital Camera Utility 5 Help].-
Can the camera be operated from PC?
Yes. By installing the optional tethering software [IMAGE Transmitter 2] (Update is needed) on your PC, and connecting it with the K-3 Mark III via USB terminal, you can operate the K-3 Mark III, automatically transfer and save recorded images, and check photographic data on your computer.
*For more details for [IMAGE Transmitter 2], please refer to the operation manual that uploaded at URL below.
https://www.ricoh-imaging.co.jp/english/support/man-pdf/image_transmitter2_operation_en.pdf-
Can the camera be operated from the communication device?
You can connect the camera to a communication device using Bluetooth® or a wireless LAN.
The following functions are available using the dedicated application "Image Sync".
Remote Capture Displays the Live View image of the camera on the communication device, and enables controlling exposure setting and shooting by operating the communication device. Image View Displays the images saved on the memory card inserted in the camera on the communication device and imports the images to the communication device.
“Image Sync” supports iOS and Android™, and can be download from the App Store or Google Play™. For the supported operating system and other details, refer to the download site.
Memo:
-For how to connect the camera to a communication device and details on the “Image Sync”, refer to the following website.
https://www.ricoh-imaging.co.jp/english/products/app/image-sync2/
-For details on how to operate the communication device, refer to the manual of the device.
The wireless LAN function is disabled when the power is turned on.
Enable the wireless LAN function using one of the following methods.
-Setting from the menu
-Setting from the control panel
-Using Fx button
-Press the Playback button to display the playback screen and hold down the Playback button.
When the wireless LAN function is enabled, the (white) icon indicating the wireless LAN communication status is displayed on the status screen and Live View screen.
When (Gray) icon is displayed, a connection with the communication device is not established correctly.
Memo:
-Even after the wireless LAN function is enabled, it returns to an inactive state when the camera is turned off and on again.
-Auto Power Off is not available while a wireless LAN connection is established or images are being transferred. If Auto Power Off is activated while a connection is not established, the wireless LAN function is disabled. The function is enabled when the camera recovers from Auto Power Off.
Caution:
-The wireless LAN function is disabled while the camera is connected to a computer with USB cable (expect when the power is supplied with the AC adapter).
-The camera does not support communication using a memory card with a built-in wireless LAN function (such as an Eye-Fi card or Flucard).
-Do not use wireless LAN in places where the use of wireless communication is restricted or prohibited, such as aircraft.
-When using a wireless LAN, observe the laws of the country where the wireless LAN is used.
-
What can I do in conjunction with communication device?
You can make the following settings in [Smartphone Link] of the 4 menu.
Store Location Info. Records the location information of the communication device in captured images. Auto Image Transfer Automatically sets the transfer reservation for captured images after shooting. Select the format of transferred files. Auto Resize Reduces the number of recorded pixels of a JPEG image to XS and transfers it. Image Transfer while Off Continues the image transfer even when the camera is turned off midway through the transfer.