
FAQs - USB Connections
- 1) Review basic points
- 2) Checking Device Manager settings (A)
- 3) Checking Device Manager settings (B)
- 4) Reference: Warning messages under Windows XP SP2
RICOH Gate La for Windows XP
This area provides step by step troubleshooting on USB connections when you are using Caplio Software (RICOH Gate La) in the Windows XP system.
2. Review Device Manager settings (A)
Review Device Manager settings with the following steps.
| 2-1) | Load the Caplio CD-ROM disc into your computer. |
| 2-2) | Connect your camera via the USB cable to your computer. The camera turns on. |
| 2-3) | Click the [Start] button on the Windows task bar to display the [Start] menu. |
| 2-4) | On the [Start] menu, click on [Control Panel.] |
| 2-5) | On the Control Panel displayed, click [Switch to Classic Display.] The display changes its appearance and the [System] icon appears. |
| 2-6) | Double click on the [System] icon. |
| 2-7) | On the [System Properties] screen displayed, double click on the [Device manager] tab. |
| 2-8) | On the [Hardware] tab page displayed, click on the [ Device Manger] button. |
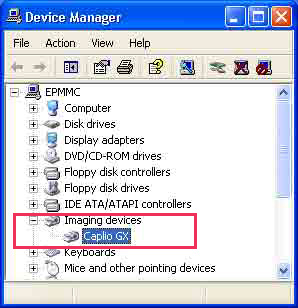
| 2-9) | On the [Device Manager] window displayed, click [+] on the left side on [Other Devices.] |
| 2-10) | Check if there is the[Caplio xxxxx] (your camera model) below it.
|
| 2-11) | The operating system will display the [Hardware Update Wizard] window. At this point, the Caplio CD-ROM is required. | ||
| 2-12) | Make sure that [Install the software automatically (Recommended)] is chose, and then click [Next.] | ||
| 2-13) | When the [Completing the Hardware Update Wizard] window appears, click [Finish.]
| ||
| 2-14) | Click the [x] (Close) button to close the [Device Manager] window. | ||
| 2-15) | Click [OK] to close the [System Properties] window. | ||
| 2-16) | Click the [x] (Close) button to close the Control Panel.
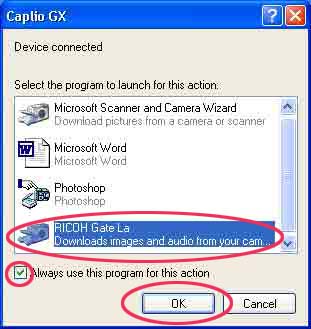
In the "step 2-13," if the [Device Connected] window appears, the process is completed and steps below (2-17 to 2-20) is not needed. |
| 2-17) | In the "step 2-13," if the [Device Connected] window does not appear, turn off your camera and shut down your computer. Remove your camera from the computer. And then follow the step 2-18 to 2-20 below. |
| 2-18) | Turn your computer back on and reinstall the software from the Caplio CD-ROM disc. At this time, do not commect your camera. |
| 2-19) | Connect your camera via the USB cable to your computer.
When the computer recognized the camera, the [New Hardware] window launches and your camera is registered by the computer. |
| 2-20) | If you still fails to transfer images to a computer, please click "STEP 3" to go to the next page. |
- 1) Review basic points |
- 2) Checking Device Manager settings (A) |
- 3) Checking Device Manager settings (B) |
- 4) Reference: Warning messages under Windows XP SP2
Quick Links