
GXR FAQs - By Product
[Question] Details on the Shooting menu.
In order to display the Shooting menu, press the [MENU/OK] button in a Shooting mode.The Shooting menu allows you to change various shooting settings.
Actual items displayed in the shooting menu will vary depending on the camera unit that it is attached to. Some items may not be displayed in the shooting menu.
- 1Press the [MENU/OK] button in a Shooting mode.
![Press the [MENU/OK] button in a Shooting mode.](/english/r_dc/support/faq/bp/docs10/img/EDXR01005_01.gif)
- The Shooting menu appears.
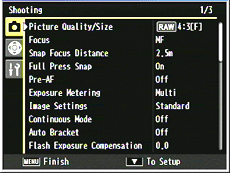
(The page 1/3) - With the SCENE mode, press the [Fn1] button (the left direction key) to select the [MODE] tab. Then press the [-] button (the down direction key) once to display the Shooting menu. See below for details on the SCENE mode operations.
About the SCENE modes. - GR LENS A12 50mm / RICOH LENS S10 24-72mm
About the SCENE modes. - RICOH LENS P10 28-300mm

[References]
- In the menu operations, the direction buttons works as follows.
- [Fn1] button : move left

- [Fn2] button : move right

- [+] button : move up

- [-] button : move down

- 2Press [+] or [-] button to select a menu item. If you press the [-] button in the last item, the next screen will be displayed.

(Shooting setting screen 2/3)
(Shooting setting screen 3/3) - 3Press [Fn2] button to display the available options.
The screenshot below shows the example when [Picture Quality/Size] has been selected.
![the example when [Picture Quality/Size] has been selected.](/english/r_dc/support/faq/bp/docs10/img/EDXR01005_06.gif)
- 4Press [+] or [-] button to select an option.
- 5Press the [MENU/OK] button. Or, press [Fn1] button and then press the [MENU/OK] button. The setting is fixed, it exits the shooting menu, and returns to the shooting screen.
Or some setting menu will return to the Setup menu. In the case, press the [MENU/OK] button once again, then it will return to the shooting screen.
* The method of selecting the settings may vary depending on the function.
[Items in the Shooting menu]| Option | Default |
|---|---|
| Picture Quality/Size | L 4.3 N |
| Focus | Multi-AF |
| Snap Focus Distance | 2.5m |
| Full Press Snap | On |
| Pre-AF | Off |
| Exposure Metering | Multi |
| Image Settings | Standard |
| Continuous Mode | Off |
| Auto Bracket | Off |
| Flash Exposure Compensation | 0.0 |
| Manual Flash Amount | 1/2 |
| Flash Synchro Settings | 1st Curtain |
| Noise Reduction | Off |
| Noise Reduction ISO | Over ISO 401 |
| Distortion Correction | Off |
| Auto Macro | Off |
| Custom Self-Timer | 2 pictures, 5 sec. |
| Interval Shooting | - |
| Date Imprint | Off |
| Exposure Compensation *1 | 0.0 |
| White Balance | Multi-P AUTO |
| White Balance Compensation | A:0, G:0 |
| ISO Setting | Auto |
| Restore Defaults *2 | - |
| Auto Aperture Shift *3 | Off |
| Shutter Speed Auto Shift *4 | Off |
| Switch Shooting Mode *5 | - |
| Camera Shake Correction *6 | On |
- *1 Not available in M mode.
- *2 Only available in Auto Shooting mode.
- *3 Only available in A mode.
- *4 This item will not be displayed in the GXR with GR LENS A12 50mm F2.5 MACRO, or with RICOH LENS S10 24-72mm F2.5-4.4 VC.
- *5 Only available in MY1, MY2 or MY3.
- *6 This item will not be displayed in the GXR with GR LENS A12 50mm F2.5 MACRO.
Answer ID:
EDXR01005
Date created: December 21, 2009
Date modified: May 7, 2010
Product: GXR (GR LENS A12 50mm F2.5 MACRO), GXR (RICOH LENS S10 24-72mm F2.5-4.4 VC), GXR (RICOH LENS P10 28-300mm F3.5-5.6 VC)
Operating system: --
Category: Hardware specifications
Date created: December 21, 2009
Date modified: May 7, 2010
Product: GXR (GR LENS A12 50mm F2.5 MACRO), GXR (RICOH LENS S10 24-72mm F2.5-4.4 VC), GXR (RICOH LENS P10 28-300mm F3.5-5.6 VC)
Operating system: --
Category: Hardware specifications
Useful LINKs:
Do you need other information? Please click any link you want from the following.
FAQs - By Product Top
FAQs - All models (General hints & tips)
Troubleshooting / Failure diagnosis
FAQs Top
Support Top
Do you need other information? Please click any link you want from the following.
FAQs - By Product Top
FAQs - All models (General hints & tips)
Troubleshooting / Failure diagnosis
FAQs Top
Support Top
Related Links
Quick Links