CX6 : How to install the VM-1 software (supplied software for Macintosh):
The supplied software is stored in the internal memory in the camera. For Macintosh, VM-1 software is contained. The VM-1 is the MP (Multi-Picture) file viewer, which allows you to play back MP files and export still images on a Macintosh computer.
[What is an MP file ?]
VM-1 system requirement
* VM-1 software is stored in the camera memory. In order to connect the camera to a computer, the supplied USB cable is required.
| Operating Systems Supported | Mac OS X 10.4-10.7 |
| Macintosh computer | Macintosh computer from Apple Inc. |
| Memory | Mac OS X 10.4 : 256 MB or more Mac OS X 10.5 : 512 MB or more Mac OS X 10.6 : 1GB or more Mac OS X 10.7 : 2GB or more |
| Hard Disk Space Required | 5 MB or more |
| Supported languages | Japanese, English, French, and Chinese (Simplified) |
Camera setting before installations
The camera USB setting must be set to [Mass Storage]. Go to [Setup] menu > [USB Connection Type] > [Mass Storage].
Installations on a Macintosh computer
* The screen captures are examples with the Mac OS X 10.5.5.
- 1 Turn the camera power off, and remove the memory card from the camera.
 If a memory card is in the camera, the software cannot be installed.
- 2 Connect the common terminal for USB port / AV output of the camera (gray) to the computer using the supplied USB cable.
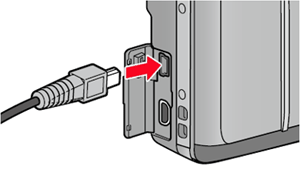
- • The camera will turn on automatically when the connection is established.
- • If iPhoto software will start up, quit the software.
- • The camera internal memory will be mounted as the [RICOHDCI] drive.

- 3 Double click [RICOHDCI] > [MAC] > [MAC_DATA.DMG]. The [MAC_DATA] volume will be mounted in the desktop.
![[RICOHDCI] > [MAC] > [MAC_DATA.DMG]](/english/r_dc/support/faq/bp/cx5/img/edc05530_02.gif)
- Mounted volume, [MAC_DATA] will automatically open, then double click on [VM-1 Installer.pkg] to run.
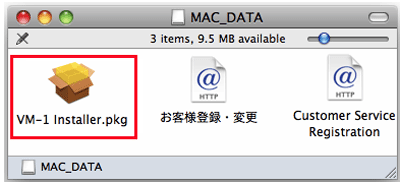
- 4 The [Install VM-1] screen will appears.
![The [Install VM-1] screen appears.](/english/r_dc/support/faq/bp/docs09/img/EDC09080_04.gif)
- 5 Click [Continue].
A screen allowing you to select the installation destination appears. - 6 Select the disk you want to install to, and click [Continue].
- 7 Click [Install].
- •To change the installation destination, click [Change Install Location...].
- •To upgrade VM-1, click [Upgrade].
- •A screen asking for your name and password appears.
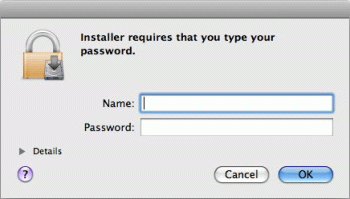
- 8 Enter your name and password, and click [OK].
The installation completion message is displayed.
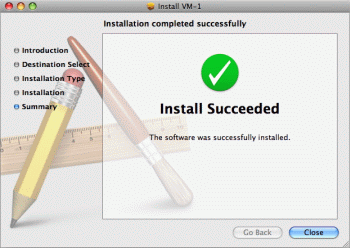
- 9 Click [Close].
![]() If you have some difficulties to connect the camera to a computer for the installations, the VM-1 is also available from the site below.
If you have some difficulties to connect the camera to a computer for the installations, the VM-1 is also available from the site below.
VM-1 software downloads (for Macintosh)
- • Do not force the USB cable into the terminal, or apply excessive force with the USB cable connected. Also when using the USB cable, do not move the camera with the USB cable.
- • Do not disconnect the USB cable with the camera power on.
- • Be sure to use the supplied USB cable. Do not connect other cable than the supplied USB cable.
Date created: November 16, 2011
Date modified: December 5, 2011
Product: CX6
Operating system: --
Category: Software / OS compatibility
Do you need other information? Please click any link you want from the following.
Quick Links

