
CX6 : About the Date and time setting operations.
At the first time when you turn on the camera, you will be asked to set the date and time setting in the camera.
Or you may want to change the date and time setting to the local date and time, if you go to another country with time differences.
The date and time option is located the [Date Settings] in the Setup menu.
Operating procedure
- 1 Choose [Date Settings] in the Setup menu, and then press
 .
.
![Choose [Date Settings].](/english/r_dc/support/faq/bp/cx6/img/6085_01.gif)
- 2 The [Date Settings] will appear on the screen.
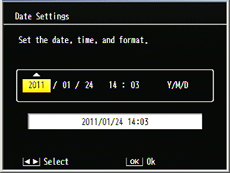
Using the [ADJ./OK] button allows to change the setting. The [ADJ./OK] button
  allows to change the item.
- The 3 options of the date format are available. Use the [ADJ./OK] button
for the format changes.
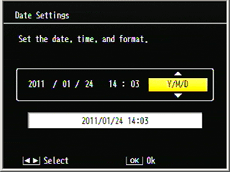
| Y/M/D/ hh:mm | example; [2011/03/10 12:30] |
| M D Y hh:mm | example; [MAR 10 2011 12:30] |
| D M Y hh:mm | example; [10 MAR 2011 12:30] |
- 3 After completed the settings, check to see the selections, and press the [ADJ./OK] button. The confirmation screen will be displayed.
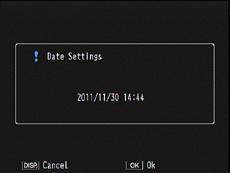
- 4 Press the [ADJ./OK] button again. The setting is fixed and it returns to the Setup menu. Press the [MENU] button or [ADJ./OK] button to exit the Setup menu.
[Note]
- •If the battery is removed for more than one week, the date and time settings will be lost. These settings must be made again.
- •In order to retain the date and time settings, load a battery with adequate remaining power for more than two hours.
- •This option is to set the camera clock. For the Date imprinting on a picture, see the FAQ below.
- Is imprinting the date on images available ?
Answer ID: edc06085
Date created: December 5, 2011
Date modified: --
Product: CX6
Operating system: --
Category: Hardware operations
Date created: December 5, 2011
Date modified: --
Product: CX6
Operating system: --
Category: Hardware operations
Useful LINKs:
Do you need other information? Please click any link you want from the following.
Related Links
Quick Links