CX6 : What is a dynamic range expansion effect?
When you are shooting in dynamic range double-shot mode, the camera shoots two consecutive still images with different exposures and combines the areas with the appropriate exposure into one picture.
With the CX6, you can select from 5 expansion effects of the dynamic range (the range of brightness that can be processed by the camera) from [AUTO], [Very Weak], [Weak], [Medium], to [Strong].
The stronger the expansion effect, the wider the range of brightness that can be processed by the camera.
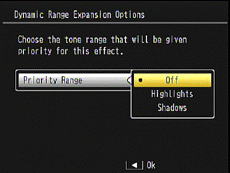
Also the Priority Range for the expansion effect (other than AUTO) is also selectable from [Highlights], [Shadows], or [Off].
The procedures for changing the dynamic range expansion effect settings
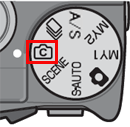
- 1Turn the mode dial to Creative Shooting mode.

- 2Press the [MENU] button to display the Creative Mode Selection screen.
![2 Press the [MENU] button to display the shooting setting screen.](/english/r_dc/support/faq/bp/cx6/img/menu_btn.gif)
- 3Push the [ADJ./OK] button to
 and choose the [DR] icon.
![3 Press the [ADJ./OK] button down to select [Dynamic Range Expansion] and press the button to the right.](/english/r_dc/support/faq/bp/cx6/img/adjok_btn.gif)
- 4 Selected the [DR] mode.
![[DR] is selected.](/english/r_dc/support/faq/bp/cx6/img/6005_02.gif)
- 5Push the [ADJ./OK] button
 (left) and then
  to go to Shooting tab. The Shooting menu for the [DR] mode will be displayed.
 - 6Push the [ADJ./OK] button
 (right) to choose [Dynamic Range Expansion], and press
  (right) again to show options.
![4 Press the [ADJ./OK] button right twice to show the Dynamic Range Expansion options.](/english/r_dc/support/faq/bp/cx6/img/6005_03.gif)
- 7Choose an option from [AUTO], [Very Weak], [Weak], [Medium], or [Strong] with ADJ./OK button
 , then press the ADJ.OK button.
 - 8If you choose an option other than [Auto], and go to the [ADJ./OK] button right
 , the option menu of the Dynamic range expansion will be displayed. Choose an tone range option from [Highlights], [Shadows], or [Off] to be given priority for the effect.

- Press the [ADJ./OK] button
 to choose an option, and press the [ADJ./OK] button.
Plus Normal Shooting setting operations
You can also record two images by adding an image taken with normal shooting to an image taken with expanded dynamic range.
- 1 From the step 5 above in the Shooting tab;
Choose [Plus Normal Shooting] with the ADJ./OK button , and go to right
  to choose [On], then press the ADJ./OK button to save the setting.
![Press the [ADJ./OK] button up and down to select [ON], and then press the [ADJ./OK] button.](/english/r_dc/support/faq/bp/cx6/img/6005_05.gif)
- 2It will return to the shooting screen. Press the shutter release button to take a picture.
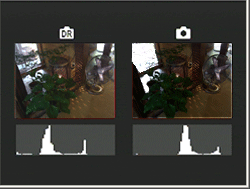
- 3 The confirmation screen displays a comparison of the image taken with expanded dynamic range (left) and the image taken with normal shooting (right).

(Images are simulated) - The histogram display for both images is displayed on the confirmation screen above. When [LCD Confirmation Time] is set to [Hold] *1, the confirmation screen remains displayed so you can confirm the histograms and easily compare the images.
- *1 [Hold] The image will remain displayed in the confirmation screen until the next time you half-press the shutter release button. You can enlarge or delete images that are displayed in the confirmation screen.
Date created: December 5, 2011
Date modified: --
Product: CX6
Operating system: --
Category: Hardware specifications
Do you need other information? Please click any link you want from the following.
Related Links
Quick Links


