
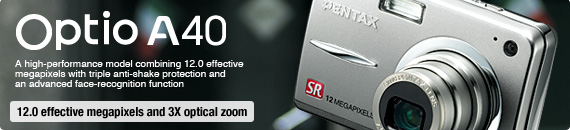
Digital Compact Camera: Optio A40
<General function and specification>
- Is the OptioA40 equipped with Shake Reduction?
- What exactly is the "Digital SR" shooting mode?
- What accessories are provided with this camera?
- What kind of accessories is available as option?
- Will a waterproof case be released?
<Storage media>
- What are the storage media?
- Does the camera come with an SD (SDHC) Memory Card?
- Which SD (SDHC) Memory Cards are recommended for this camera?
- What are the figures for the number of recordable still images and the length of recordable video or audio for each of the SD (SDHC) Memory Card capacities?
- Why the maximum number of recordable images by setting 1024(1024x768) and 640(640x480) is the same? (10000)
- Are there any precautions needed when using SD (SDHC) Memory Cards?
- How do I switch from using the camera's built-in memory to using an SD (SDHC) Memory Card?
<Battery and Power Sources>
- What type of batteries does the OptioA40 use?
- What about Operating Time of battery?
- Is there an AC adapter for the camera?
<Capture and Playback>
- How long is the startup time?
- How long is the shutter release time lag?
- How long is the interval between shots in continuous shooting?
- How big is the LCD monitor and how many pixels does it have?
- Where is the audio microphone? Can an external microphone be connected to the camera?
- What is "Face Recognition AF" and "Face Recognition AE"?
- What kind of exposure mode available?
- With the "Auto" ISO sensitivity setting, what is the range of variation in the ISO sensitivity?
- What is the "Half-length Portrait mode"
- What is the "D-Range Comp."?
- Can Remote control be used?
- Can the "Multi-exposure" be used?
- Is the OptioA40 equipped with noise reduction function?
- Can sound be added to still images?
- What is the movie recording format? And what is the number of recorded pixels and the frame rate in recorded movies?
- Can the optical zoom or digital zoom be used in movie mode?
- Can the focus be adjusted while recording movie?
<Computers and Software>
- What are the system requirements for USB connection?
- Does OptioA40 support the USB Mass Storage Class standard?
- Does OptioA40 support the USB 2.0?
- Can a third-party USB cable be used with the camera?
- What is included in the CD-ROM of the Optio A40?
<Print Connection>
- Can the camera be connected directly to a printer to print images?
- Can the camera be connected directly to a printer to print images with the date inserted?
<Troubleshooting>
- I made a mistake in the Initial Settings. How do I reset the settings?
- How long is the date set in the camera retained? And does the internal clock keep running?
- Does the deleted file number become a missing number when deleting a file?
- The subject is not in focus.
- The flash does not fire.
- The flash fired but the photo is too dark.
- What is the Frame composite?
- The camera doesn't record my images.
- Can data in the camera's built-in memory be copied onto an SD (SDHC) Memory Card?
- The "Card not formatted" message is displayed on the LCD panel.
- The "Memory card full" message is displayed on the LCD panel.
- The "Card locked" message is displayed on the LCD panel.
- The "Memory card error" message is displayed on the LCD panel.
- Can the file number reset to 0001?
- Can I view images on a TV?
- The image is not clearly display on TV.
- The camera is connected to the computer, but is not recognized as a removable disk.
- How should the camera be disconnected from the computer?
- What should I do when I get the error massage "CarbonLib-xxxxx-... " while installing the provided software to Macintosh?
- When playback the movie on the computer, the movie is not smooth and voice is play back with delay, why?
- What is the procedure for printing images with the date imprinted?
- The camera is connected to a PictBridge-compatible printer via the USB cable, but it still won't print.
- Why the image can not print as camera setting when connecting the camera with PictBridge?
- With a PictBridge connection, can the paper size be specified on the camera?
- Is there an operating manual for Application software attached in the packaging?
- Suddenly, the camera stops operating.
<General function and specification>
- Is the OptioA40 equipped with Shake Reduction?
- Yes, when photographing still images, highly corrective effects, equivalent to shutter speeds of approximately 2.5 to 3.5 steps can be achieved.
- What exactly is the "Digital SR" shooting mode?
- This is a shooting mode that reduces camera shake and subject blur by automatically
selecting a high camera sensitivity (up to ISO 3200) depending on the ambient
brightness during shooting.
Note that the number of recorded pixels is fixed at 5M (2592 x 1944) in this mode.
- What accessories are provided with this camera?
- The Optio A40 kit includes the following:
- Camera Strap (O-ST20)*
- USB cable (I-USB7)*
- AV cable (I-AVC7)*
- Rechargeable lithium-ion battery (D-LI8)*
- Battery charger (D-BC8)
- AC code D-CO2
- Software CD-ROM(S-SW68)
- Quick Guide
- Operating manual
- PC Connection Manual
No camera case or SD (SDHC) Memory cards are included with the camera.
*Accessories marked with an asterisk (*) can also be purchased separately.
- What kind of accessories is available as option?
- The following accessories are available.
- Camera case (O-CC73)
- Leather strap (O-ST24)
- Chain strap (O-ST8)
- Sports strap (O-ST30)
- Remote control E (Release/ Zooming)
- Remote control F (Release)
- AC adapter kit (K-AC63)
- Battery charger (K-BC8)
<Storage media>
- Does the camera come with an SD (SDHC) Memory Card?
- No. Memory Cards should be purchased as required.
- Which SD (SDHC) Memory Cards are recommended for this camera?
- We recommend the SD (SDHC) Memory Card brands shown in the table below.
As of August 2008Panasonic *SD Memory Card - Capacities: 128MB to 2GB
*SDHC Memory Card - Capacities: 4GB to 32GBToshiba *SD Memory Card - Capacities: 128MB to 2GB
*SDHC Memory Card - Capacities: 4GB to 32GBSanDisk *SD Memory Card - Capacities: 128MB to 2GB
*SDHC Memory Card - Capacities: 4GB to 16GB
*When recording a movie, using a Class 6 or faster SD (SDHC) Memory Card with a guaranteed maximum write speed of at least 10 MB/sec. allows you to shoot the movie without having to stop mid-way.
*When saving still images, using a Class 6 or faster SD (SDHC) Memory Card with a guaranteed maximum write speed of at least 10 MB/sec. gives no noticeable improvement in the continuous shooting speed.
*"Recommended" denotes only that the operation of the product has been checked by PENTAX and in no way constitutes a guarantee to customers that the product is suited to their requirements.
- What are the figures for the number of recordable still images and the length of recordable video or audio for each of the SD (SDHC) Memory Card capacities?
- The figures vary depending on the shooting conditions and subject, but an approximate guide to the number of still images, the length of continuous movie recording time and the length of audio recording time in Voice Recording mode can be found here.
- Why the maximum number of recordable images by setting 1024(1024x768) and 640(640x480) is the same? (10000)
- Because the number of files is limited up to 10000.
- Are there any precautions needed when using SD (SDHC) Memory Cards?
-
- Card that are unused or that have been used on other devices, such as another camera or a computer, must first be formatted (initialized) on the Optio A40.
* Note that formatting a card erases all the data on the card, including protected images and sound files. - Do not remove an SD (SDHC) Memory Card or turn the camera off while you are recording data or playing back images or audio, or while the camera is connected to a computer via a USB cable. Doing so will result in the corruption of stored data and/or damage to the SD (SDHC) Memory Card.
- Do not bend an SD (SDHC) Memory Card or subject it to violent impacts. And do not leave cards in locations where they will be exposed to moisture or high temperatures. Doing so will result in the corruption of stored data and/or damage to the SD (SDHC) Memory Card.
- SD (SDHC) Memory Cards have a limited life-span.
If a card is left unused for a long period, it may no longer be possible to read the data stored on the card. Important data should be backed up regularly. - Avoid using or storing the card where it may be exposed to static electricity or electrical interference.
- Card that are unused or that have been used on other devices, such as another camera or a computer, must first be formatted (initialized) on the Optio A40.
- How do I switch from using the camera's built-in memory to using an SD (SDHC) Memory Card?
- There is no selector switch for this.
When an SD (SDHC) Memory Card is inserted into the camera, data is recorded onto the SD (SDHC) Memory Card.
If there is no SD (SDHC) Memory Card in the camera, data is recorded into the built-in memory.
No data is recorded in the built-in memory while there is an SD (SDHC) Memory Card in the camera.
<Battery and Power Sources>
- What type of batteries does the OptioA40 use?
- The OptioA40 includes a rechargeable lithium-ion battery (D-LI8)
- What about Operating Time of battery?
-
No. of still images shot: Approx. 180
Playback time (Slideshow): Approx. 200 minutes
Movie recording time: Approx. 70 minutes
Audio recording time: Approx. 180 minutes
• The number of still images shot is measured in conditions that comply with CIPA standards. (Includes: With a 50% flash use rate and the LCD monitor ON at 23°C.)
* CIPA standards are standards formulated by the Camera and Imaging Products Association.
• The playback time, movie recording time and audio recording time are based on the result of in-house testing.
<Capture and Playback>
- How long is the startup time?
- The startup time is approximately 1.8 seconds. This is the time between the camera being turned on and the camera being ready to record with P mode selected, the built-in flash set to Flash Off, and no Start-up Screen or Start-up Sound selected.
- How long is the shutter release time lag?
- The shutter release time lag is approximately 0.01 seconds. This is the time between the shutter release button being pressed fully and the camera starting image capture with the flash set to Flash Off and the focus locked.
- How long is the interval between shots in continuous shooting?
- It varies depending on the write speed of the recording media, the number of recorded pixels, the quality level and the recording conditions, but an approximate guide to the continuous shooting interval in Continuous Shooting mode using the Initial Settings is 0.68 frames per second.
- How big is the LCD monitor and how many pixels does it have?
- The monitor is a 2.5-inch LCD panel, wide viewing angle with approximately 232,000 dots.
- Where is the audio microphone? Can an external microphone be connected to the camera?
- The microphone is on the front of the camera, just below and to the right
of the lens.
External microphones cannot be connected to the v\camera.
- What is "Face Recognition AF" and "Face Recognition AE"?
- Simply point the camera toward your subject's face and the camera automatically recognizes the location of the subject's face, adjusts the focus (using Face Recognition AF) and the exposure (using Face Recognition AE) and allows you to take a picture
- What kind of exposure mode available?
- Program exposure, TV exposure and Manual exposure can be selected.
- With the "Auto" ISO sensitivity setting, what is the range of variation in the ISO sensitivity?
- When the ISO setting is [Auto], the sensitivity automatically adjusts between
ISO 50 and 800.
* When [Digital SR] is selected, the sensitivity automatically adjusts up to ISO 3200.
- What is the "Half-length Portrait mode"
- Lets you take portraits at a certain angle of view based on the size and position of the subject's face when recognizing the face.
- What is the "D-Range Comp."?
- For making dark portions brighter while keeping the exposure level for the entire image. "Auto", "Strong", "Weak", and "Off" can be selected.
- Is the OptioA40 equipped with noise reduction function?
- Yes. The noise reduction is automatically activated when a picture is taken at a shutter speed higher than 1/4 sec.
- What is the movie recording format? And what is the number of recorded pixels and the frame rate in recorded movies?
- The recording format is AVI (AVI (DivX® compatible with MPEG-4).
The frame rate is [Approx. 30 fps]. * fps: frames per second
- Can the optical zoom or digital zoom be used in movie mode?
- In movie mode the optical zoom is fixed at the wide-angle end.
Digital zoom is possible when recording movies; optical zoom cannot be used.
<Computers and Software>
- What are the system requirements for USB connection?
- [Windows]
Requires a computer with a USB port as standard equipment running Windows Vista, XP or 2000 pre-installed at shipment, with the latest system software updates installed.
* Operation is not guaranteed for all computers with the recommended requirements. Even on computers that meet the above requirements, the software may not run correctly depending on the computer settings and the other installed software applications.
* This product does not support USB connections in Windows Me, Windows 98 SE or Windows 98.
* Windows NT 4.0 and Windows 95 do not support USB, so USB connections are not possible. A separate card reader that is compatible with your computer's operating system is also required.
[Macintosh]
Requires a computer with a USB port as standard equipment and Mac OS 9.2 or X (versions 10.1 or later) preinstalled, with the latest system software updates installed.
* Driver installation is not required.
- Can a third-party USB cable be used with the camera?
- This is not recommended. The dedicated USB cable (I-USB7) should be used.
- What is included in the CD-ROM of the Optio A40?
- [Windows]
ACDSee for PENTAX 3.0
Div X
Languages: English, French, German, Spanish, Italian, Russian, Chinese (Traditional), Chinese (Simplified) Korean, Japanese
[Macintosh]
ACDSee for PENTAX ( ACDSee 2 for Mac )
Languages: English, French, German, Spanish, Italian, Japanese
<Print Connection>
- Can the camera be connected directly to a printer to print images?
- The camera can print via a direct connection to any PictBridge-compatible printer using the bundled USB cable I-USB7. For details, refer to printer's instruction manual.
- Can the camera be connected directly to a printer to print images with the date inserted?
- Yes.
Selecting [Date Imprint] in the recording mode settings will imprint the date onto recorded images.
* The date imprinted with the Date Imprint function cannot be deleted. When images with the date imprinted are printed, if an image editing program such as ACDSee for PENTAX is then used to add the date to the images, duplicate dates will may be printed on the images.
* The date is imprinted on the picture with the date style set in the [Date Adjust] screen.
<Troubleshooting>
- I made a mistake in the Initial Settings. How do I reset the settings?
- The Initial Setting screen is only displayed once.
If any of the settings are incorrect, they must be reset individually.
* If an option other than Japanese, English or Korean is selected in the initial settings, the video output is set to [PAL].
-- Adjusting the date (Date Style, Date and Time settings) ---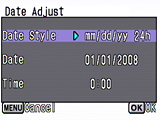
- Press the power switch. (Capture mode)
- Press the MENU button.
- Press the four-way controller (right) once to open the Setting screen.
- Press the four-way controller (down) 3 times to select [Date Adjust].
- Press the four-way controller (right) once to display the [Date Adjust] screen.
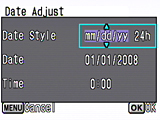
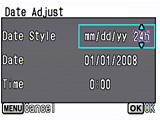
- [Date Style] setting
Press the four-way controller (right) once to move the selection frame.
Use the four-way controller (up/down) to select [yy/mm/dd], [dd/mm/yy] or [mm/dd/yy].
Next, press the four-way controller (right) once to move the selection frame.
Use the four-way controller (up/down) to select [12h] (12-hour display) or [24h] (24-hour display).
After making your selection, press the four-way controller (right). - [Date] setting ([yy/mm/dd] selected as the date style)
Press the four-way controller (down) once to move the selection frame to [Date].
Press the four-way controller (right) once and then use the four-way controller (up/down) to select the [Year] setting. Press the four-way controller (right) once and then use the four-way controller (up/down) to select the [Month] setting.
Press the four-way controller (right) once and then use the four-way controller (up/down) to select the [Day] setting.
After completing the settings, press the four-way controller (right). - Press the four-way controller (down) once to move the selection frame to
[Time].
Press the four-way controller (right) once and then use the four-way controller (up/down) to select the [Hour] setting. Press the four-way controller (right) once and then use the four-way controller (up/down) to select the [Minute] setting. After completing the settings, press the OK button. - Press the OK button. (The Setting screen reappears.)
Press the OK button (The camera returns to Capture mode.)
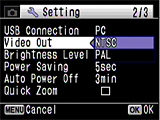
-- Setting the video output (changing from PAL to NTSC) --- Turn the camera on. (Capture mode)
- Press the MENU button.
- Press the four-way controller (right) once to open the [Setting] screen.
- Press the four-way controller (up) 7 times to select [Video Out].
- Press the four-way controller (right) once and then use the four-way controller (up/down) to change the setting from [PAL] to [NTSC].
- Press the OK button. [Confirming the setting]
- Press the OK button. (The camera returns to Capture mode.)
- How long is the date set in the camera retained? And does the internal clock keep running?
- Once a new battery has been loaded and left in the camera for at least 1 day, data in the camera remains backed up for approximately 1 day when the battery is removed. The internal clock also continues to run while the data is backed up.
- Does the deleted file number become a missing number when deleting a file?
- It becomes a missing number.
- The subject is not in focus.
- Check the following:
- Are you trying to photograph a subject that is difficult to focus on with autofocus?
Certain subjects are not suitable for autofocus, such as subjects with little or no contrast (blue sky, white walls, etc.), dark subjects, finely patterned subjects, fast-moving subjects, and scenes shot through windows or mesh. First focus on an object that is at the same distance as your subject and lock the focus (by pressing the shutter release button down halfway). Then recompose the shot as you want to take it and release the shutter. Or you can also try using Manual Focus. - The subject is not in the focusing area.
Frame the shot so the your subject is inside the [ ] (focusing area) marks on the LCD monitor. If your subject is not inside the focusing area, briefly move the camera so that the desired subject is inside the focusing area and lock the focus (by pressing the shutter release button down halfway). Then recompose the shot as you want to take it and release the shutter. - The subject is too close.
The effective shooting range is from 0.35 m to infinity from the end of the lens.
- Are you trying to photograph a subject that is difficult to focus on with autofocus?
- The flash does not fire.
- Check the following:
- Is the flash mode set to [Flash Off]?
- The drive mode is set to [Continuous Shooting], the focus mode is set to [Infinity], or the shooting mode is set to [Movie].
- The flash fired but the photo is too dark.
- Check the following:
- The subject is too far away in a dark location.
If the subject is too far away, the picture becomes dark because the light of the flash does not reach the subject.
Use the following as a guide to flash photography:
Wide-angle: Approx. 0.06 to 7.1 m
Telephoto: Approx. 0.35 to 3.5 m (with Auto selected as the ISO setting)
- The subject is too far away in a dark location.
If the subject is too far away, the picture becomes dark because the light of the flash does not reach the subject.
- The subject is too far away in a dark location.
- What is the Frame composite?
- Optio E50 offers three innovative digital photo frames to recorded images for viewing and printing. There are three frames already stored in the camera as follows.
* The number of recorded pixels is fixed to at 3M(2048x1536)and the quality level at .
.
Capture Mode Palette Frame selection screen Taking a picture screen with frame 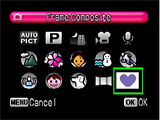


- The camera doesn't record my images.
-
Check the following:
- Is the "Memory card full" message displayed?
The SD (SDHC) Memory Card is full and no more images can be saved. Insert a new SD (SDHC) Memory Card or delete (erase) some unwanted images. Changing the quality level or the number of recorded pixels may enable you to save images. - Is the "Memory card error" message displayed?
Shooting and playback are impossible due to a problem with the SD (SDHC) Memory Card. It may be possible to view your images on a computer. - Is the "Card not formatted" message displayed?
The SD (SDHC) Memory Card you have inserted is unformatted or has been formatted on a computer or other device. Format the SD (SDHC) Memory Card in the camera using the procedure described in the operating manual. - Is the "Card locked" message displayed?
The write-protect switch on the SD (SDHC) Memory Card in the camera is locked. This setting prohibits you from recording new data on the card, erasing data or formatting the card. You can only use the menus and change the camera modes.
- Is the "Memory card full" message displayed?
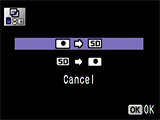
- Can data in the camera's built-in memory be copied onto an SD (SDHC) Memory Card?
- Yes.
-- Copy procedure --
- Press the power switch. (Capture mode)
- Press the Play button. (Playback mode)
- Press the four-way controller (down). (Playback mode palette)
- Press the four-way controller (right) 3 times to select [Image/Sound Copy].
- Press the OK button to display the screen for selecting the copy destination.
- Press the OK button to copy the data.
- Press the Play button or press the shutter release button down halfway to return to Capture mode.
* This function can only be selected when an SD (SDHC) Memory Card has been inserted in the camera.Playback Mode Palette Copy destination selection 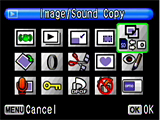

- The "Card not formatted" message is displayed on the LCD panel.
- The SD (SDHC) Memory Card you have inserted is unformatted or has been formatted
on a computer or other device. Format the SD (SDHC) Memory Card in the camera
before using it.
-- Formatting procedure --- Press the power switch. (Capture mode)
- Press the MENU button.
- Press the four-way controller (right) once to display the [Setting] menu.
- Press the four-way controller (down) once to select [Format].
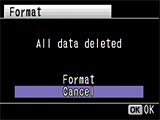
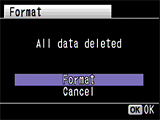
- Press the four-way controller (right) once to display the [Format] screen.
- Press the four-way controller (up) once to select [Cancel] -> [Format].
- Press the OK button to format the card.
- When formatting ends, the camera returns to Capture mode.
Setting menu Format selection 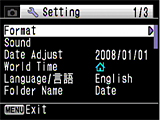
- The "Memory card full" message is displayed on the LCD panel.
- The SD (SDHC) Memory Card is full and no more images can be saved. Insert a new SD (SDHC) Memory Card or delete some unwanted images. Changing the quality level or the number of recorded pixels may enable you to save images.
- The "Card locked" message is displayed on the LCD panel.
- A locked SD (SDHC) Memory Card is inserted in the camera. You can only use the menus, change the camera modes or play back images.
- The "Memory card error" message is displayed on the LCD panel.
- Shooting and playback are impossible due to a problem with the SD (SDHC) Memory Card. It may be possible to view your images on a computer.
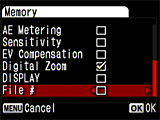
- Can the file number reset to 0001?
- Yes, but first you should backup the data of internal/SD(SDHC) memory card,
and then follow the procedure.
- Turn the power of the camera ON, then press Menu button to display capture menu
- Press four way controller top five times and select mode memory
- Press four way controller right one time to display mode memory
- Press four way controller top one time and select file No
- Press four way controller right one time (Setting without mark)
- Press OK button twice, Select [all image/Voice deletion] and execute
- The file number will be reset to 0001
Rec. Mode menu There is no check in file No. 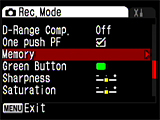
- Can I view images on a TV?
- Yes. By using the AV cable (I-AVC7), you can capture and play back images
on a TV that has a Video-In (and Audio-In for sound) port.
Note: Make sure that both the TV and the camera are turned off before connecting the cable.
- The image is not clearly display on TV.
- Please check the video output in the menu and select NTSC or PAL to adapt video output system in your country
- The camera is connected to the computer, but is not recognized as a removable disk.
- • Check that [PC] is set as the camera's USB connection mode.
• If [PictBridge] is set as the camera's USB connection mode, the camera is not recognized correctly as a USB mass storage device and the images cannot be viewed.
-- Procedure for changing the USB connection mode (from PictBridge to PC) --- Press the power switch. (Capture mode)
- Press the MENU button.
- Press the four-way controller (right) once to display [Setting].
- Press the four-way controller (down) 7 times to select [USB Connection].
- Press the four-way controller (right) once to display [PC] and [PictBridge].
- Press the four-way controller (down) once to select [PC].
- Press the OK button to change the USB connection mode to [PC].
- Press the OK button. (Capture mode)
• Check that the camera and computer ends of the USB cable are both inserted fully into the connection sockets.
• If the computer has multiple USB ports, try using another port.
• If the camera is connected via a USB hub, connect it directly to the computer.
- How should the camera be disconnected from the computer?
- The procedure differs depending on the operating system type and version. The disconnection procedures for the different operating systems are shown below.
[Windows Vista/Windows XP/Windows 2000]
Double-click the hot plug icon in
the taskbar at the bottom-right of the desktop and stop "PENTAX USB DISK Device"
in the "Safely Remove Hardware" dialog box.
in
the taskbar at the bottom-right of the desktop and stop "PENTAX USB DISK Device"
in the "Safely Remove Hardware" dialog box.
* The hot plug-in icon varies depending on the operating system.
[Mac OS 9.2]
Drag the "Untitled" icon on the desktop to the Trash and turn the camera off and disconnect the USB cable.
[Mac OS X (10.1 or later)]
Drag the "NO_NAME" icon on the desktop to the trash and then turn the camera off and disconnect the USB cable.
- What should I do when I get the error massage "CarbonLib-xxxxx- ..." while installing the provided software to Macintosh?
- A:If you see this error message, you should download the latest version of the CarbonLib files from Apple Computer, Inc: http://www.apple.com/ and install them on your computer. Then, you can install the bundled software for your camera.
- When playback the movie on the computer, the movie is not smooth and voice is play back with delay, why?
- The following System Requirements is recommended for view the movie on the computer
OS: Window Vista/WindowXP
CPU: Pentium M 1GHz / Pentioum 4 2GHz
Memory: 1GMB or more (Windows XP 512MB or more)
- What is the procedure for printing images with the date imprinted?
- The procedure is as follows:
- If [Date Imprint] is set to [On] in the camera's recording menu
• The date is embedded in the image it self, so the image should just printed normally.
* If printing using PictBridge
If your printer supports PictBridge date imprinting, the date may be imprinted twice on your images. The PictBridge date imprinting setting must be disabled.
* If you are printing your images using the bundled ACDSee for Pentax 3.0 software, you should uncheck the [Imprint Date] option in the print output settings when printing. - If [Date Imprint] is set to [Off] in the camera's recording menu
• If printing using a print service
You can have the date imprinted on your images by taking a memory card with DPOF AUTOPRINT settings in which the [Date] option is checked to a DPOF-compatible print service. Some photo processing lab services may not print using the specified settings. Check with your photo processing lab for details.
• If Printing using the bundled ACDSee for Pentax 3.0 software
You should check the [Imprint Date] option in the print output settings when printing.
• If printing with PictBridge
* Your printer must support PictBridge date imprinting. ON some printers, date imprinting must be specified on the printer itself. Refer to the printer's instruction manual for details. You can have the date imprinted on your images by taking a memory card with DPOF AUTOPRINT settings in whish the [Date] option is checked in the print service (DPOF) settings to a DPOF-compatible print service.
- If [Date Imprint] is set to [On] in the camera's recording menu
- The camera is connected to a PictBridge-compatible printer via the USB cable, but it still won't print.
- Check that [PitBridge] is set as the camera's USB connection mode.
-- Procedure for changing the USB connection mode (from PC to PictBridge) --- Press the power switch. (Capture mode)
- Press the MENU button.
- Press the four-way controller (right) once to display [Setting].
- Press the four-way controller (down) 7 times to select [USB Connection].
- Press the four-way controller (right) once to display [PC] and [PictBridge].
- Press the four-way controller (down) once to select [PictBridge].
- Press the OK button to change the USB connection mode to [PictBridge].
- Press the OK button. (Capture mode)
- Why the image can not print as camera setting when connecting the camera with PictBridge?
- According to the kind of the printer, camera setting may be not reflected
partially.
In such case, please refer to the operating manual of the printer.
- With a PictBridge connection, can the paper size be specified on the camera?
- You can choose from 11 paper sizes (Card, L, 2L, Postcard, 100 x 150 mm, 4" x 6", 8" x 10", Letter, 11" x 17", A4, A3). However, you can only select sizes that are available on the printer. You can also select the [Printer dependent] setting. On printer models not equipped with a print settings function, images may be printed using the printer's default paper size.
- Is there an operating manual for Application software attached in the packaging?
- No. For detailed information on the functions, refer to the "Help" menu in the ACDSee for PENTAX 3.0 or ACDSee 2 for Mac menu bar